...
| Section | ||||||||||||||
|---|---|---|---|---|---|---|---|---|---|---|---|---|---|---|
|
Setting Talk Permissions
You can set up Talk Permissions on two levels: on a space level and for a specific discussion.
Setting Talk Permissions on a space level
Space permissions are a kind of default permissions applied to all Talk inline comments and discussions created within the space.
...
4. Click Apply when finished.
If you want to remove some user or user group from the restrictions list, click the Remove restriction link. Such a user or user group will no longer be able to view talks within the current space.
If you want to revert modifications, click the Revert button.
Setting Talk Permissions for a discussion
| Info |
|---|
Every time you create a Talk inline comment/discussion in the space with the configured talk permissions for the entire space, you can modify these default permissions while adding or editing the talk. |
...
- Start adding the Talk discussion or Talk Suggestion. In case you want to change permissions for an existing discussion, skip this step.
- Click the lock icon in the Talk cloud. You will see a list of users who can view this discussion (empty for a new discussion if space permissions are not set).
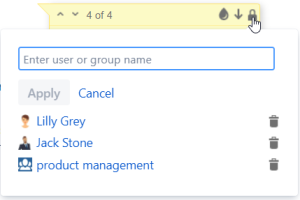
- Type names of users and/or user groups to enable viewing this discussion/suggestion for them.
- To delete a user/user group from a list, click
next to their name.
- Click Apply to save changes.
Setting Talk Permissions in
...
Edit mode
- Start adding the Talk discussion or Talk Suggestion. In case you want to change permissions for an existing discussion, skip this step.
- In the macro window, click Edit as described in the picture below.
- Go through steps 3-4 described above.
- Add your message
- Click the Insert button
...