Download PDF
Download page Advanced table cells formatting.
Advanced table cells formatting
General information
The Table Transformer macro supports Confluence Wiki Markup (the FORMATWIKI function ) and Markdown syntax (the FORMATMARKDOWN function) for the purposes of cell formatting.
These functions don't support formatting of complex macros that dynamically change the content, get data from someplace ( e.g User List Macro, Expand Macro etc.)
Below you can find how Table Transformer helps to enhance the formatting abilities of tables in Confluence.
Use cases
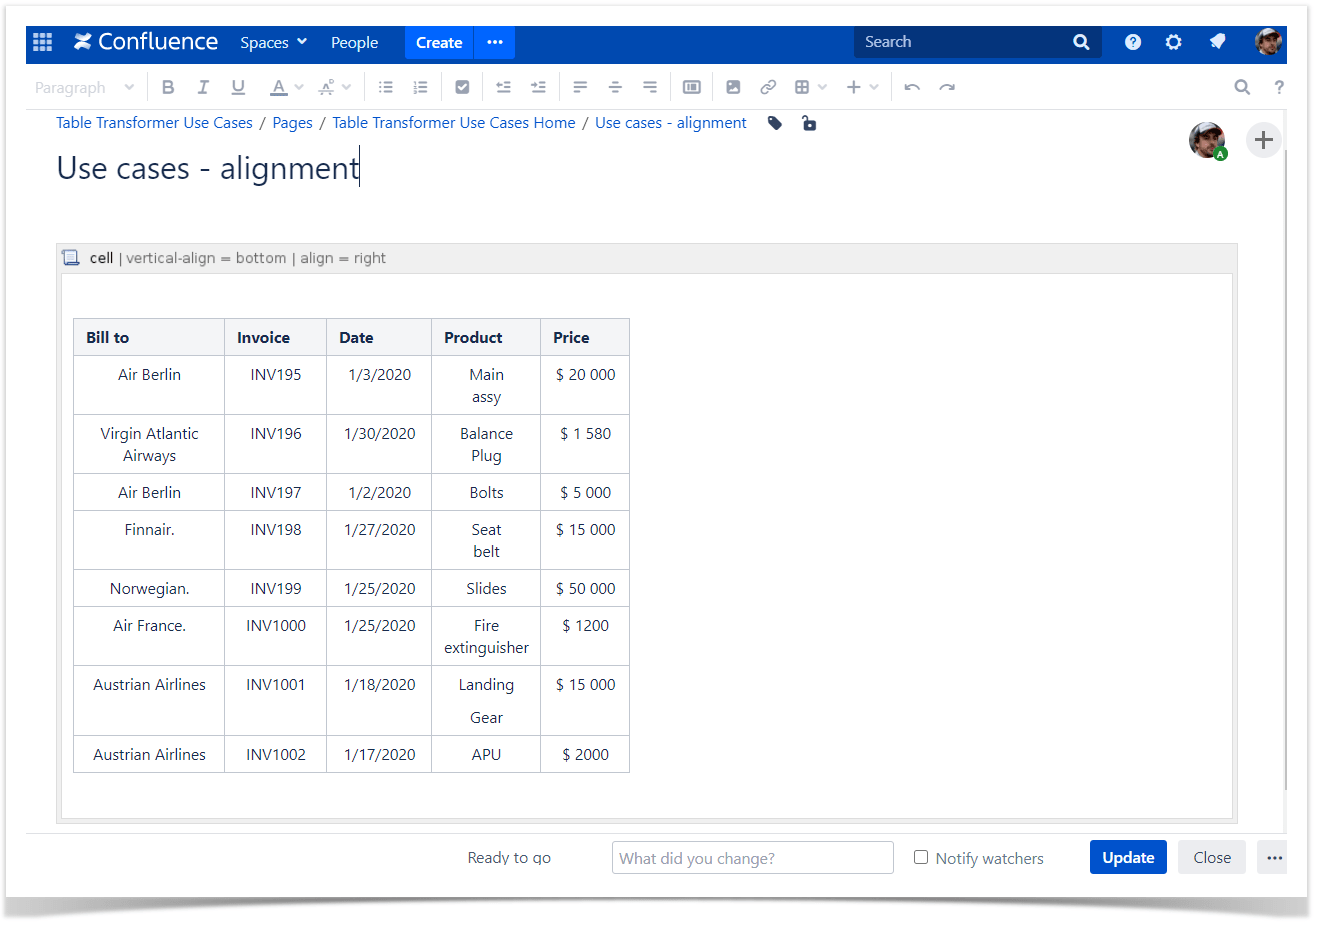
Changing alignment
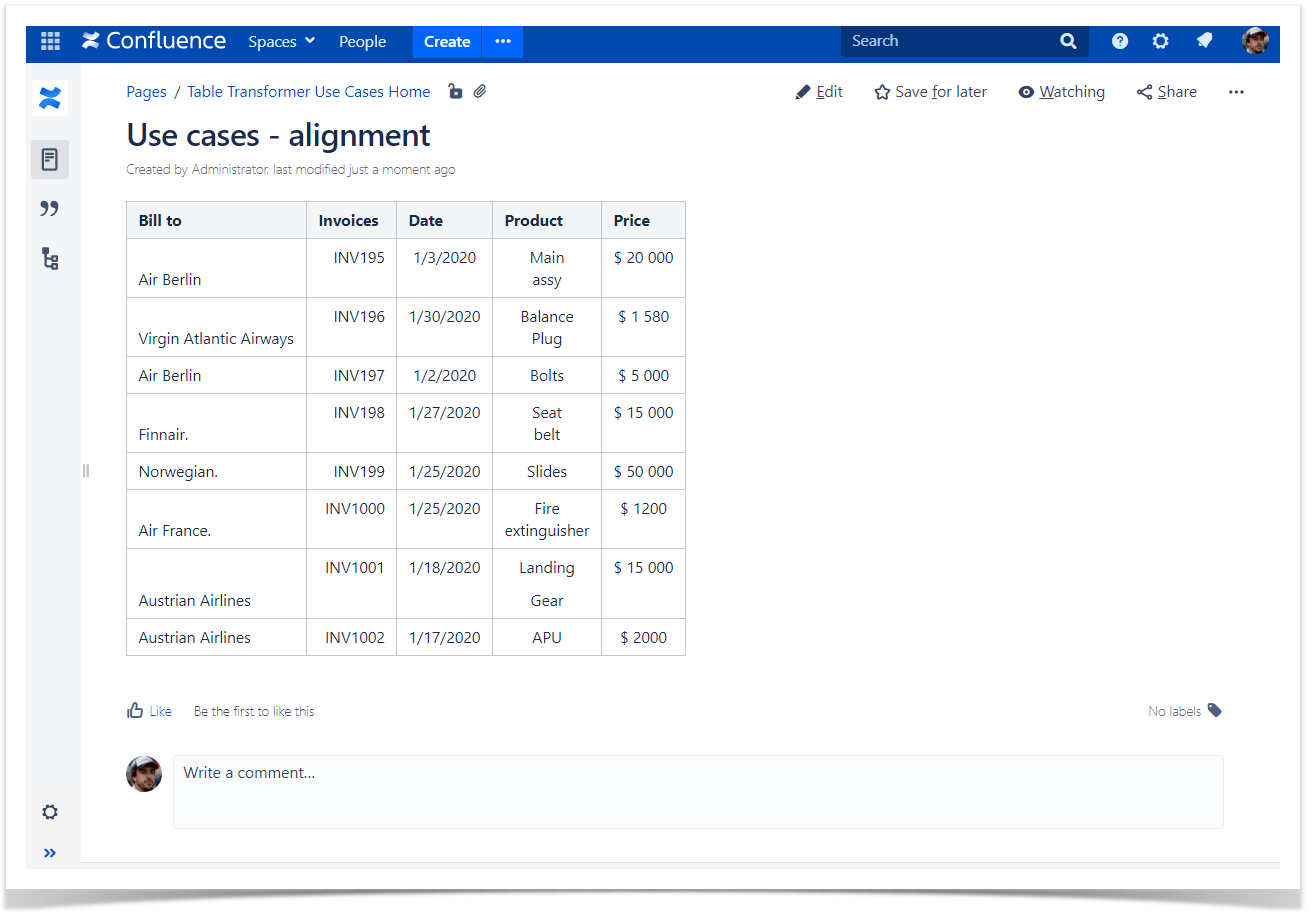
Use case:
You need to align text in some columns of the table.
Solution:
Switch the page to the edit mode.
Insert the Table Transformer macro and paste the table or the macros outputting tables within the macro body.
Select the macro and click Edit.
In the Presets tab select Custom transformation and click Next.
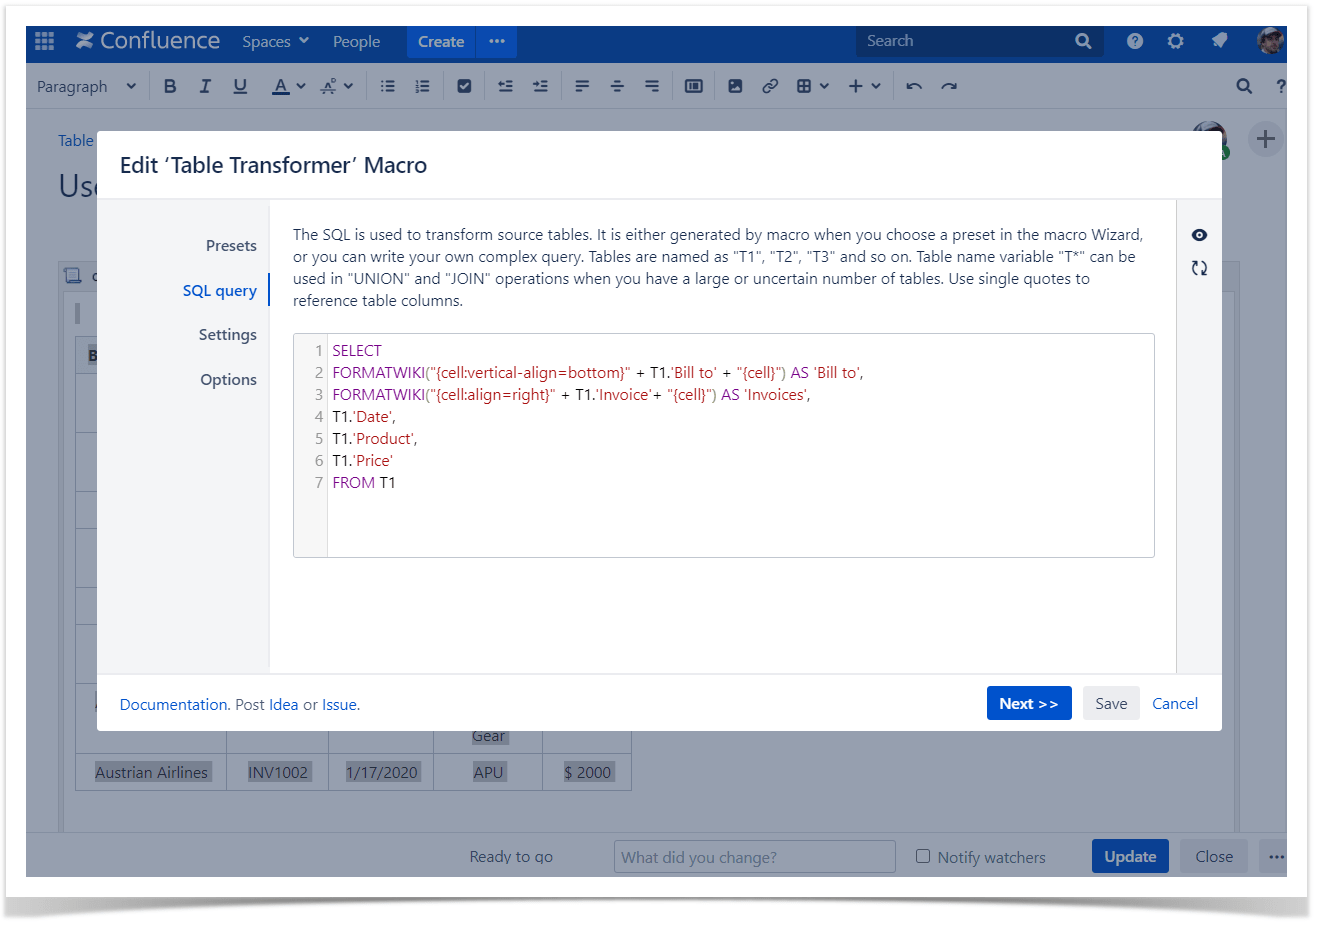
Enter the following SQL query:
SELECT FORMATWIKI("{cell:vertical-align=bottom}" + T1.'Bill to' + "{cell}") AS 'Bill to', FORMATWIKI("{cell:align=right}" + T1.'Invoice'+ "{cell}") AS 'Invoices', T1.'Date', T1.'Product', T1.'Price' FROM T1SQLClick Next .
Define the table settings and view options if needed.
Save the macro and the page.
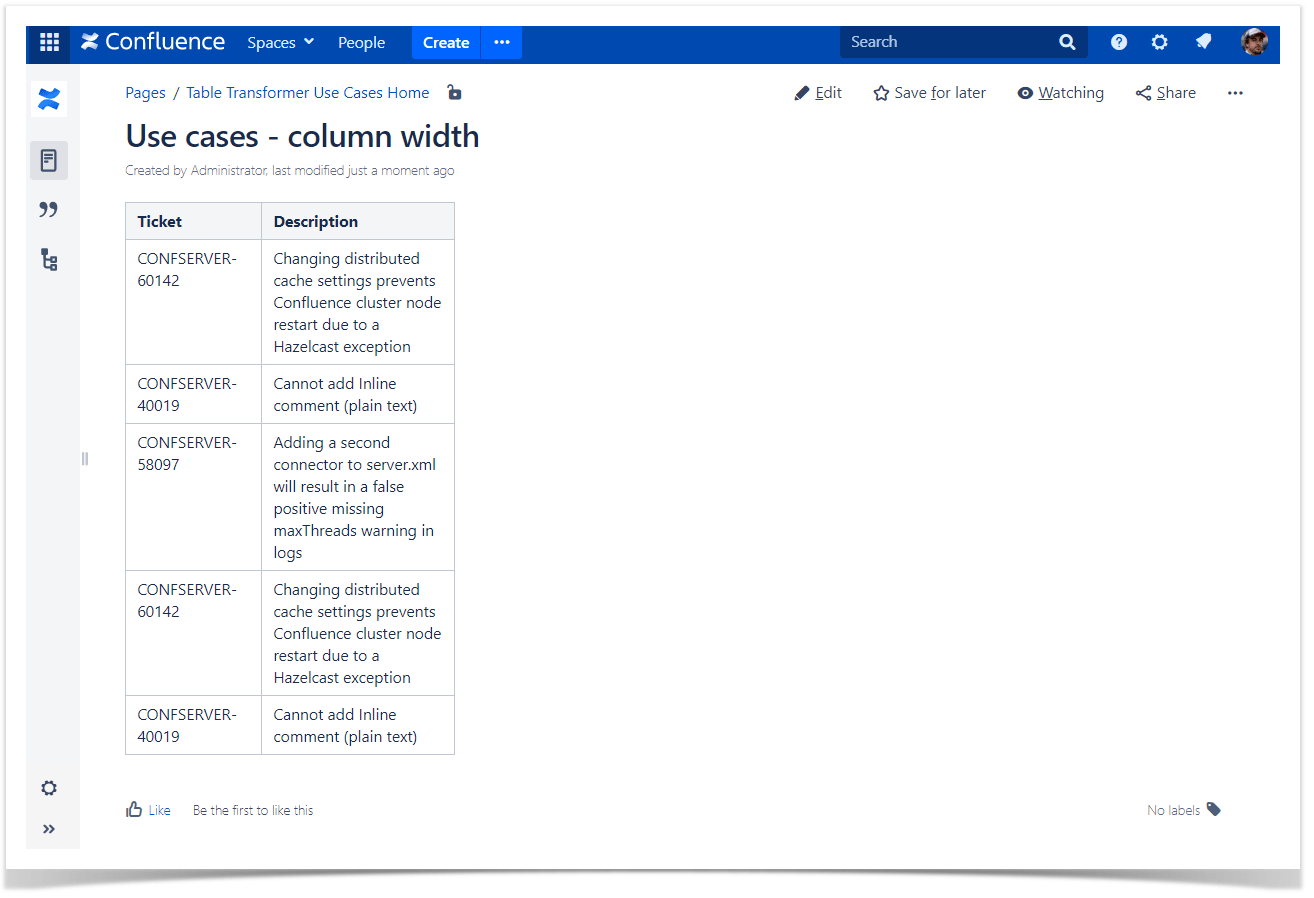
Changing column width
Use case:
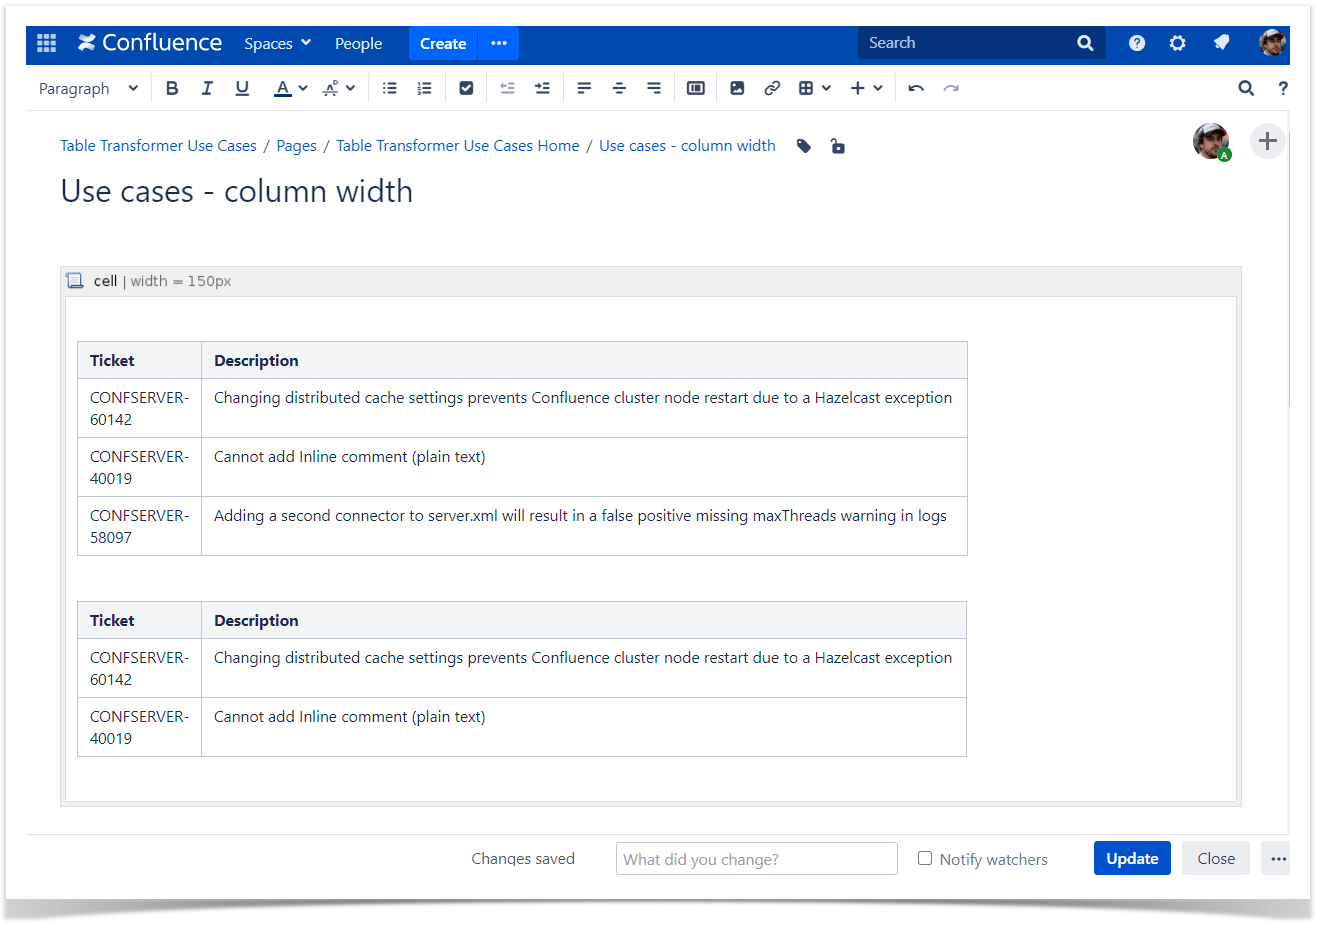
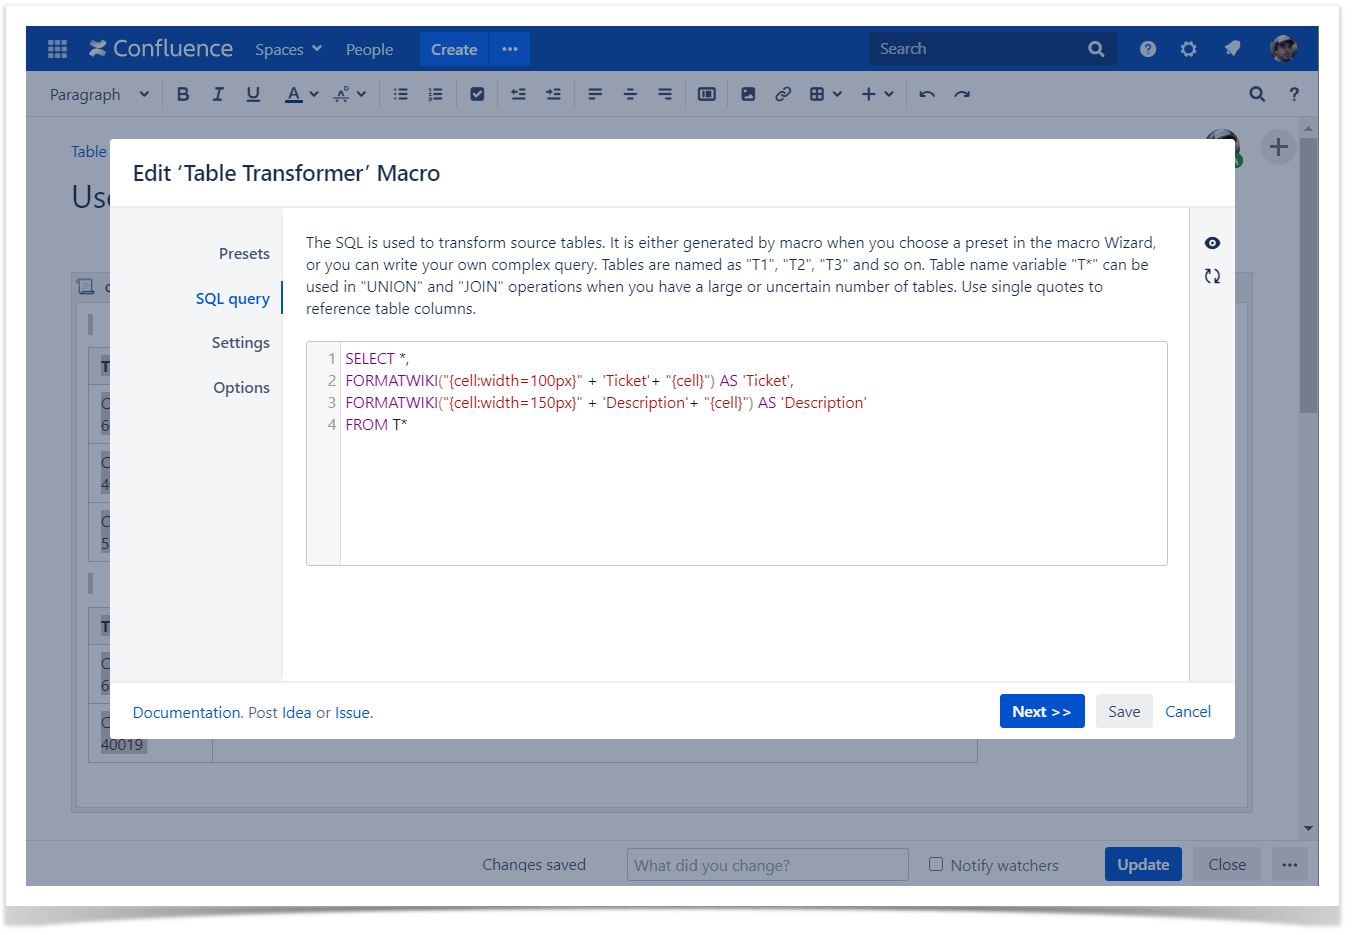
You need to change columns width in the merged table.
Solution:
Switch the page to the edit mode.
Insert the Table Transformer macro and paste the table or the macros outputting tables within the macro body.
Select the macro and click Edit.
In the Presets tab select Custom transformation and click Next.
Enter the following SQL query:
SELECT *, FORMATWIKI("{cell:width=100px}" + 'Ticket'+ "{cell}") AS 'Ticket', FORMATWIKI("{cell:width=150px}" + 'Description'+ "{cell}") AS 'Description' FROM T*SQLClick Next.
Define the table settings and view options if needed.
Save the macro and the page.
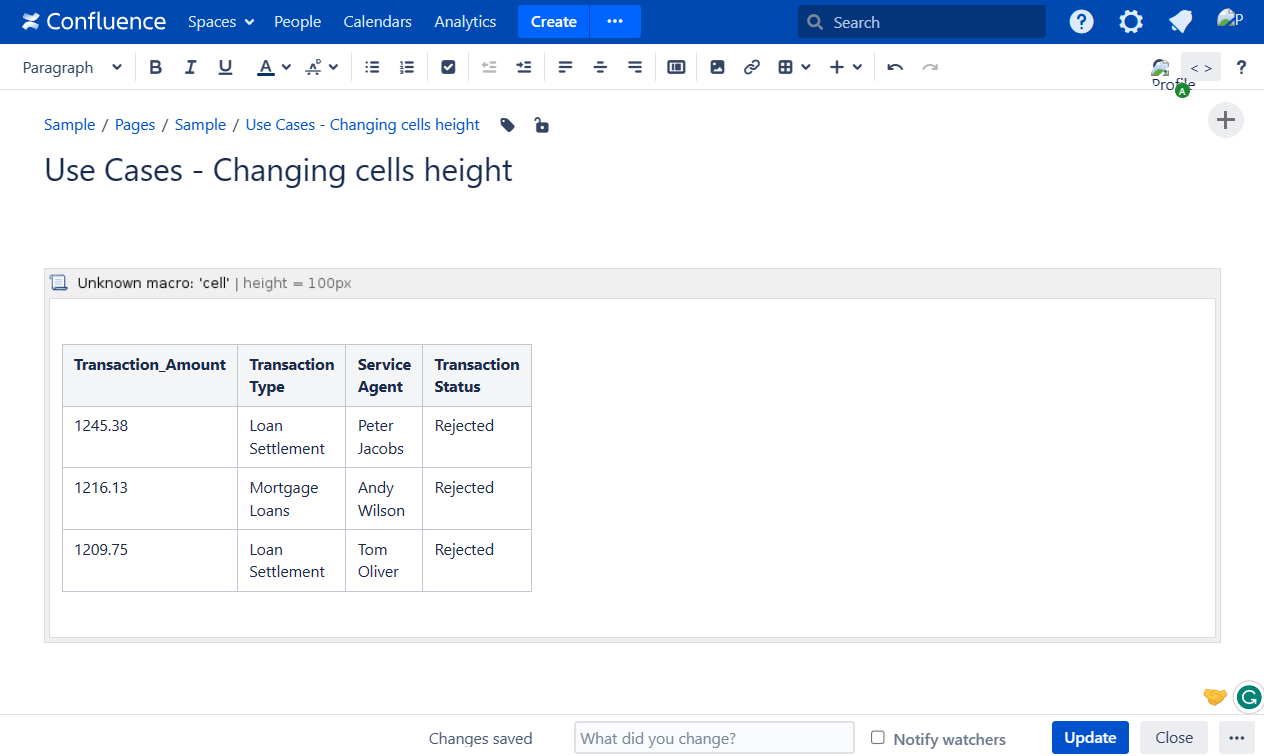
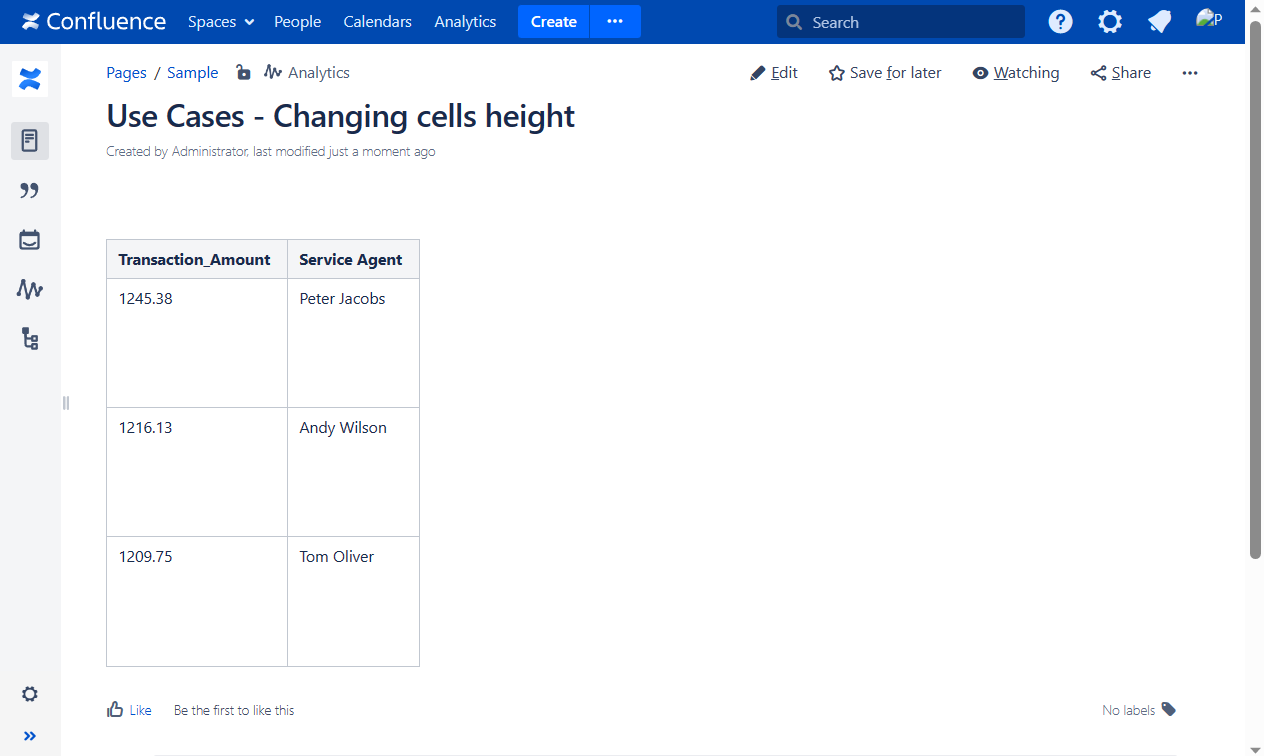
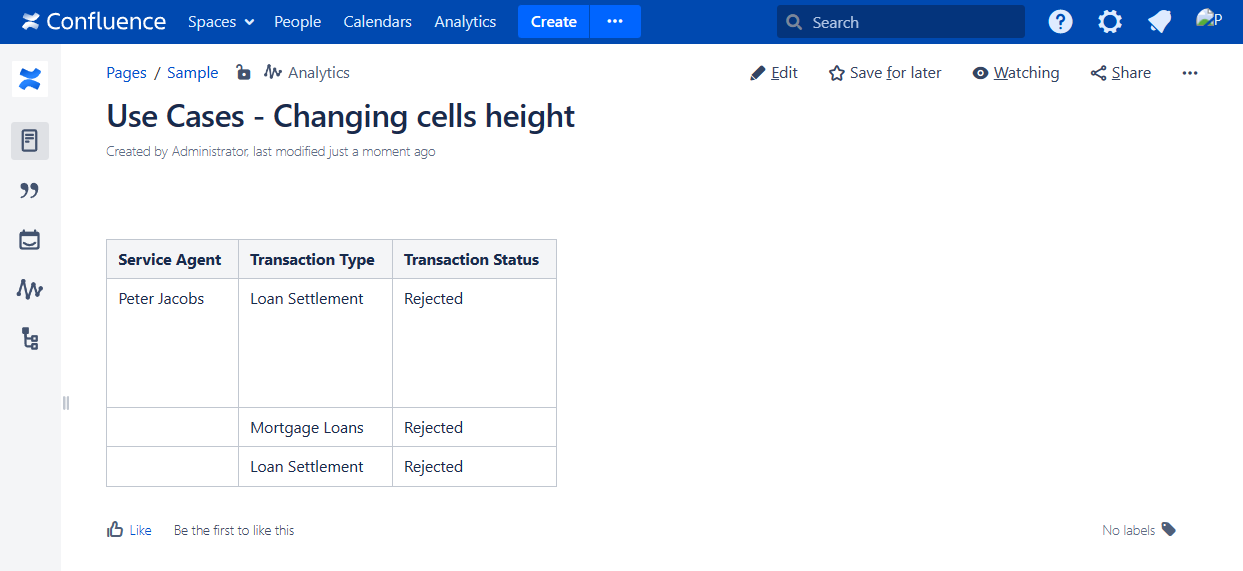
Changing cells height
Use case:
You need to change cells height of a given table.
Solution:
Switch the page to the edit mode.
Insert the Table Transformer macro and paste the table or the macros outputting tables within the macro body.
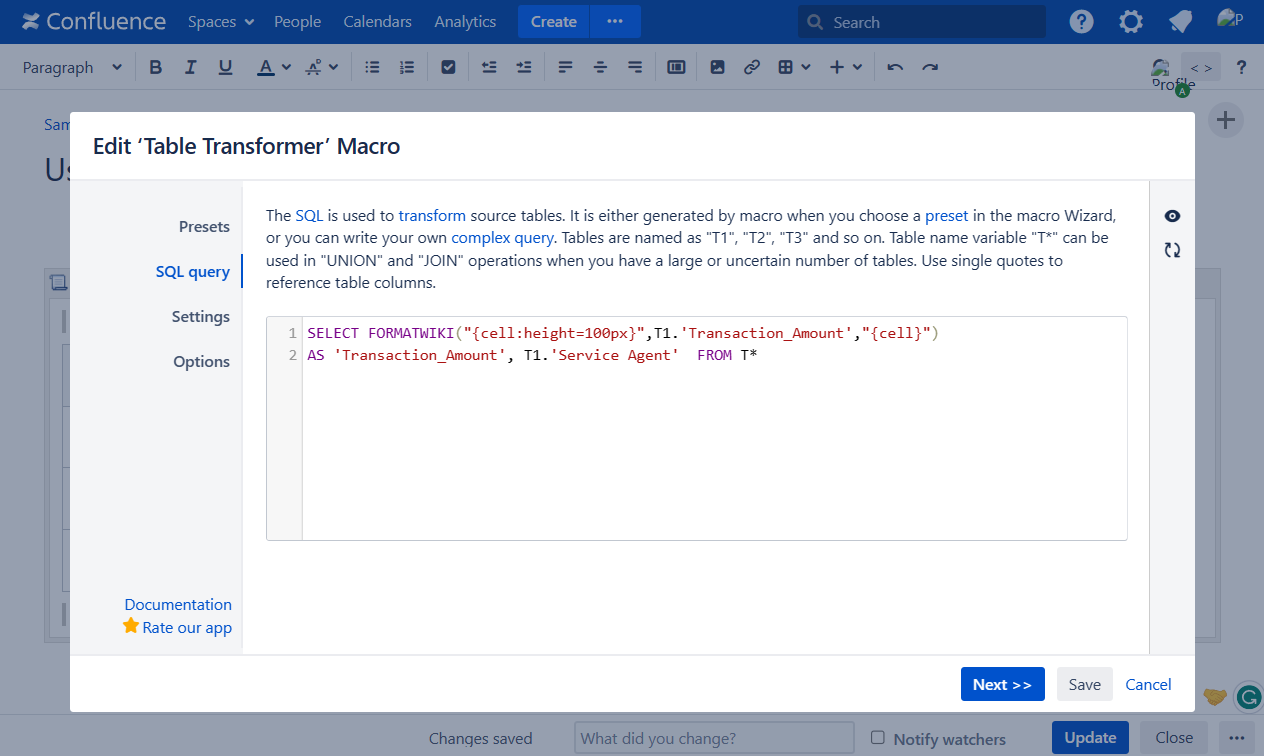
Select the macro and click Edit.
In the Presets tab select Custom transformation and click Next.
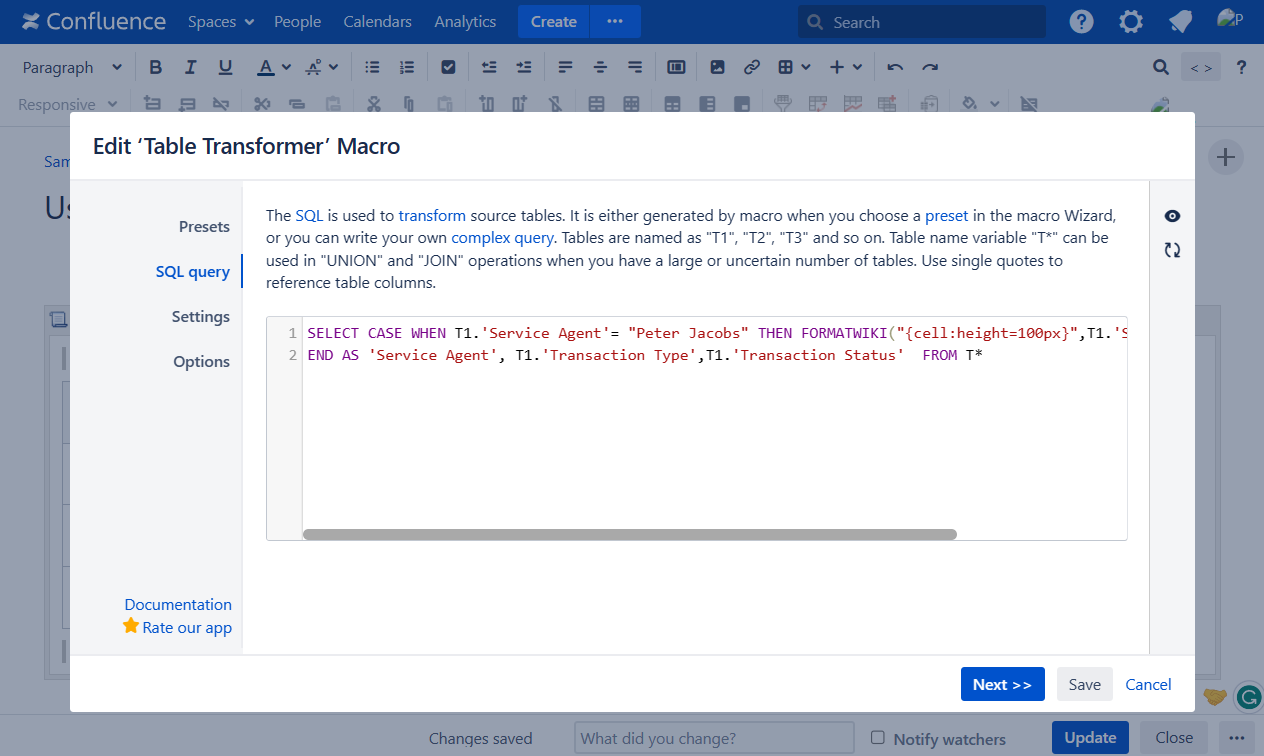
Enter one of the following SQL query patterns:
- to adjust the height of a column:SELECT FORMATWIKI("{cell:height=100px}",T1.'Transaction_Amount',"{cell}") AS 'Transaction_Amount', T1.'Service Agent' FROM T*SQL
The height applied to at least one column applies to the entire table.
- to adjust the height of a row :
SELECT CASE WHEN T1.'Service Agent'= "Peter Jacobs" THEN FORMATWIKI("{cell:height=100px}",T1.'Service Agent',"{cell}")
END AS 'Service Agent', T1.'Transaction Type',T1.'Transaction Status'  FROM T*
SQL
Pick at least one value in a row to adjust the cells height and add a conditional function such as IF, CASE WHEN, etc. paired with the FORMATWIKI function.
Click Next.
Define the table settings and view options if needed.
Save the macro and the page.
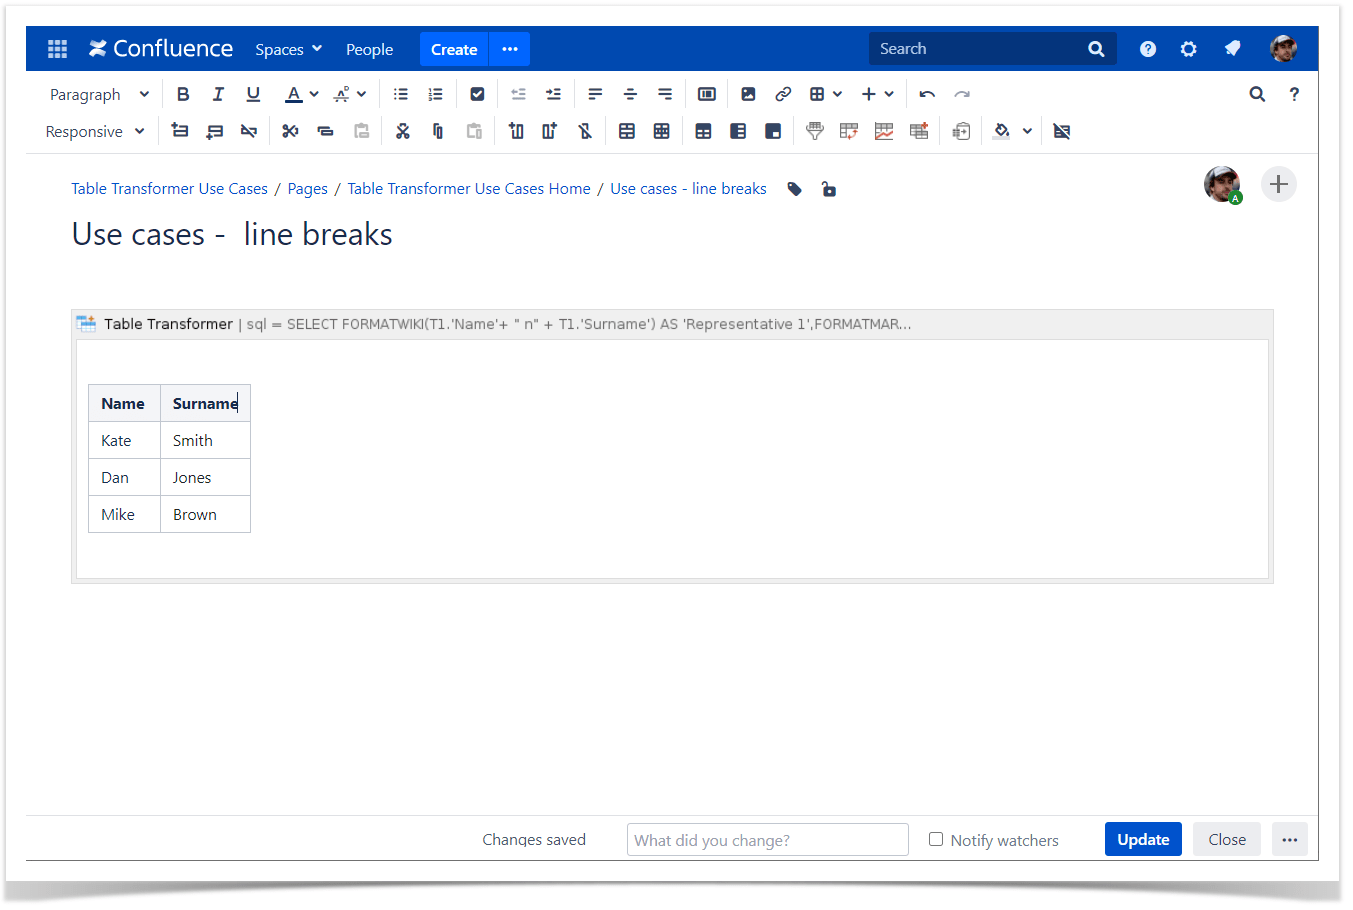
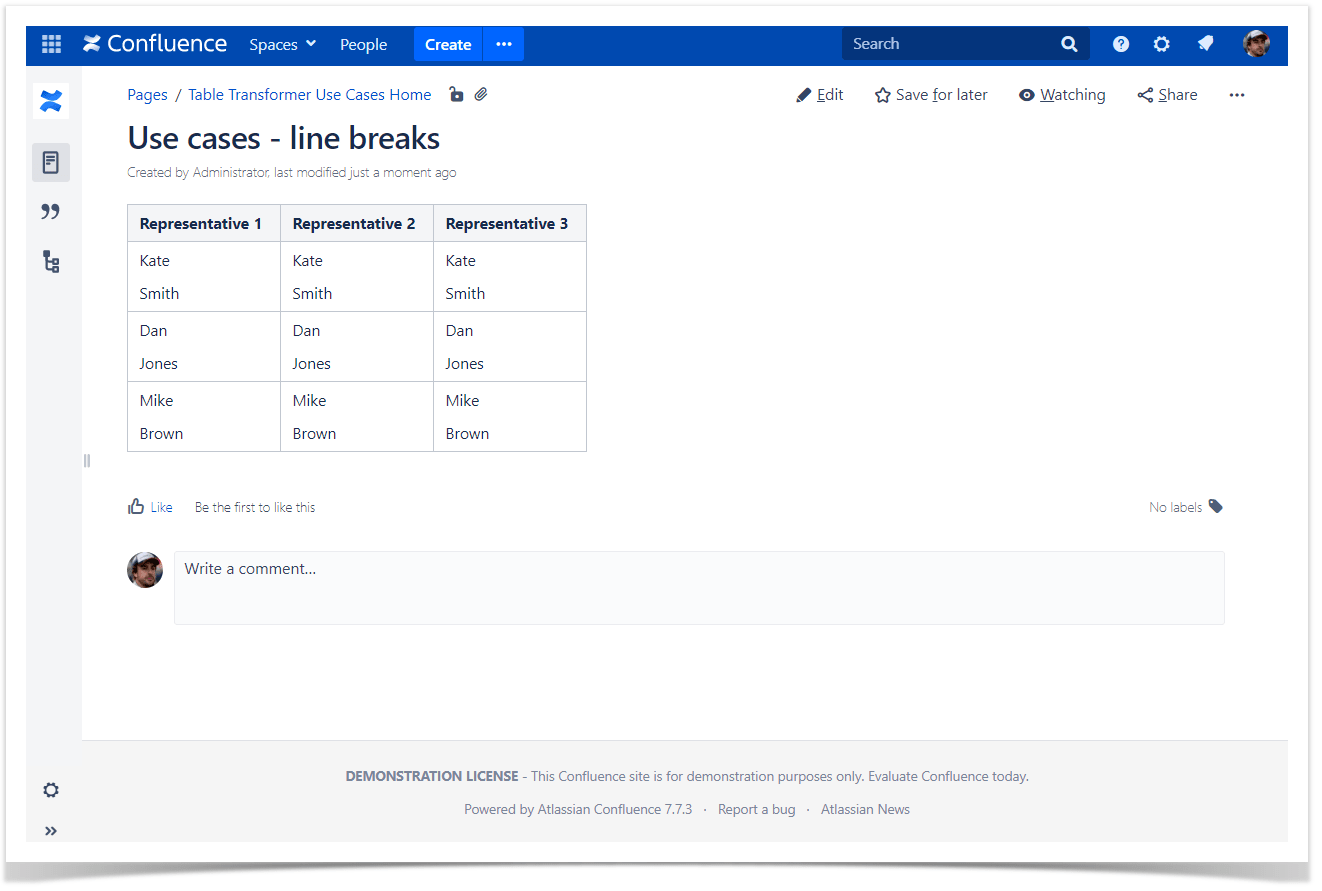
Adding line breaks
Use case:
You need to add a line break.
Solution:
Switch the page to the edit mode.
Insert the Table Transformer macro and paste the table or the macros outputting tables within the macro body.
Select the macro and click Edit.
In the Presets tab select Custom transformation and click Next.
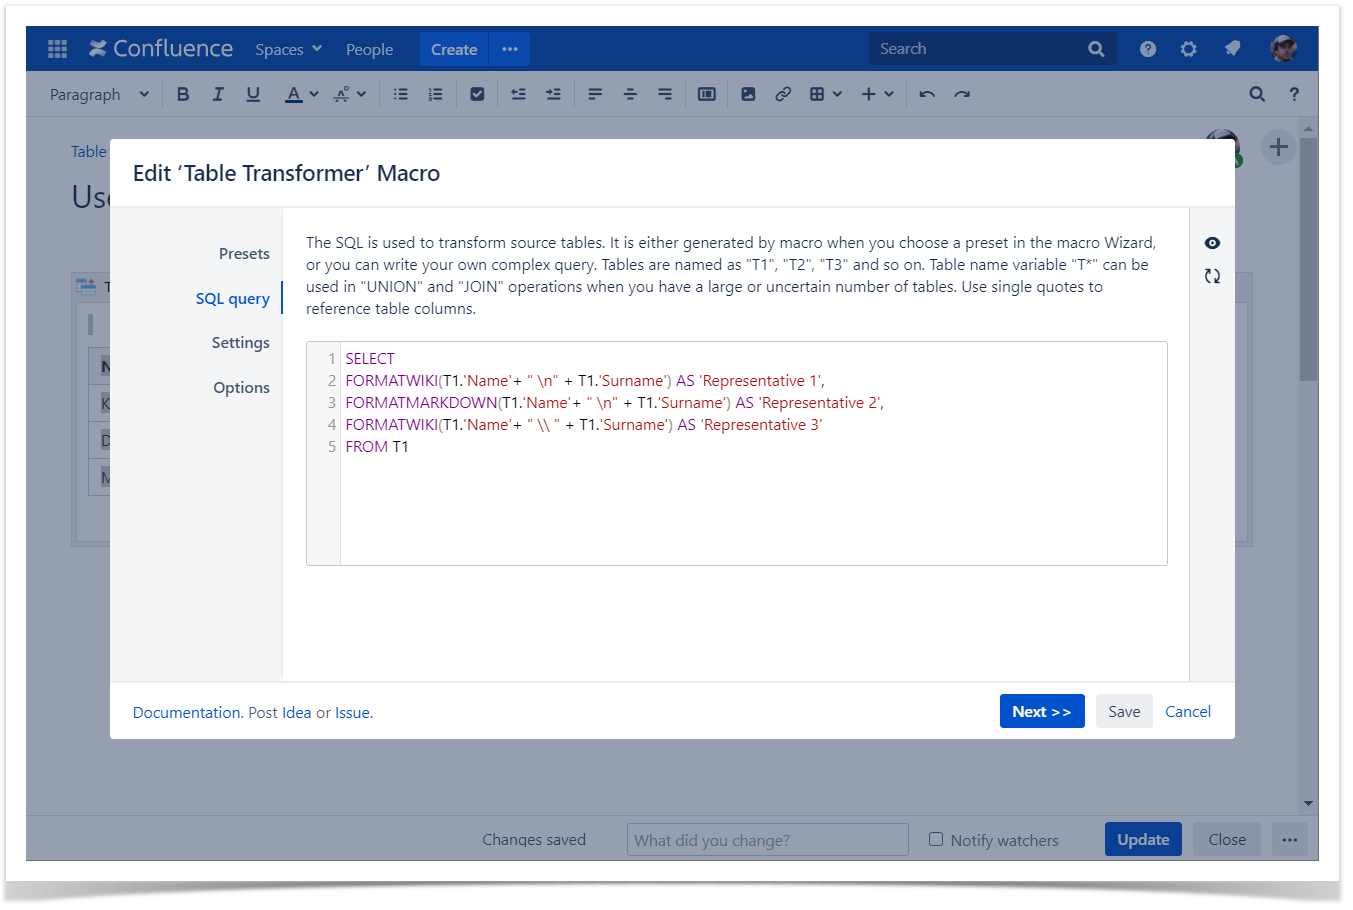
Enter the following SQL query:
SELECT FORMATWIKI(T1.'Name'+ " \n" + T1.'Surname') AS 'Representative 1', FORMATMARKDOWN(T1.'Name'+ " \n" + T1.'Surname') AS 'Representative 2', FORMATWIKI(T1.'Name'+ " \\ " + T1.'Surname') AS 'Representative 3' FROM T1SQL
Three alternative ways of adding line breaks are shown in the SQL query.
Click Next.
Define the table settings and view options if needed.
Save the macro and the page.
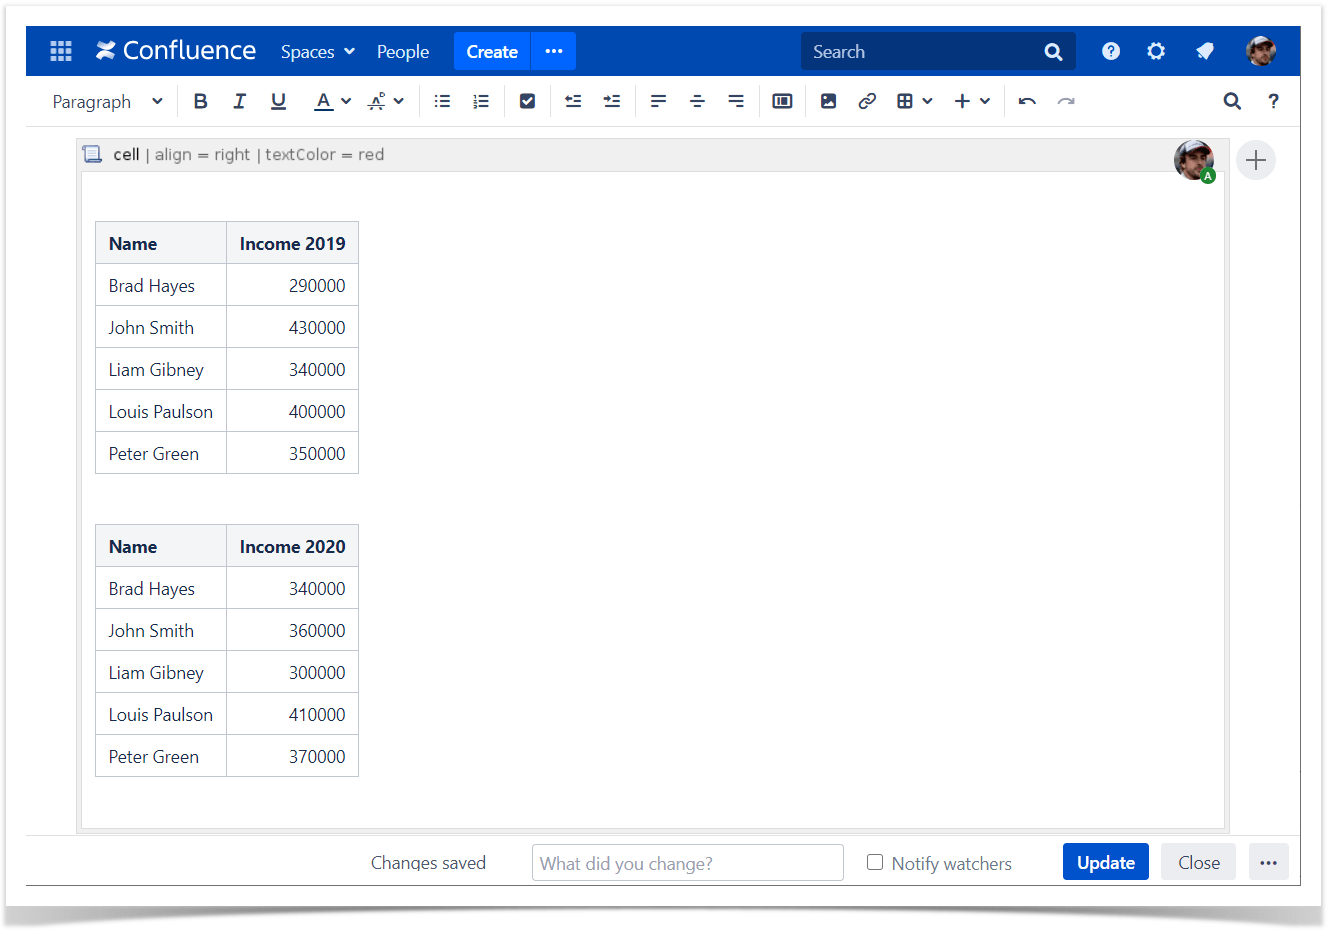
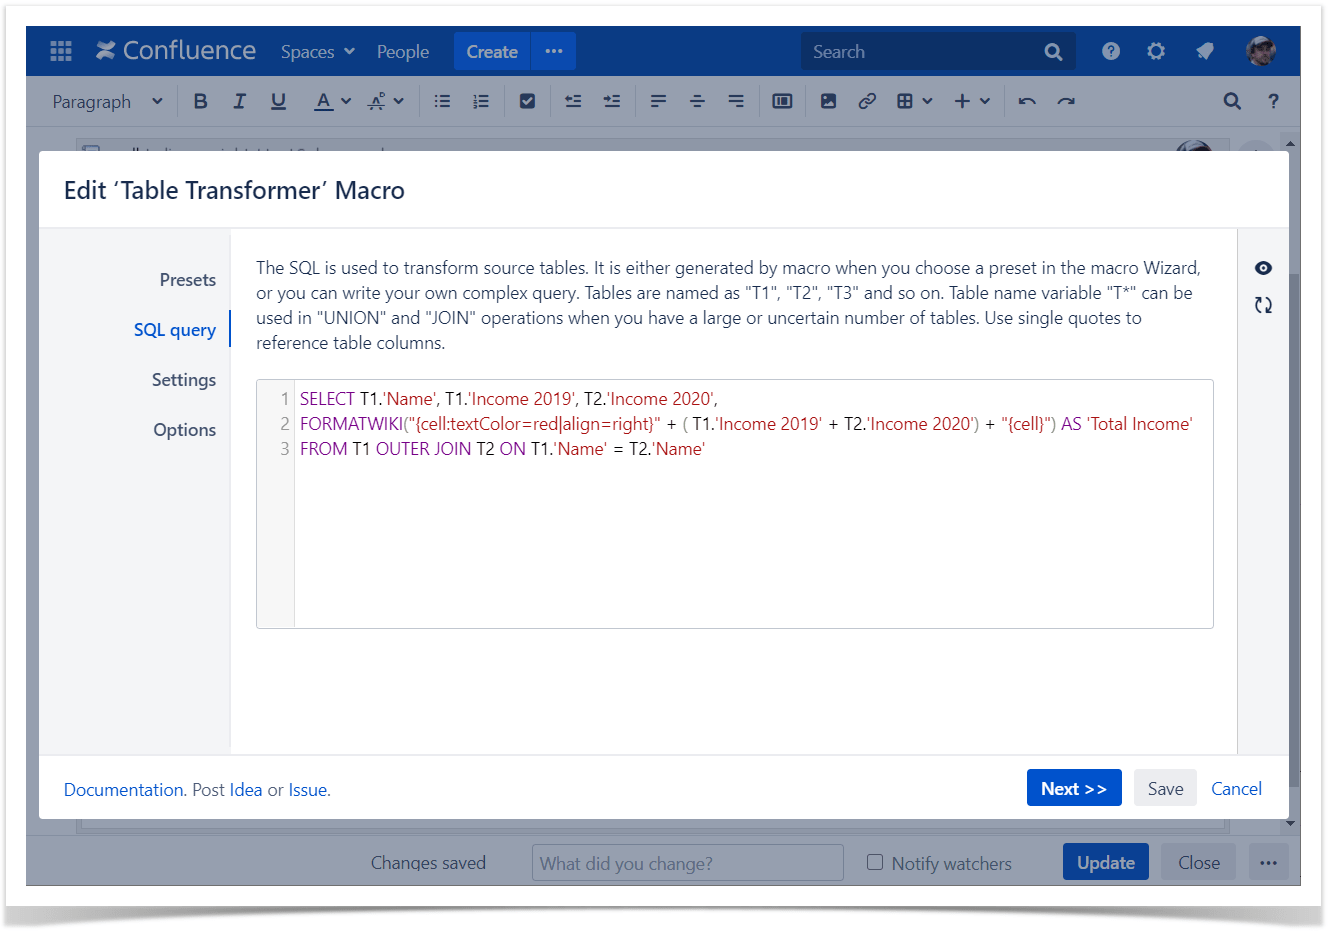
Adding text color
Use case:
You need to merge tables, create a new column with the sum of two others, and then highlight and align text.
Solution:
Switch the page to the edit mode.
Insert the Table Transformer macro and paste the table or the macros outputting tables within the macro body.
Select the macro and click Edit.
In the Presets tab select Custom transformation and click Next.
Enter the following SQL query:
SELECT T1.'Name', T1.'Income 2019', T2.'Income 2020', FORMATWIKI("{cell:textColor=red|align=right}" + ( T1.'Income 2019' + T2.'Income 2020') + "{cell}") AS 'Total Income' FROM T1 OUTER JOIN T2 ON T1.'Name' = T2.'Name'SQLClick Next.
Define the table settings and view options if needed.
Save the macro and the page.

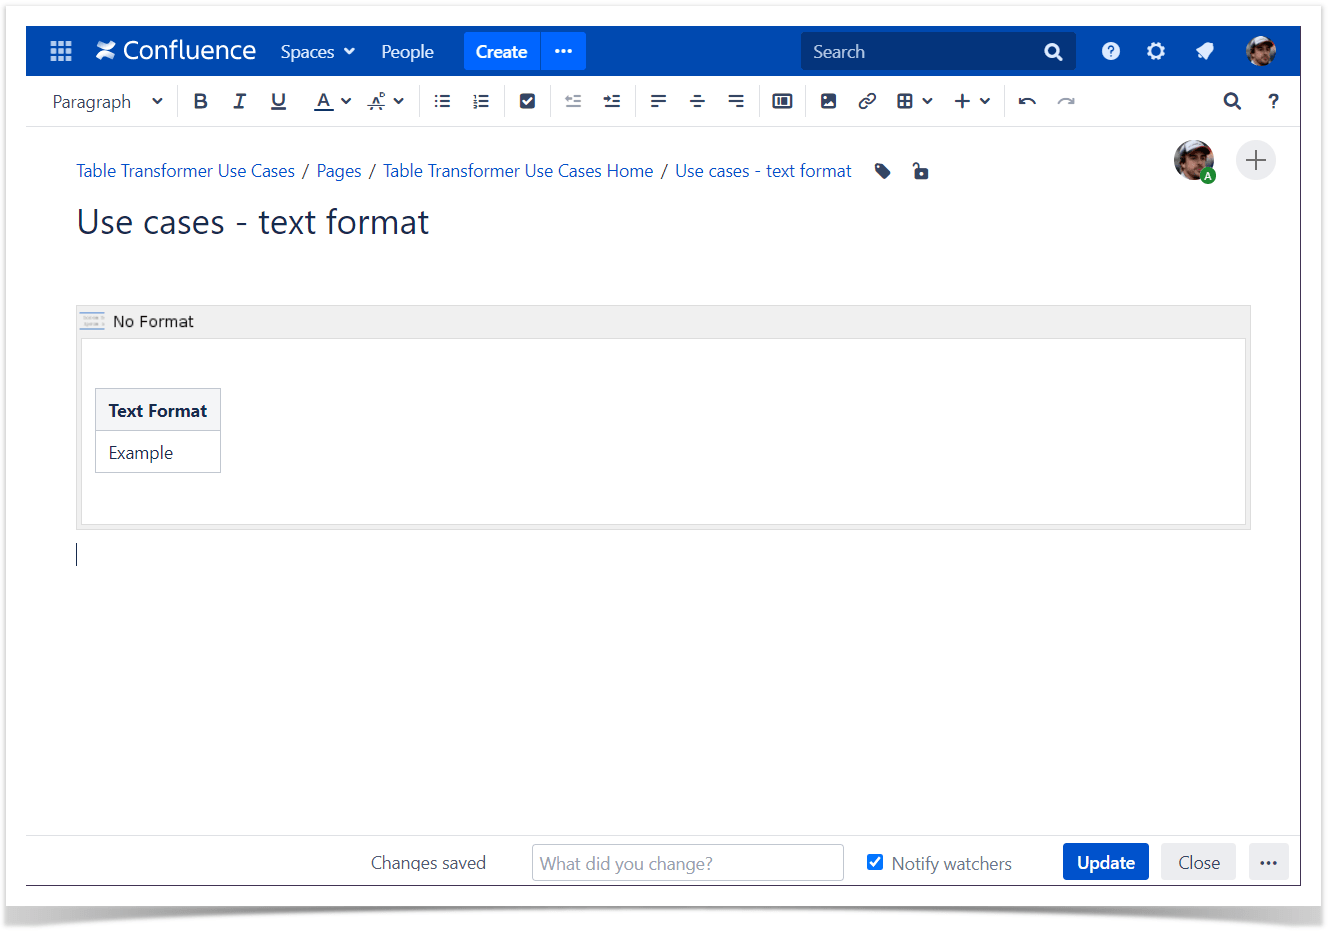
Text formatting
Use case:
You need to format some text.
Solution:
Switch the page to the edit mode.
Insert the Table Transformer macro and paste the table or the macros outputting tables within the macro body.
Select the macro and click Edit.
In the Presets tab select Custom transformation and click Next.
Enter the following SQL query:
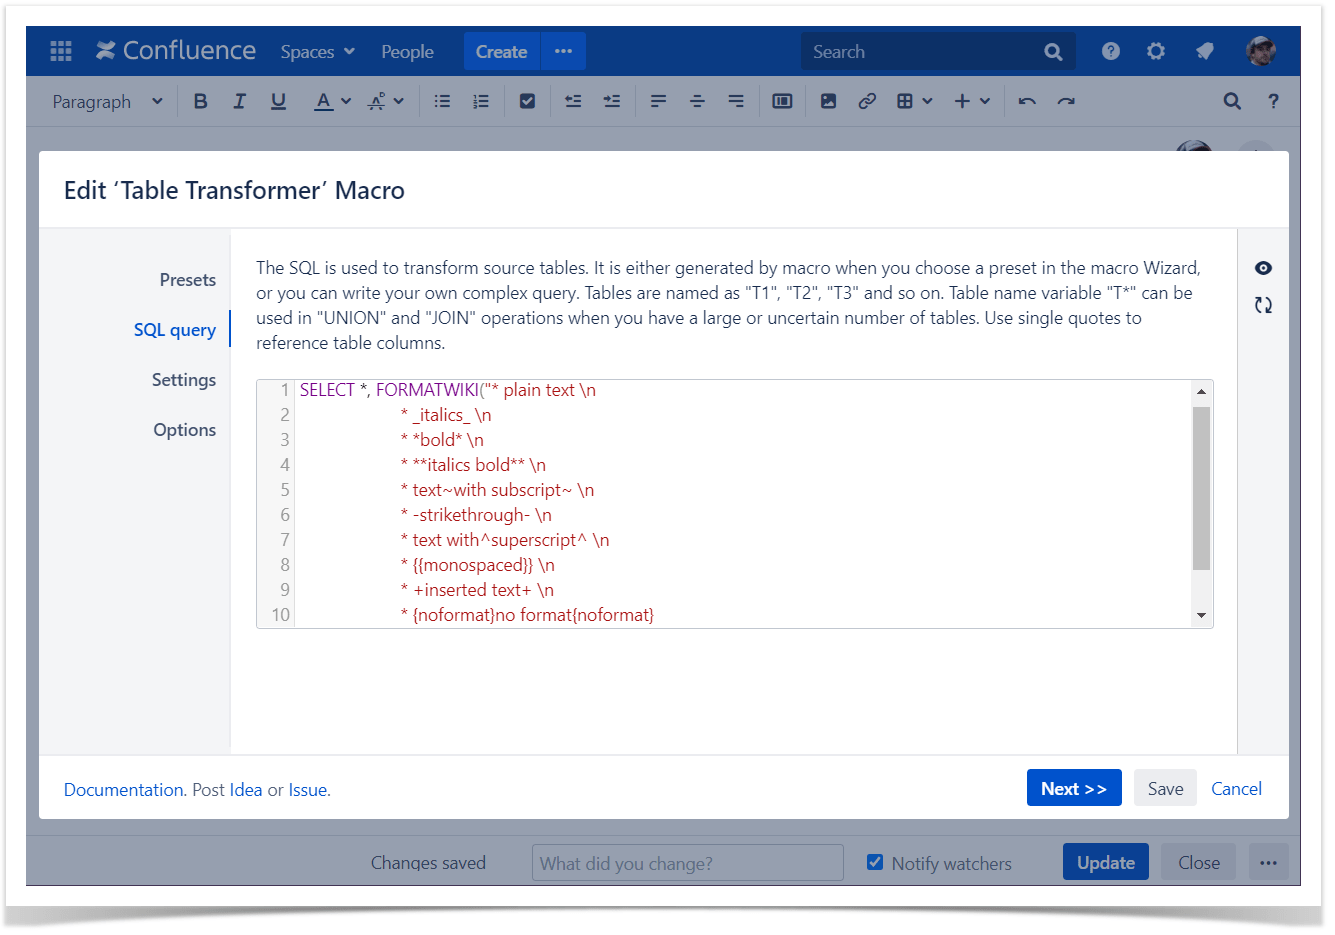
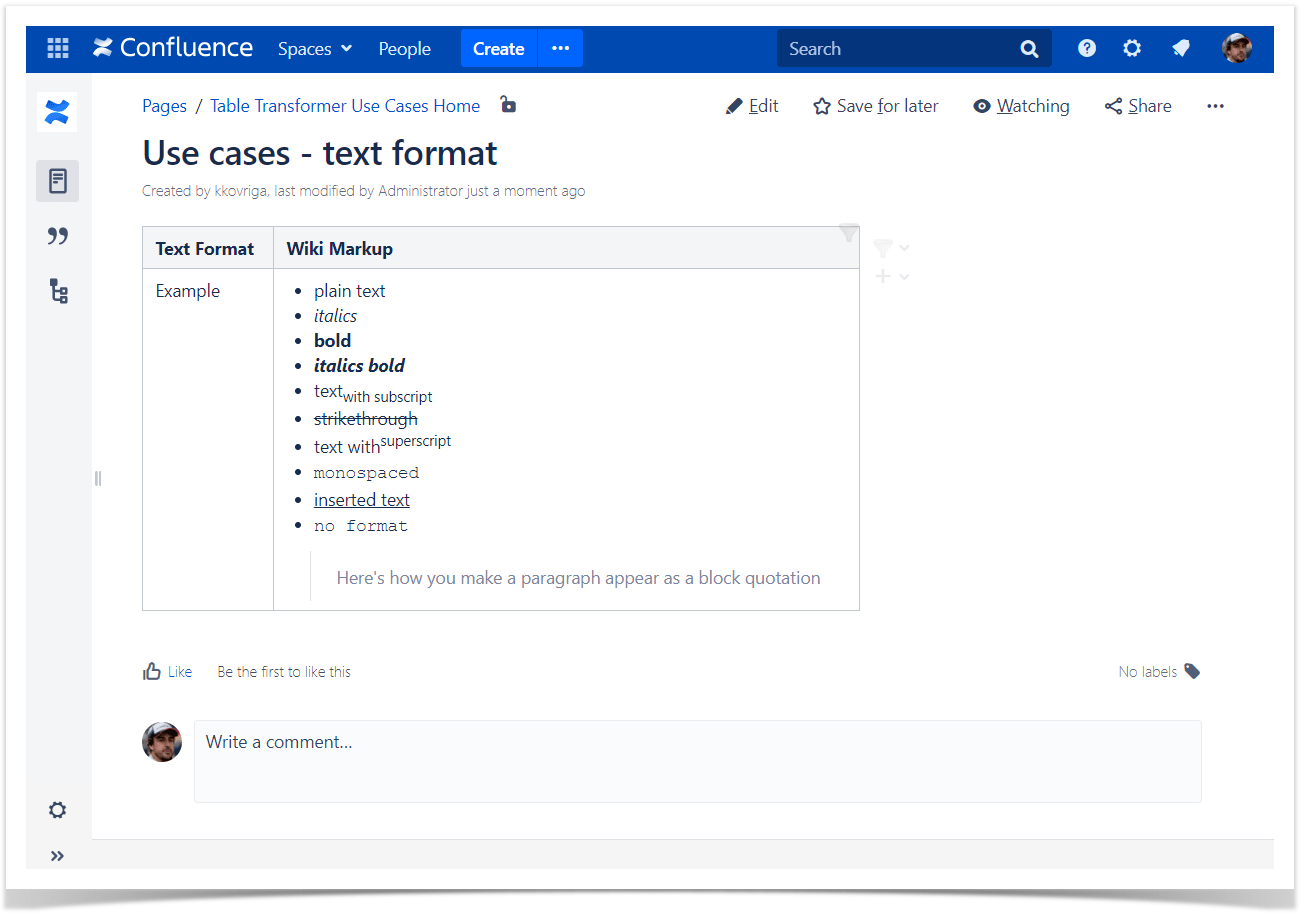
SELECT *, FORMATWIKI("* plain text \n * _italics_ \n * *bold* \n * **italics bold** \n * text~with subscript~ \n * -strikethrough- \n * text with^superscript^ \n * {{monospaced}} \n * +inserted text+ \n * {noformat}no format{noformat} \nbq. Here's how you make a paragraph appear as a block quotation") AS 'Wiki Markup' FROM T*SQLClick Next.
Define the table settings and view options if needed.
Save the macro and the page.
Сhanging font size, style
Use case:
You need to adjust the font size, style.
Solution:
- Switch the page to the edit mode.
- Insert the Table Transformer macro and paste the table or the macros outputting tables within the macro body.
- Select the macro and click Edit.
- In the Presets tab select Custom transformation and click Next.
Enter either of the following SQL query patterns:
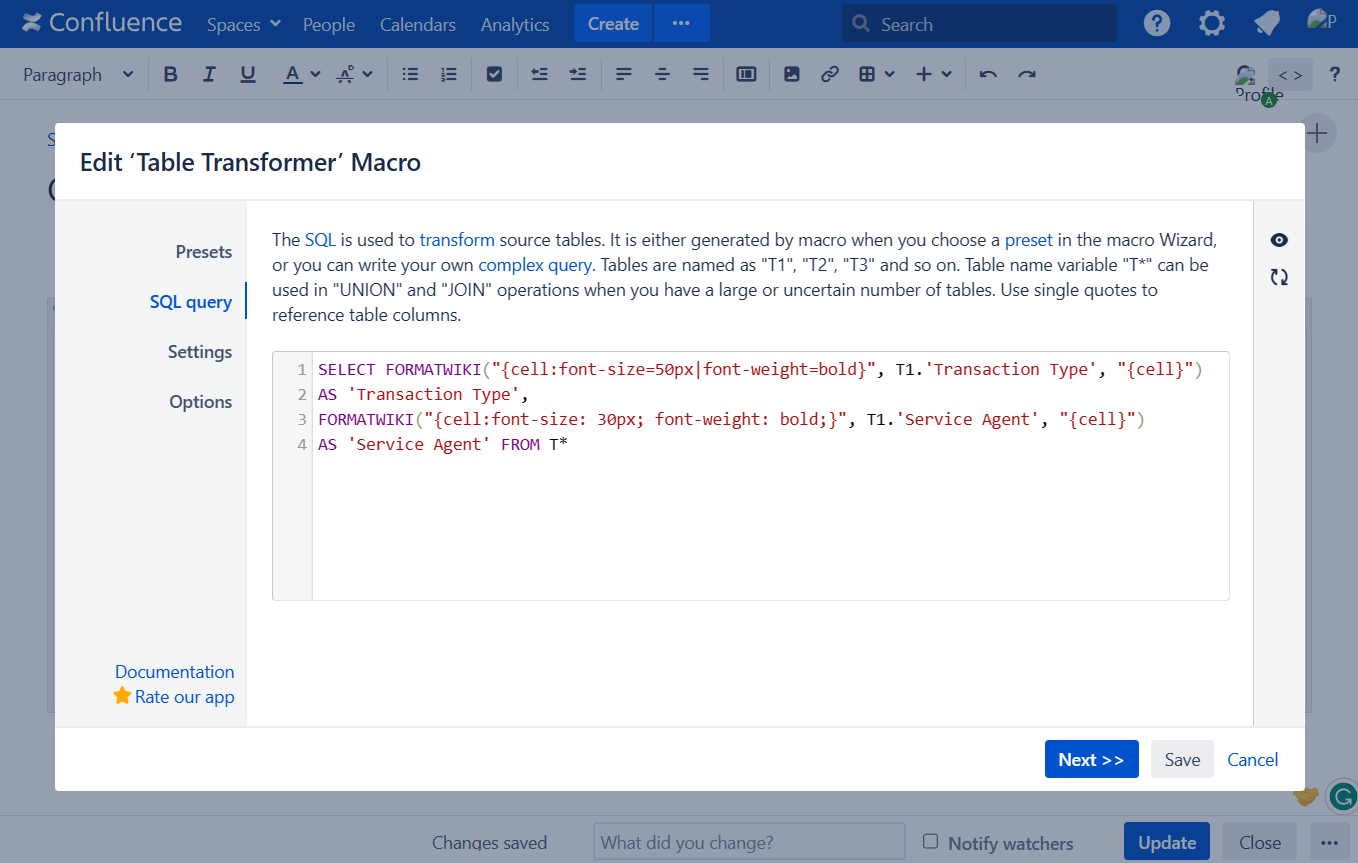
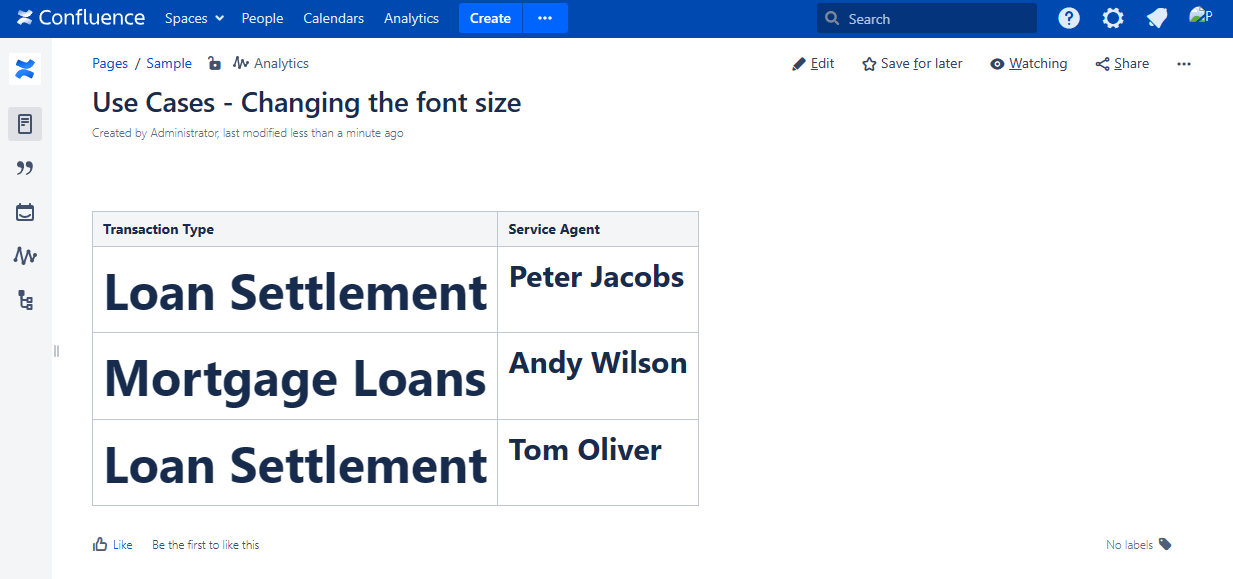
SELECT FORMATWIKI("{cell:font-size=50px|font-weight=bold}", T1.'Transaction Type', "{cell}") AS 'Transaction Type', FORMATWIKI("{cell:font-size: 30px; font-weight: bold;}", T1.'Service Agent', "{cell}") AS 'Service Agent' FROM T*SQLClick Next.
Define the table settings and view options if needed.
Save the macro and the page.

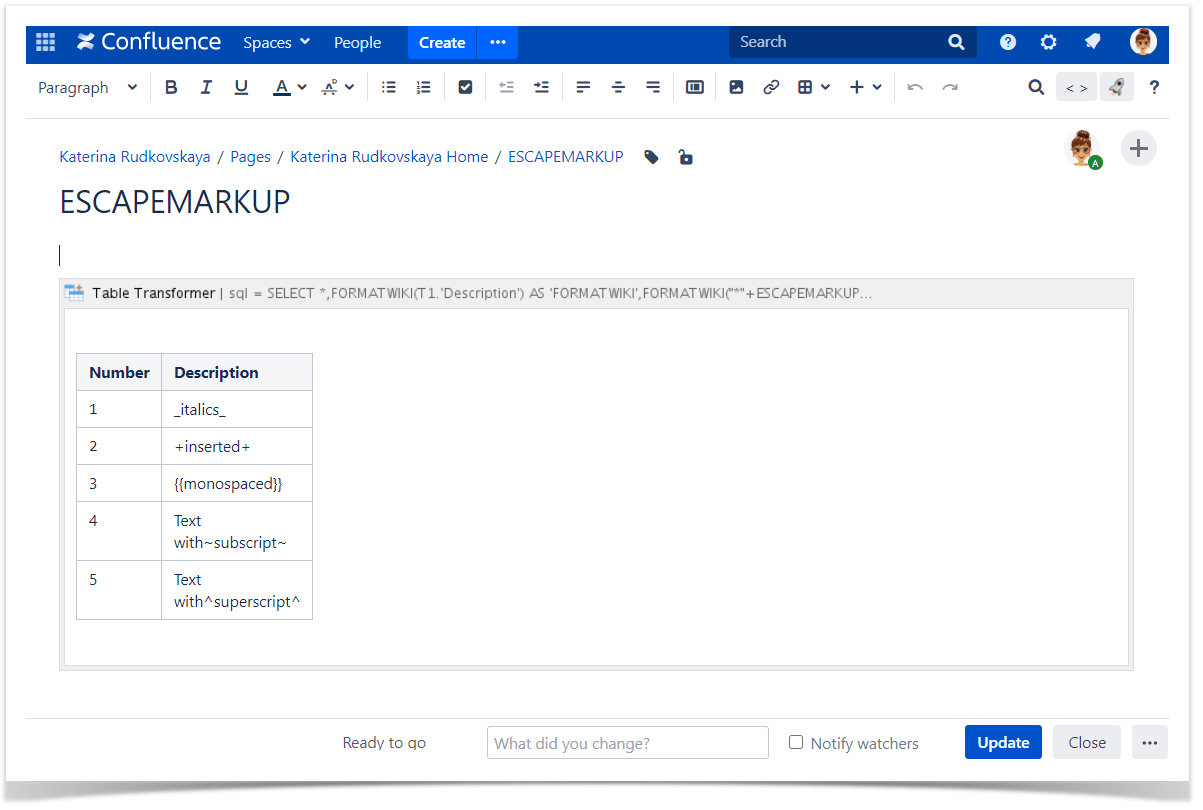
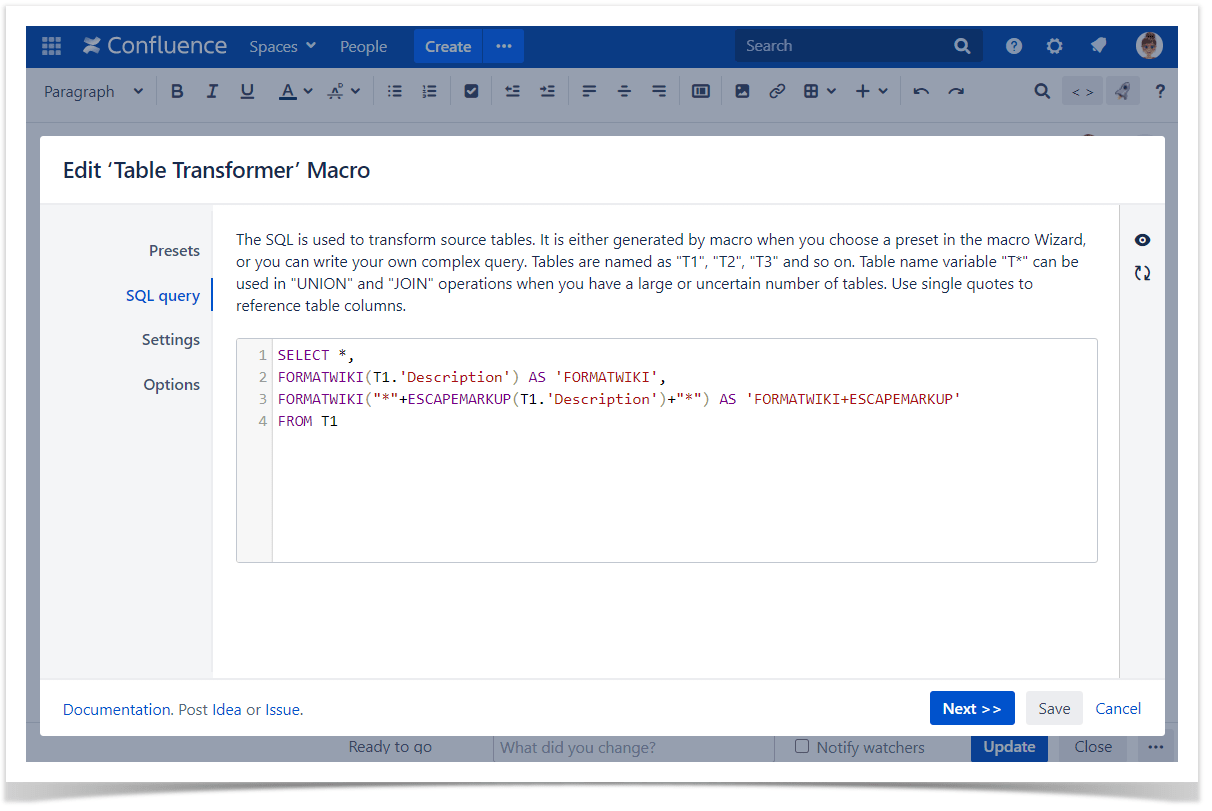
Escaping special characters for wiki markup
Use case:
You need to e scape special characters for wiki markup.
Solution:
Switch the page to the edit mode.
Insert the Table Transformer macro and paste the table or the macros outputting tables within the macro body.
Select the macro and click Edit.
In the Presets tab select Custom transformation and click Next.
Enter the following SQL query:
SELECT *, FORMATWIKI(T1.'Description') AS 'FORMATWIKI', FORMATWIKI("*"+ESCAPEMARKUP(T1.'Description')+"*") AS 'FORMATWIKI+ESCAPEMARKUP' FROM T1SQLClick Next.
Define the table settings and view options if needed.
Save the macro and the page.
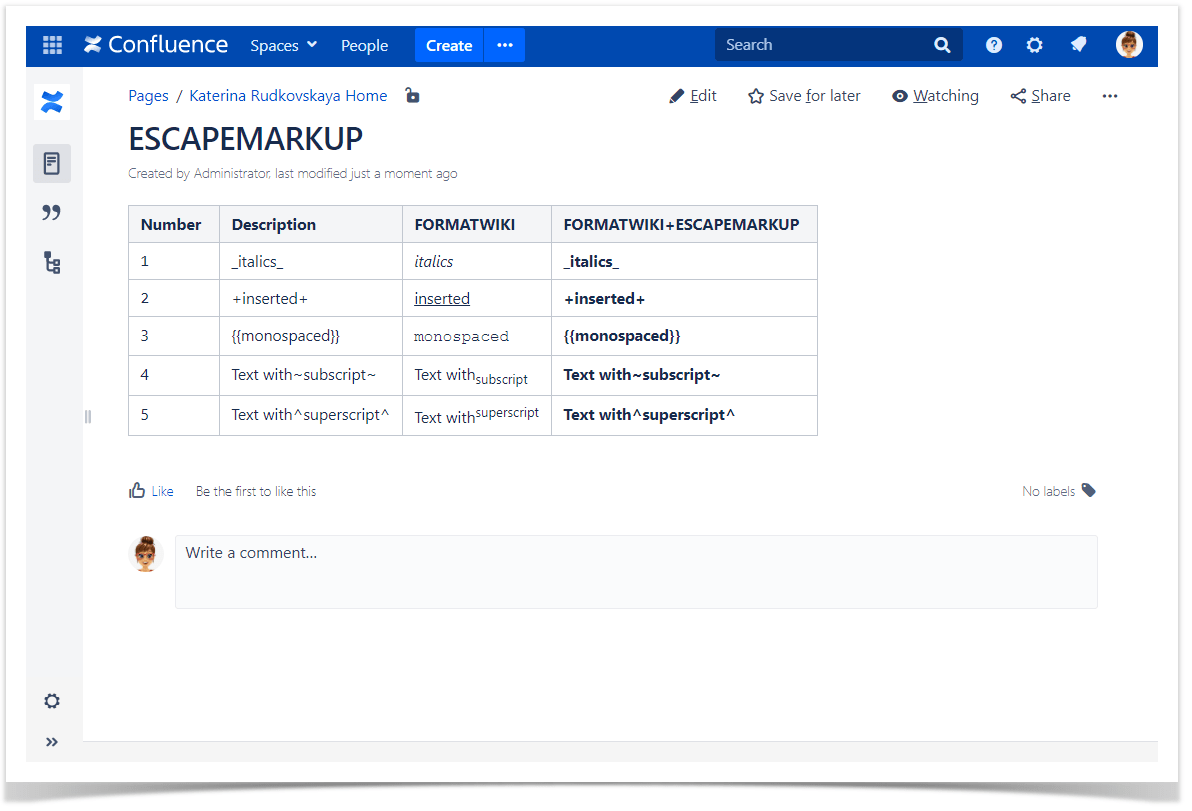
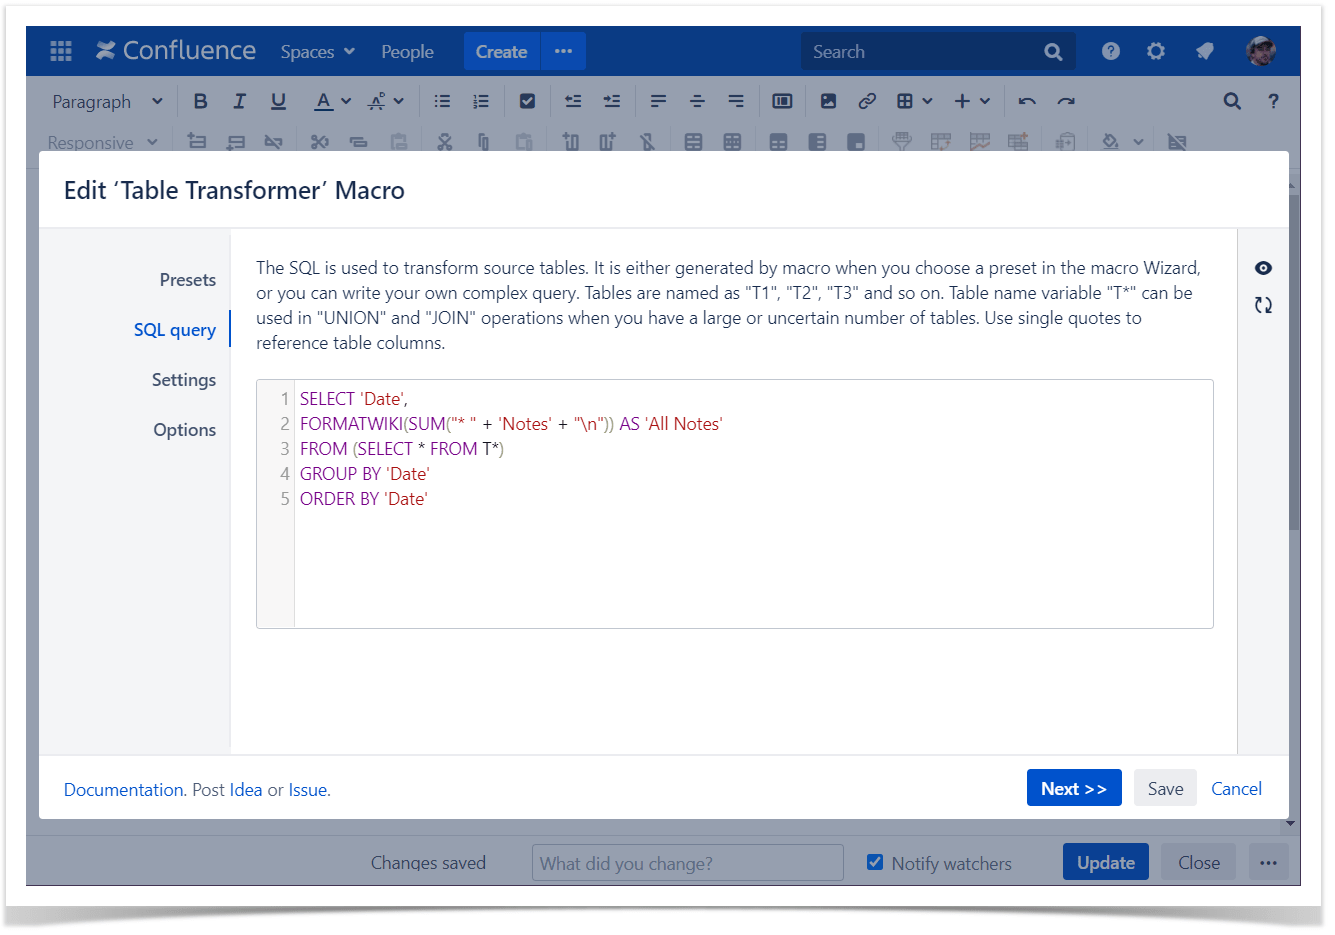
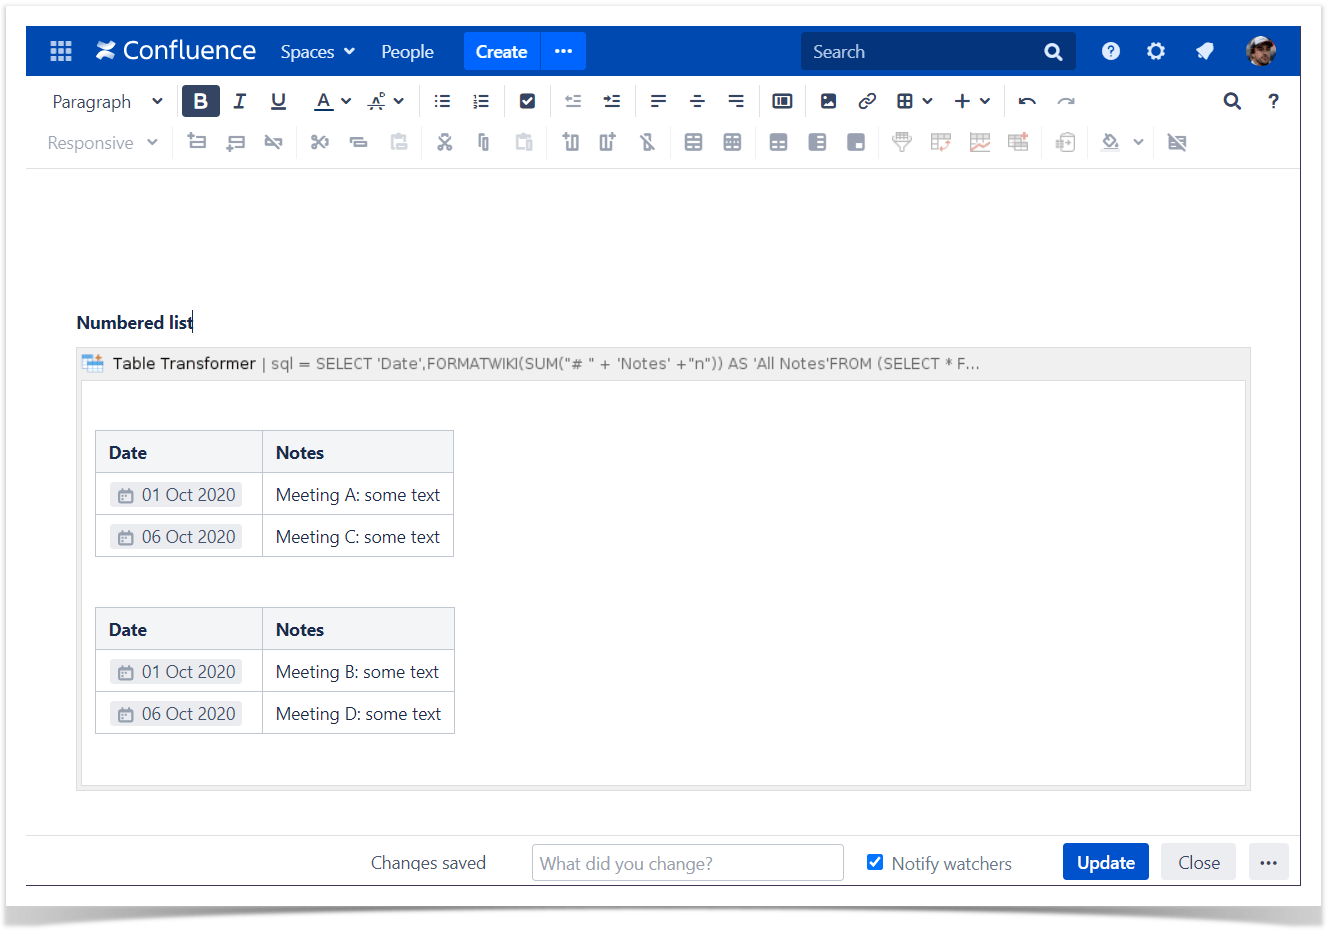
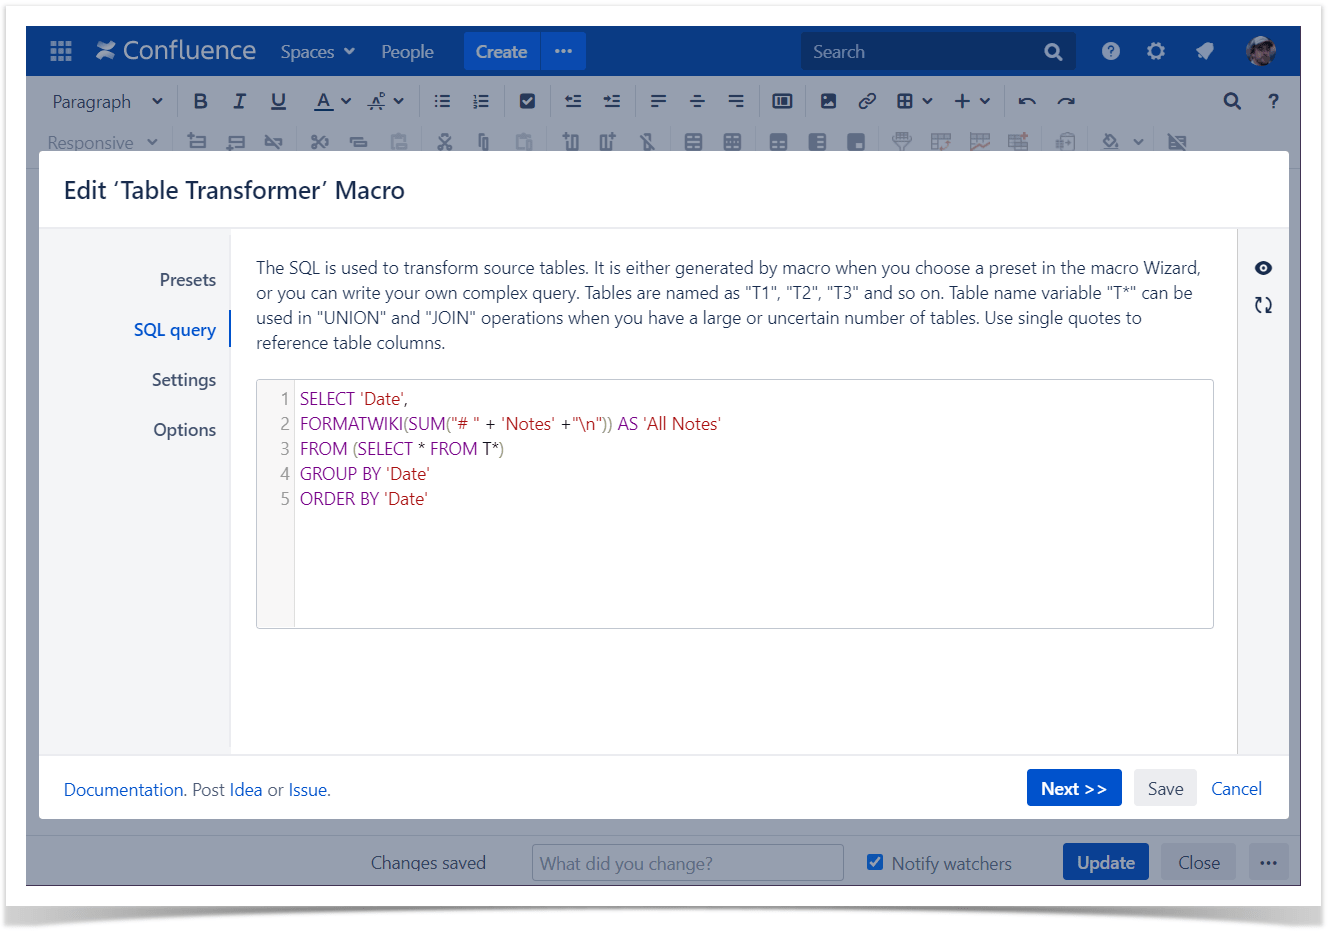
Adding bullet, numbered list
Use case:
You need to merge tables and apply bullet or numberd list to merged data.
Solution:
Switch the page to the edit mode.
Insert the Table Transformer macro and paste the table or the macros outputting tables within the macro body.
Select the macro and click Edit.
In the Presets tab select Custom transformation and click Next.
Enter the following SQL query:
SELECT 'Date', FORMATWIKI(SUM("* " + 'Notes' + "\n")) AS 'All Notes' FROM (SELECT * FROM T*) GROUP BY 'Date' ORDER BY 'Date'SQLor
SELECT 'Date', FORMATWIKI(SUM("# " + 'Notes' +"\n")) AS 'All Notes' FROM (SELECT * FROM T*) GROUP BY 'Date' ORDER BY 'Date'SQLClick Next.
Define the table settings and view options if needed.
Save the macro and the page.

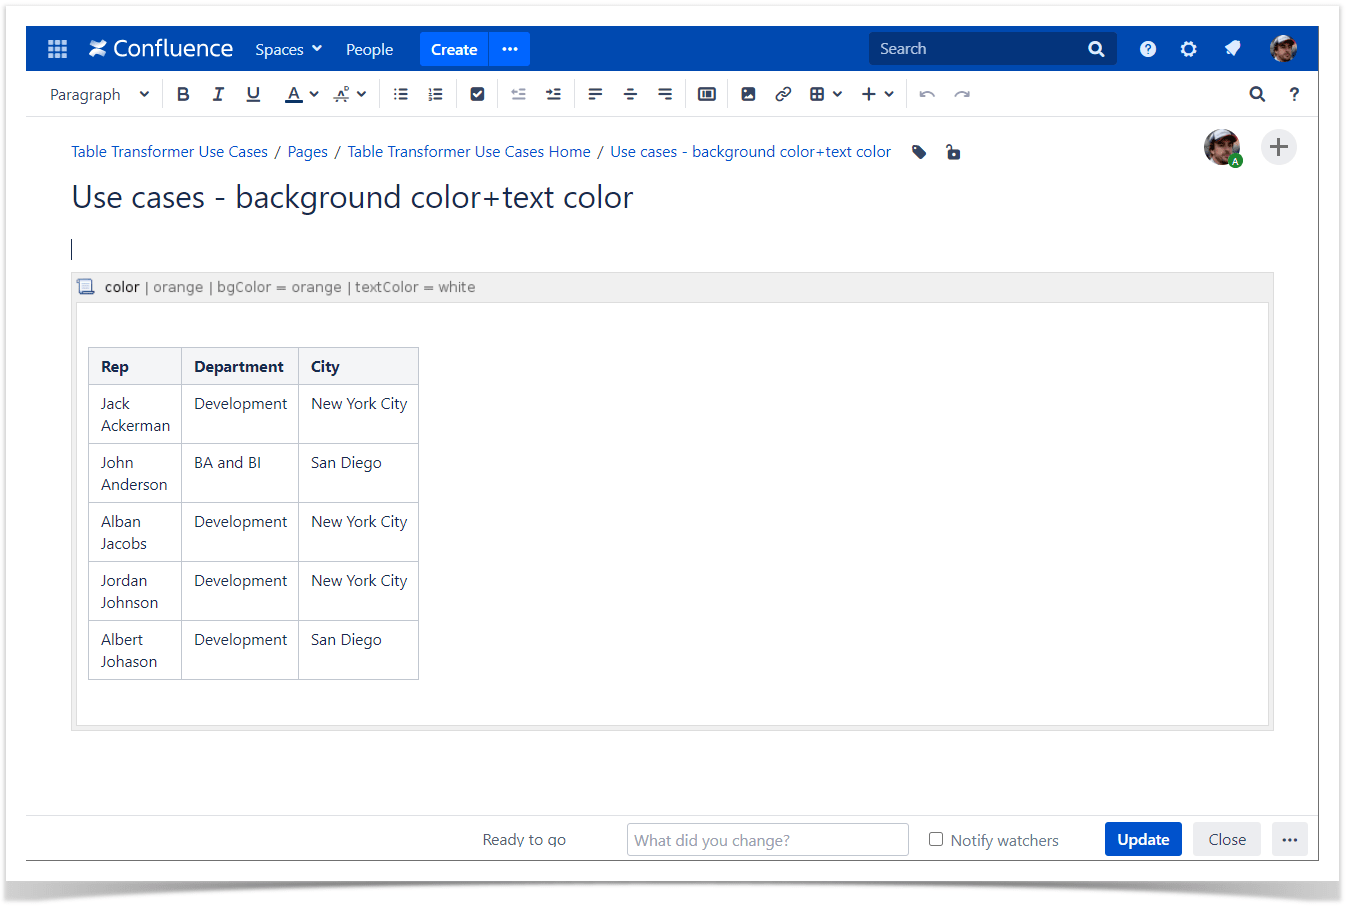
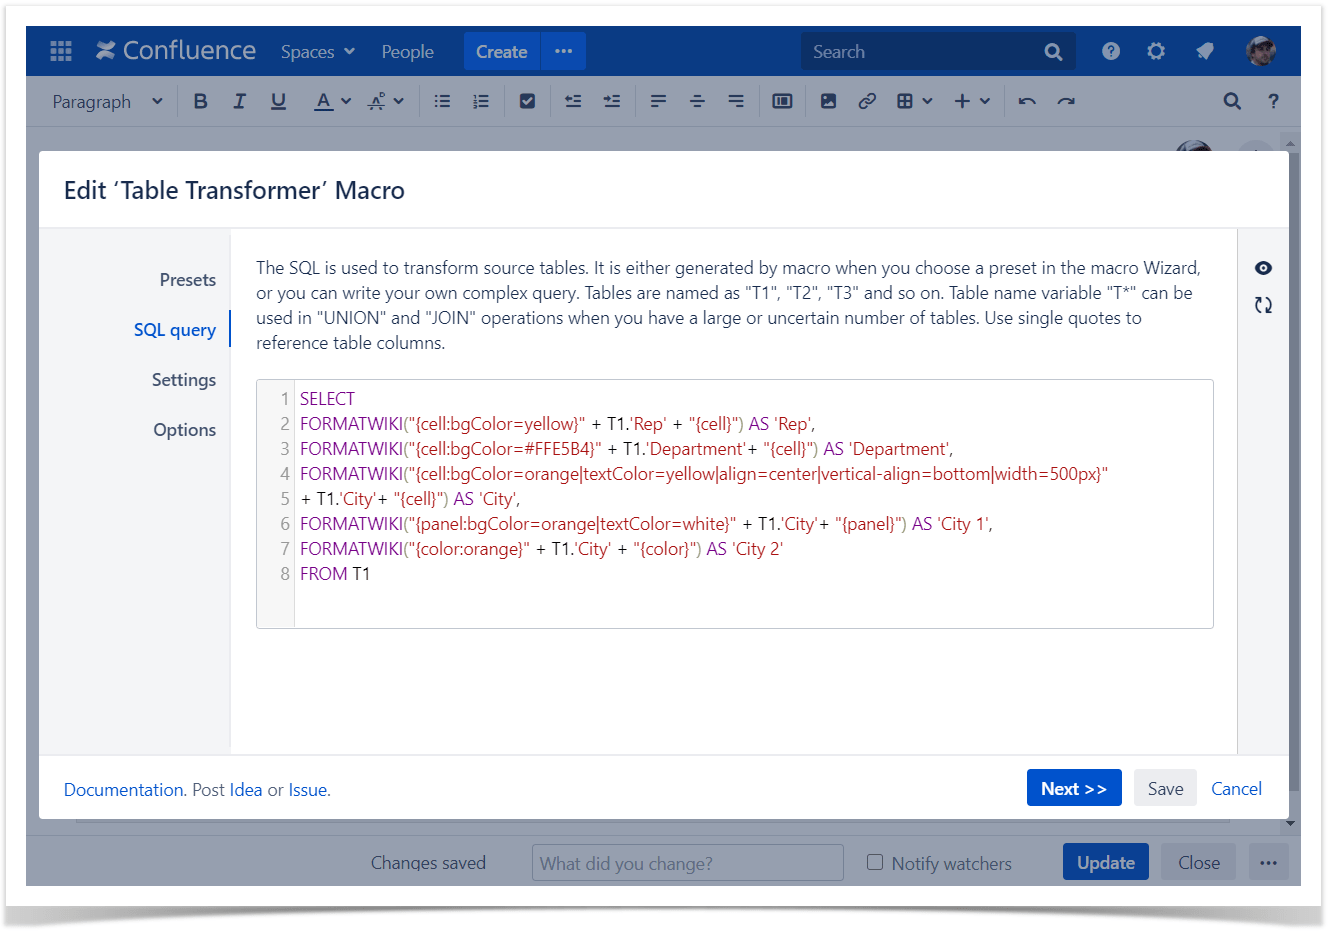
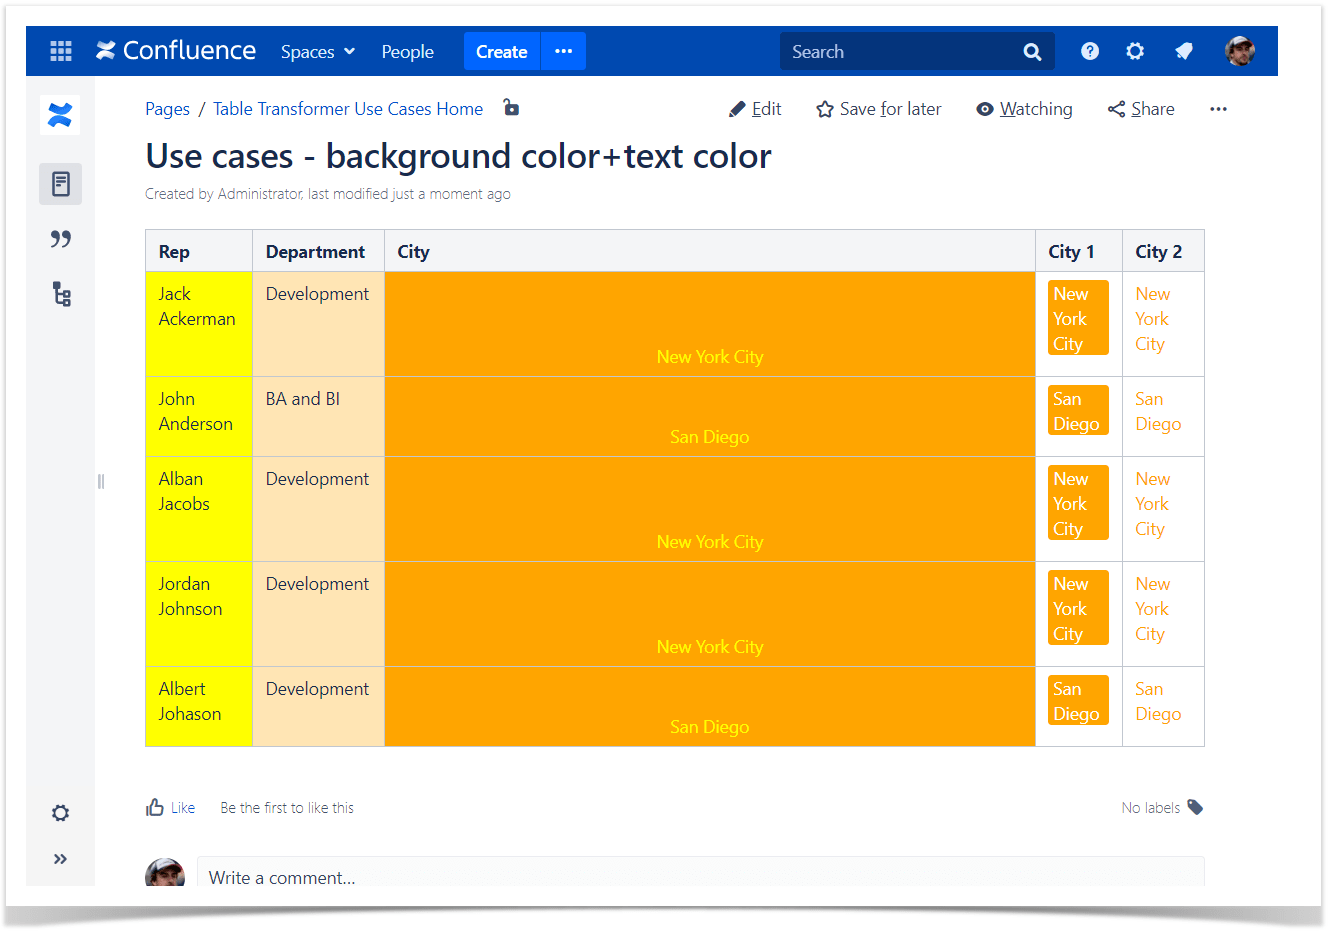
Adding background, text color
Use case:
You need to add background and text color.
Solution:
- Switch the page to the edit mode.
- Insert the Table Transformer macro and paste the table or the macros outputting tables within the macro body.
- Select the macro and click Edit.
- In the Presets tab select Custom transformation and click Next.
Enter the following SQL query:
SELECT
FORMATWIKI("{cell:bgColor=yellow}" + T1.'Rep' + "{cell}") AS 'Rep',
FORMATWIKI("{cell:bgColor=#FFE5B4}" + T1.'Department'+ "{cell}") AS 'Department',
FORMATWIKI("{cell:bgColor=orange|textColor=yellow|align=center|vertical-align=bottom|width=500px}"
+ T1.'City'+ "{cell}") AS 'City',
FORMATWIKI("{panel:bgColor=orange|textColor=white}" + T1.'City'+ "{panel}") AS 'City 1',
FORMATWIKI("{color:orange}" + T1.'City' + "{color}") AS 'City 2'
FROM T1
SQL
You can write both a color name from this list and your own HEX code in the SQL query.
Keep the following order of attribues: bgColor, textColor, align, width.
- Click Next.
- Define the table settings and view options if needed.
Save the macro and the page.
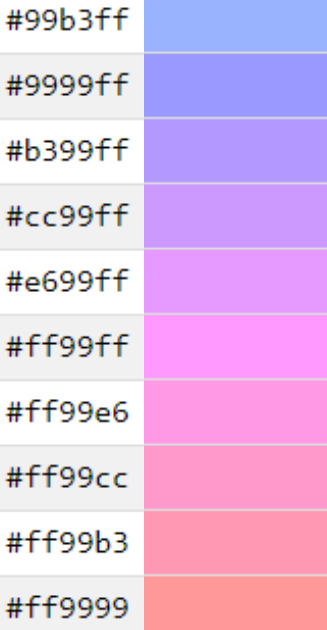
Hex codes:

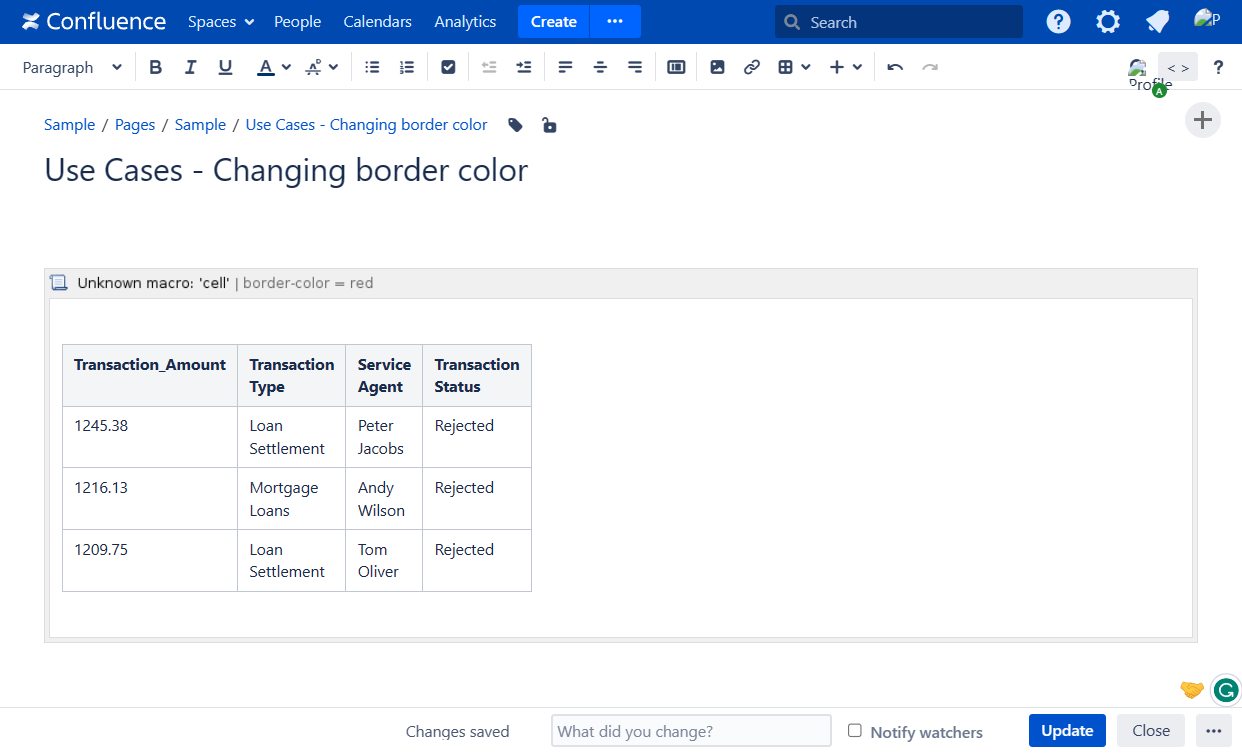
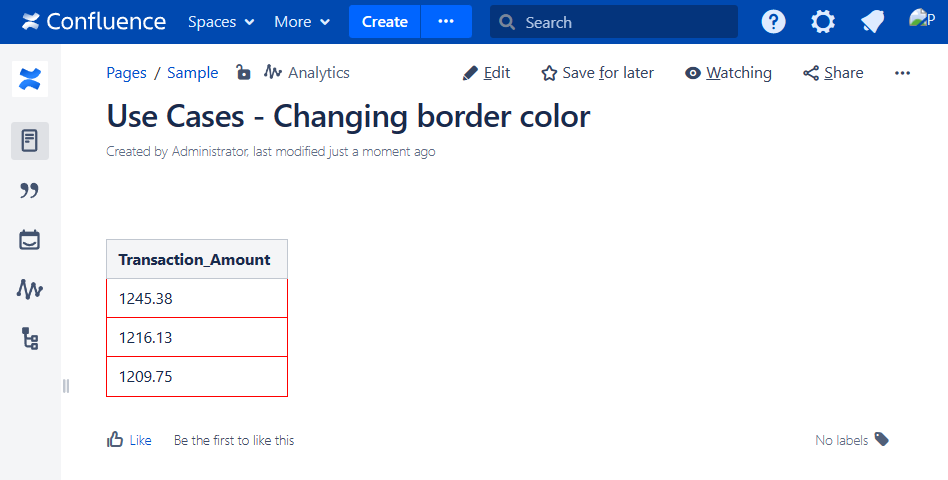
Adding border color
Use case:
You need to adjust the color of a given column/table.
Solution:
- Switch the page to the edit mode.
- Insert the Table Transformer macro and paste the table or the macros outputting tables within the macro body.
- Select the macro and click Edit.
- In the Presets tab select Custom transformation and click Next.
Enter either of the following SQL query patterns:
SELECT FORMATWIKI("{cell:border-color=red}",T1.'Transaction_Amount',"{cell}") AS 'Transaction_Amount' FROM T*SQLClick Next.
Define the table settings and view options if needed.
Save the macro and the page.

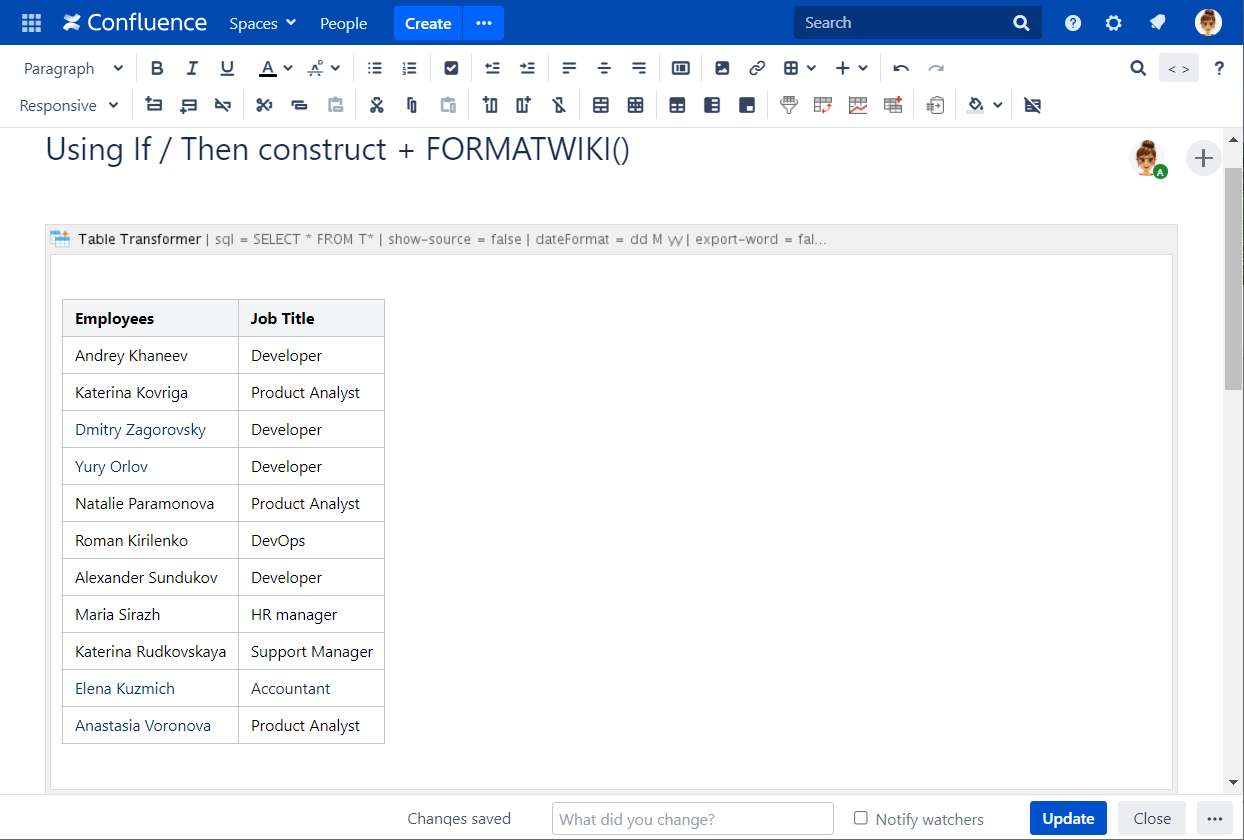
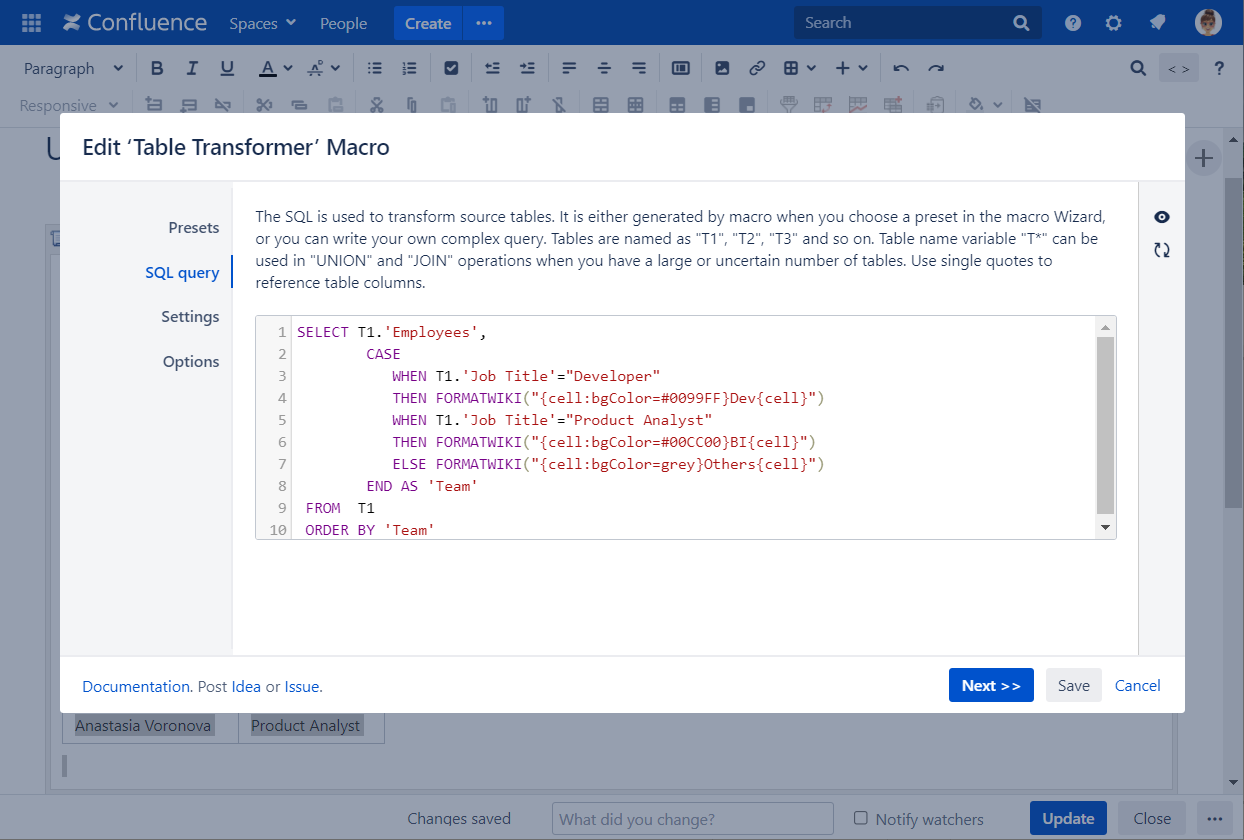
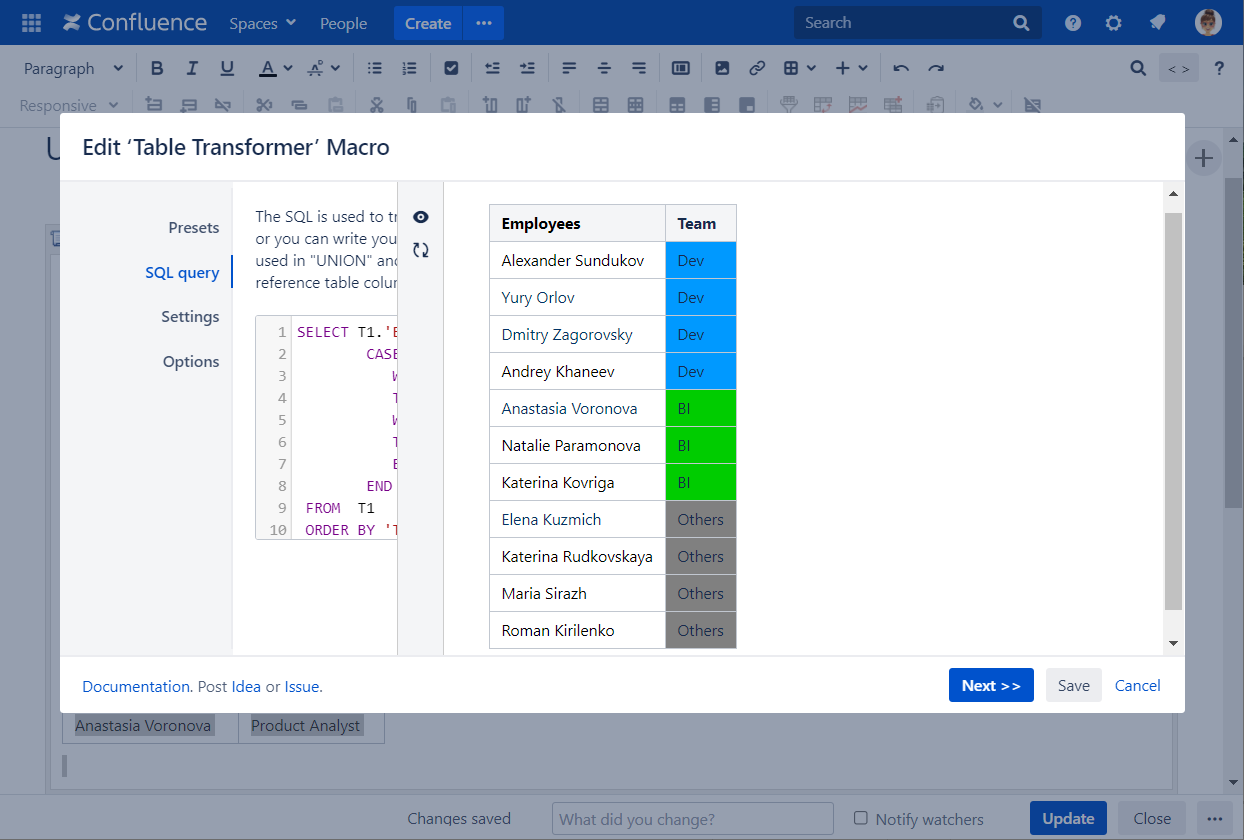
Conditional inserting of values and coloring cells background
Use case:
You need to add values in a newly created column and color its cells through conditions.
Solution:
Switch the page to the edit mode.
Insert the Table Transformer macro and paste the table or the macros outputting tables within the macro body.
Select the macro and click Edit.
In the Presets tab select Custom transformation and click Next.
Enter the following SQL query:
SELECT T1.'Employees', CASE WHEN T1.'Job Title'="Developer" THEN FORMATWIKI("{cell:bgColor=#0099FF}Dev{cell}") WHEN T1.'Job Title'="Product Analyst" THEN FORMATWIKI("{cell:bgColor=#00CC00}BI{cell}") ELSE FORMATWIKI("{cell:bgColor=grey}Others{cell}") END AS 'Team' FROM T1 ORDER BY 'Team'SQLClick Next.
Define the table settings and view options if needed.
Save the macro and the page.
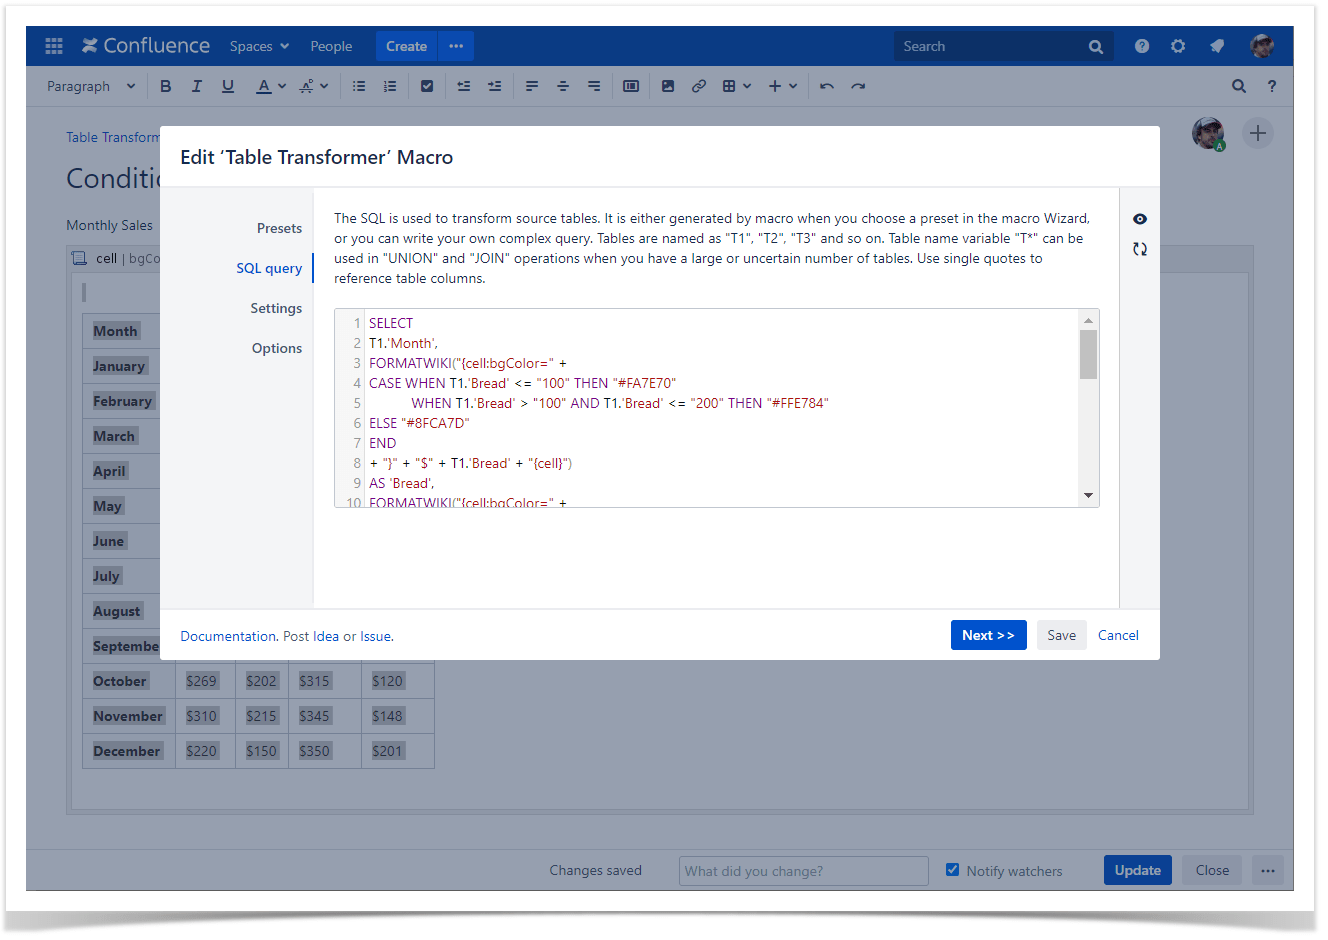
Conditional formatting
Use case:
You need to add conditional formatting of table data.
Solution:
Switch the page to the edit mode.
Insert the Table Transformer macro and paste the table or the macros outputting tables within the macro body.
Select the macro and click Edit.
In the Presets tab select Custom transformation and click Next.
Enter the following SQL query:
SELECT T1.'Month', FORMATWIKI("{cell:bgColor=" + CASE WHEN T1.'Bread' <= "100" THEN "#FA7E70" WHEN T1.'Bread' > "100" AND T1.'Bread' <= "200" THEN "#FFE784" ELSE "#8FCA7D" END + "}" + "$" + T1.'Bread' + "{cell}") AS 'Bread', FORMATWIKI("{cell:bgColor=" + CASE WHEN T1.'Rolls' <= "100" THEN "#FA7E70" WHEN T1.'Rolls' > "100" AND T1.'Rolls' <= "200" THEN "#FFE784" ELSE "#8FCA7D" END + "}" + "$" + T1.'Rolls' + "{cell}") AS 'Rolls', FORMATWIKI("{cell:bgColor=" + CASE WHEN T1.'Cookies' <= "100" THEN "#FA7E70" WHEN T1.'Cookies' > "100" AND T1.'Cookies' <= "200" THEN "#FFE784" ELSE "#8FCA7D" END + "}" + "$" + T1.'Cookies' + "{cell}") AS 'Cookies', FORMATWIKI("{cell:bgColor=" + CASE WHEN T1.'Muffins' <= "100" THEN "#FA7E70" WHEN T1.'Muffins' > "100" AND T1.'Muffins' <= "200" THEN "#FFE784" ELSE "#8FCA7D" END + "}" + "$" + T1.'Muffins' + "{cell}") AS 'Muffins' FROM T*SQLClick Next.
Define the table settings and view options if needed.
Save the macro and the page.


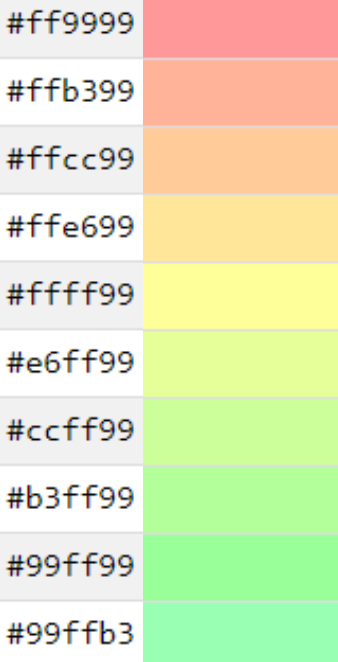
Hex codes:
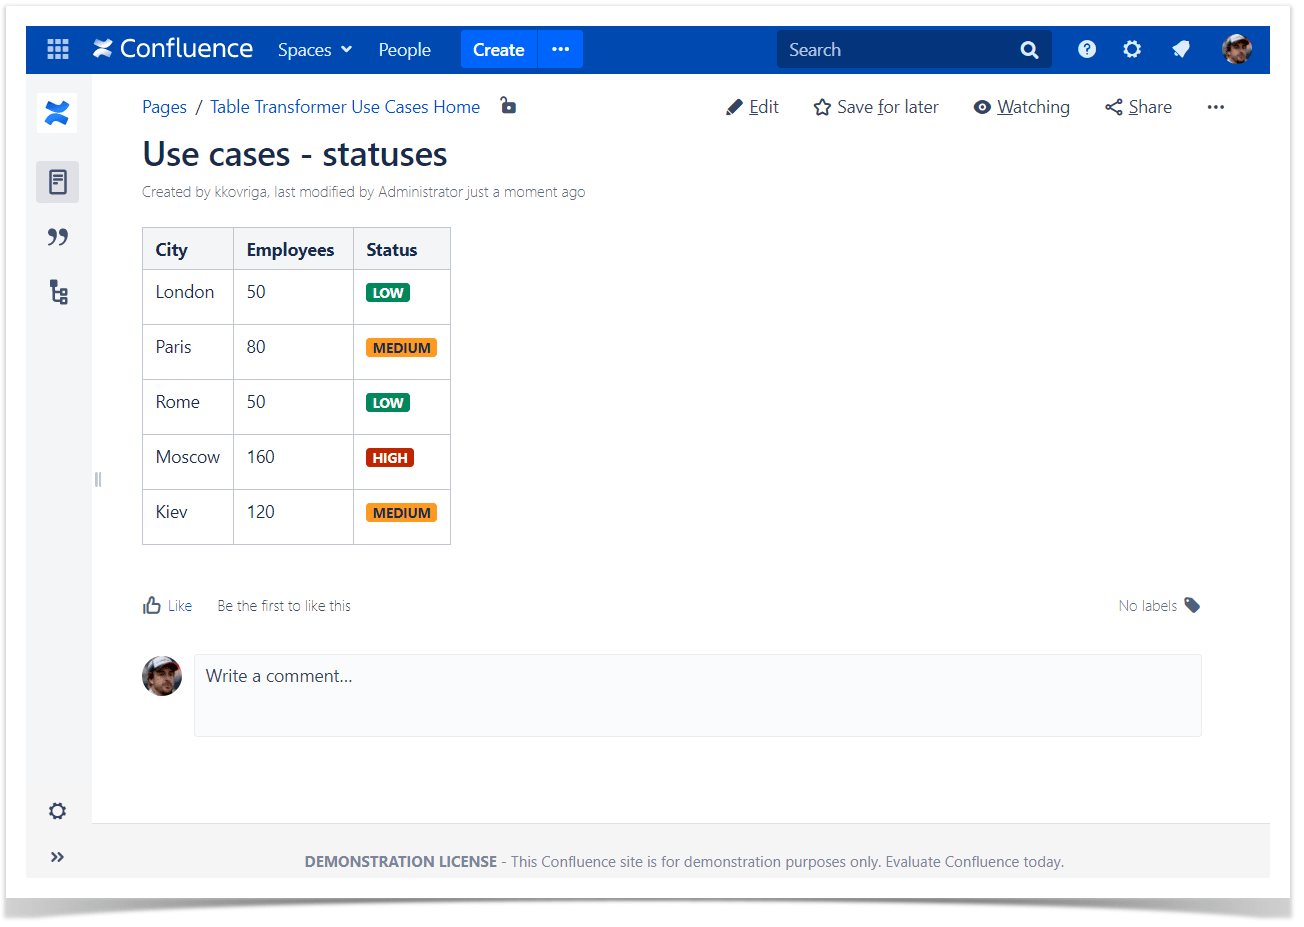
Conditional inserting of statuses
Use case:
You need to insert statuses depending on some condition.
Solution:
Switch the page to the edit mode.
Insert the Table Transformer macro and paste the table or the macros outputting tables within the macro body.
Select the macro and click Edit.
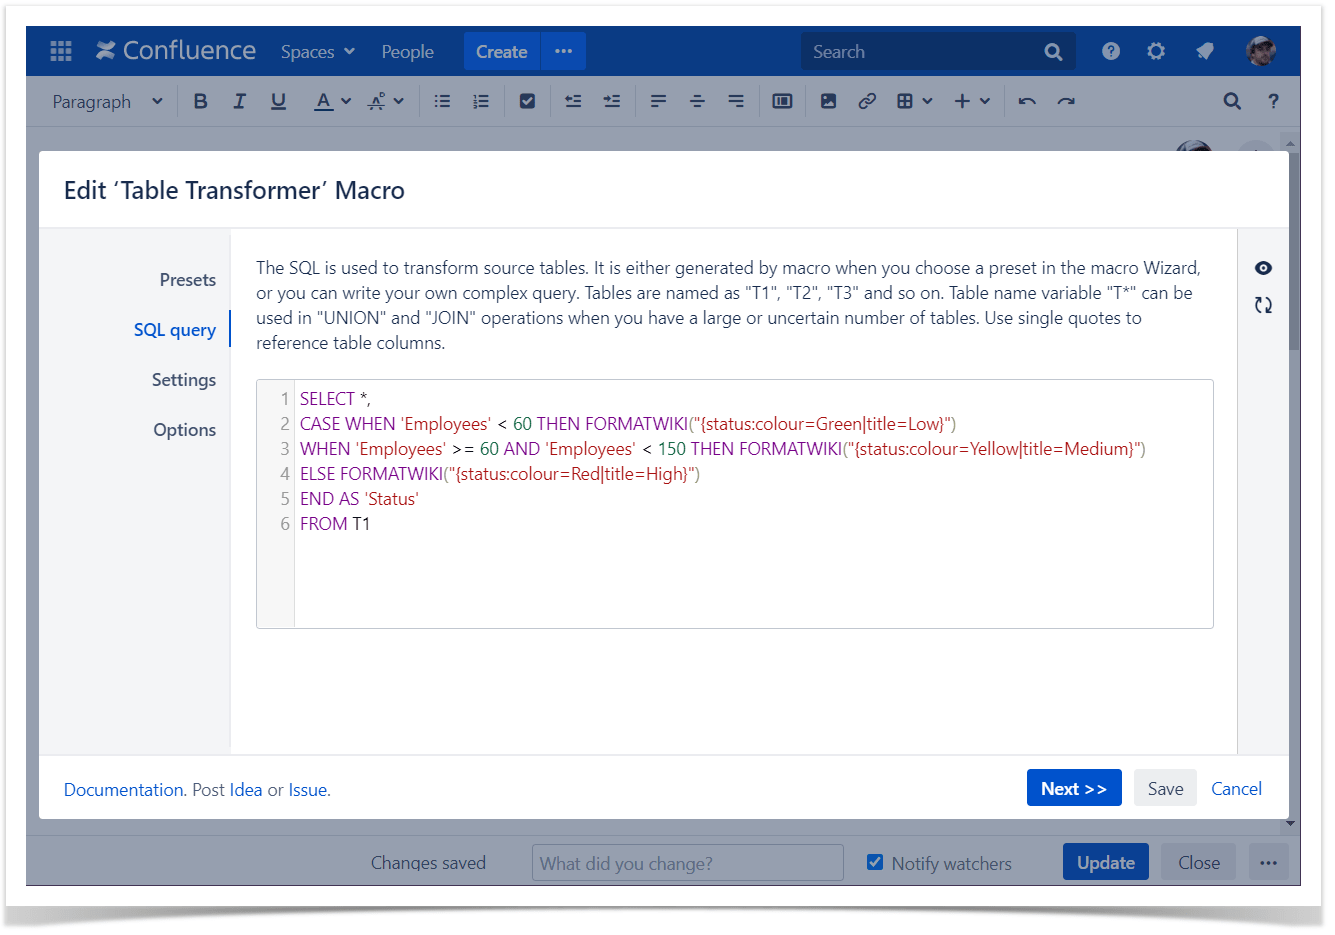
In the Presets tab select Custom transformation and click Next.
Enter the following SQL query:
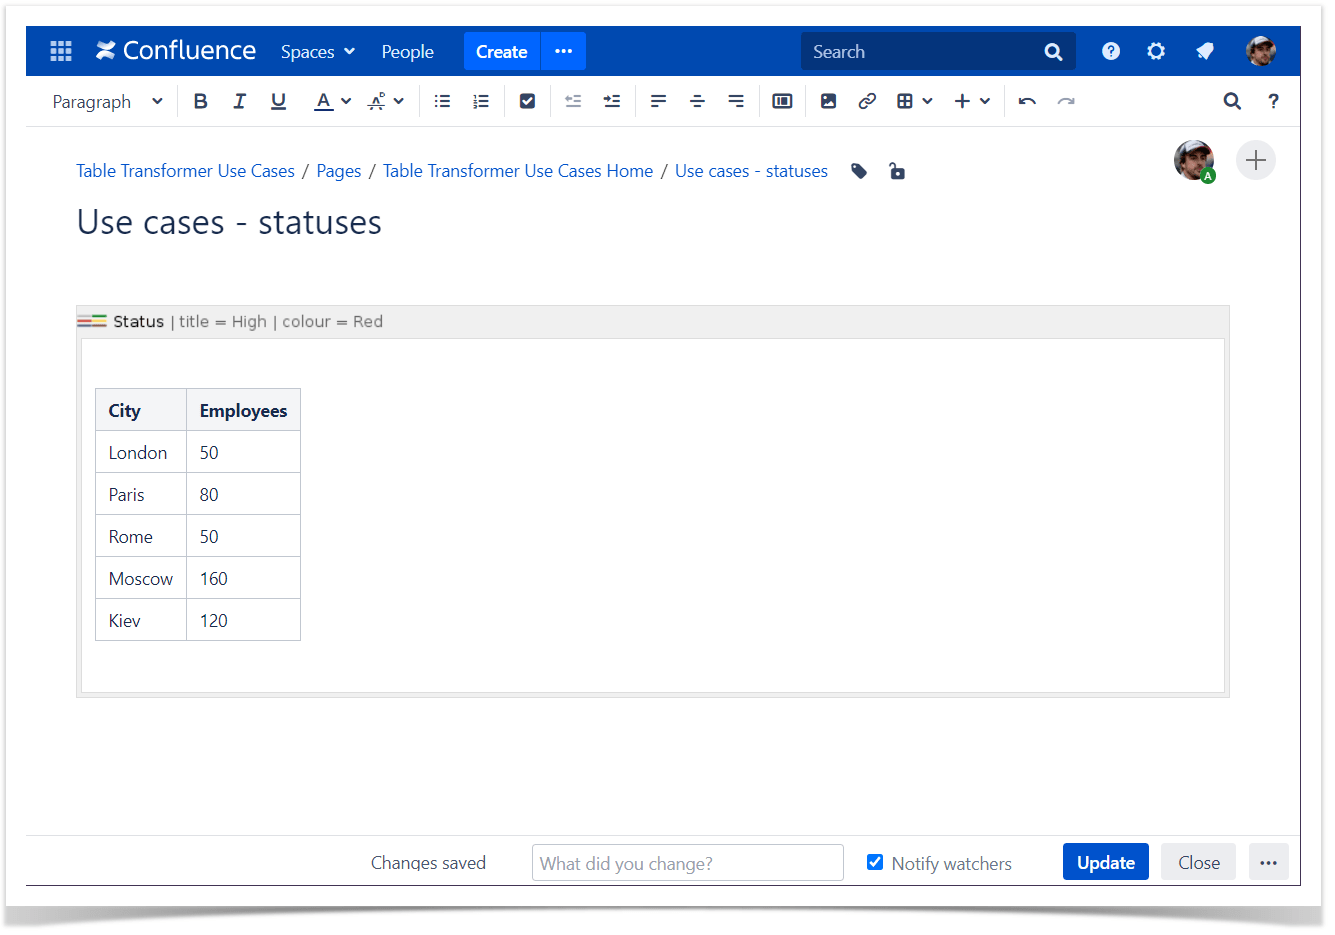
SELECT *, CASE WHEN 'Employees' < 60 THEN FORMATWIKI("{status:colour=Green|title=Low}") WHEN 'Employees' >= 60 AND 'Employees' < 150 THEN FORMATWIKI("{status:colour=Yellow|title=Medium}") ELSE FORMATWIKI("{status:colour=Red|title=High}") END AS 'Status' FROM T1SQLClick Next.
Define the table settings and view options if needed.
Save the macro and the page.
You can also use an alternative way of inserting statuses in a table.
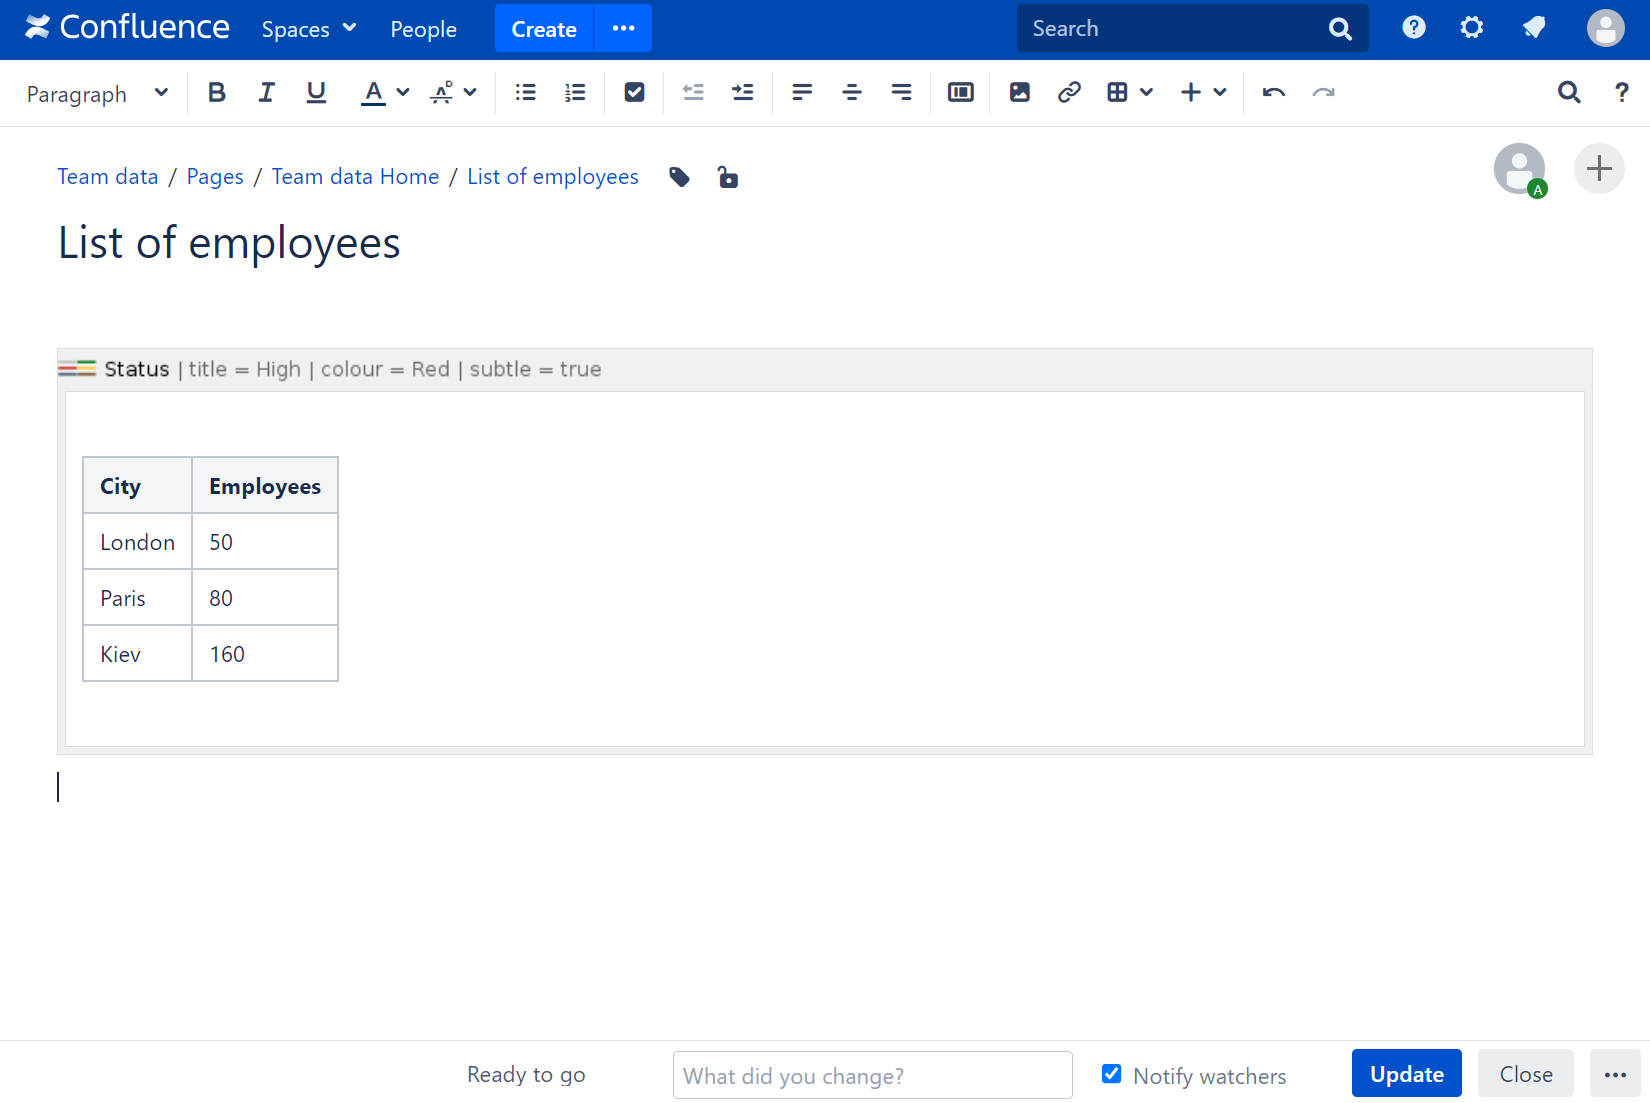
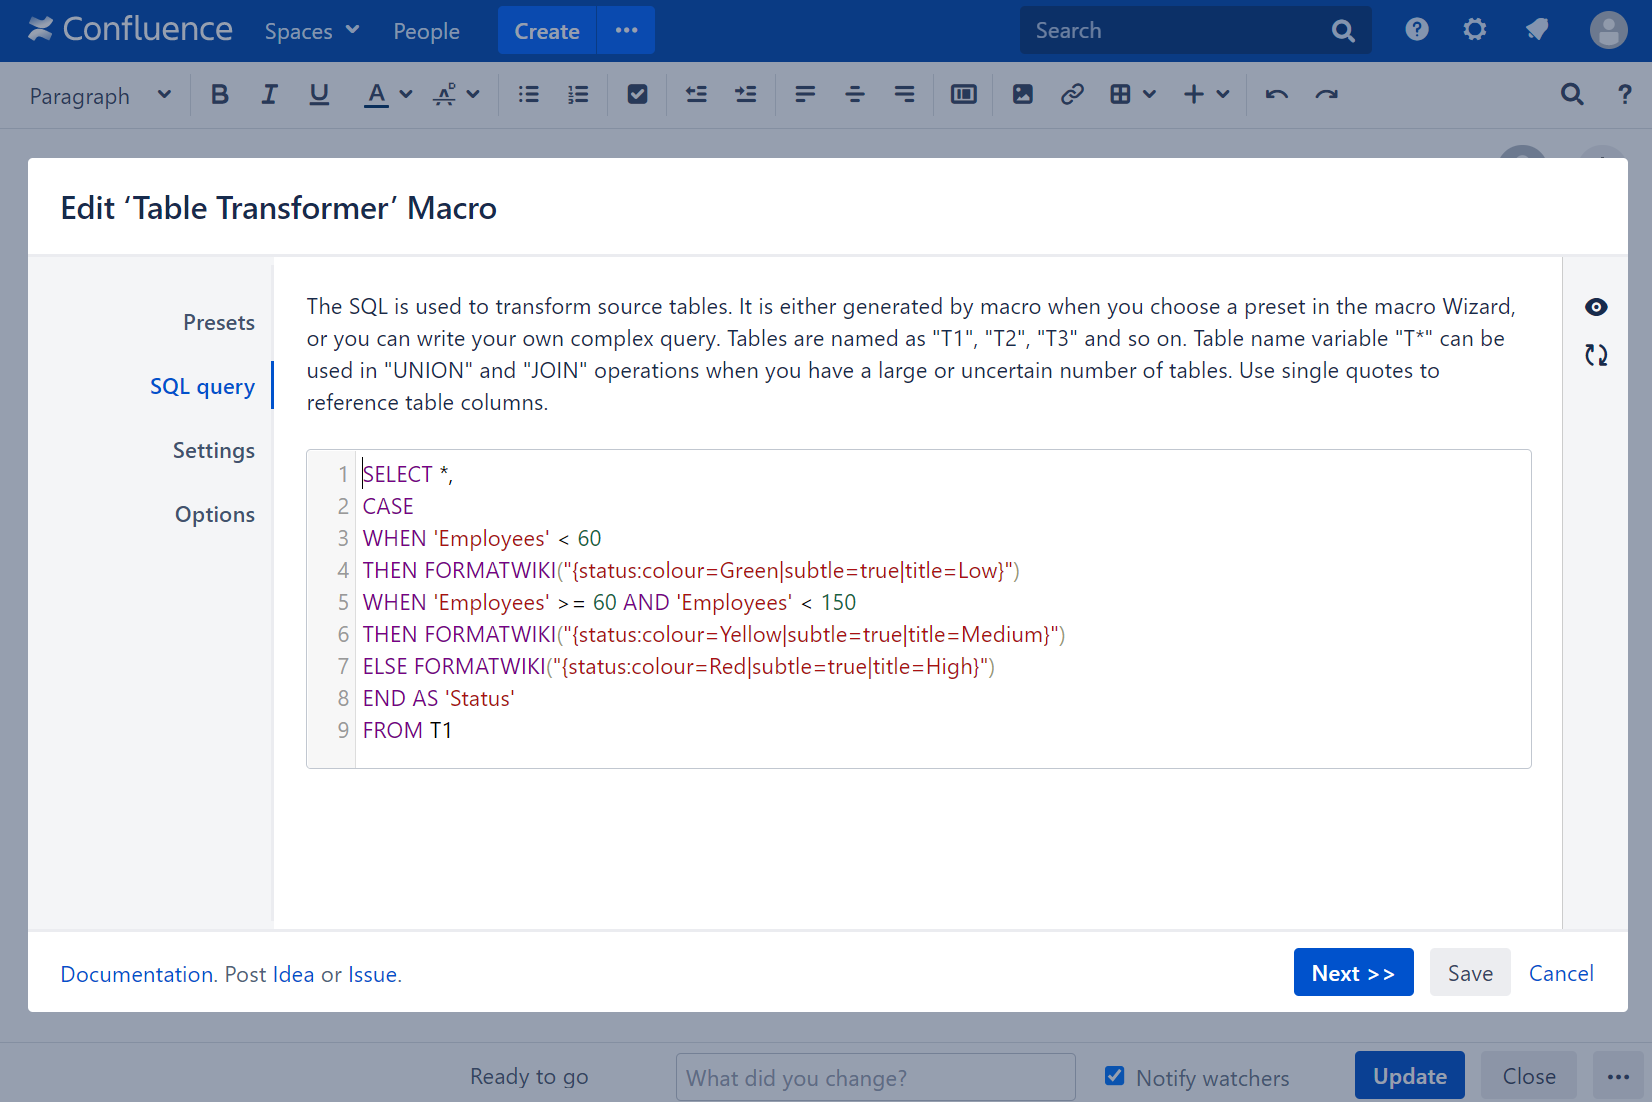
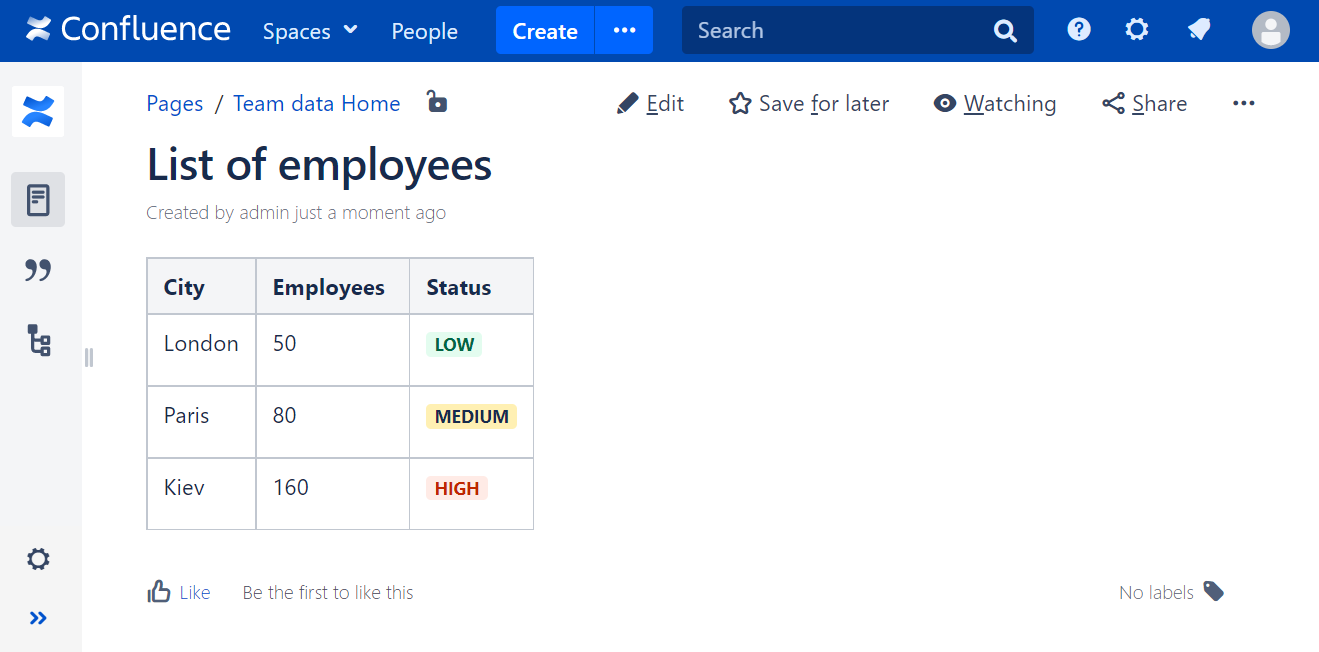
Adding lighter status color
Use case:
You need to choose a lighter status color.
Solution:
- Switch the page to the edit mode.
- Insert the Status macro and paste the table or the macros outputting tables within the macro body.
- Select the macro and click Edit.
- In the Presets tab select Custom transformation and click Next.
Enter the following SQL query:
SELECT *, CASE WHEN 'Employees' < 60 THEN FORMATWIKI("{status:colour=Green|subtle=true|title=Low}") WHEN 'Employees' >= 60 AND 'Employees' < 150 THEN FORMATWIKI("{status:colour=Yellow|subtle=true|title=Medium}") ELSE FORMATWIKI("{status:colour=Red|subtle=true|title=High}") END AS 'Status' FROM T1SQL- Click Next.
- Define the table settings and view options if needed.
Save the macro and the page.
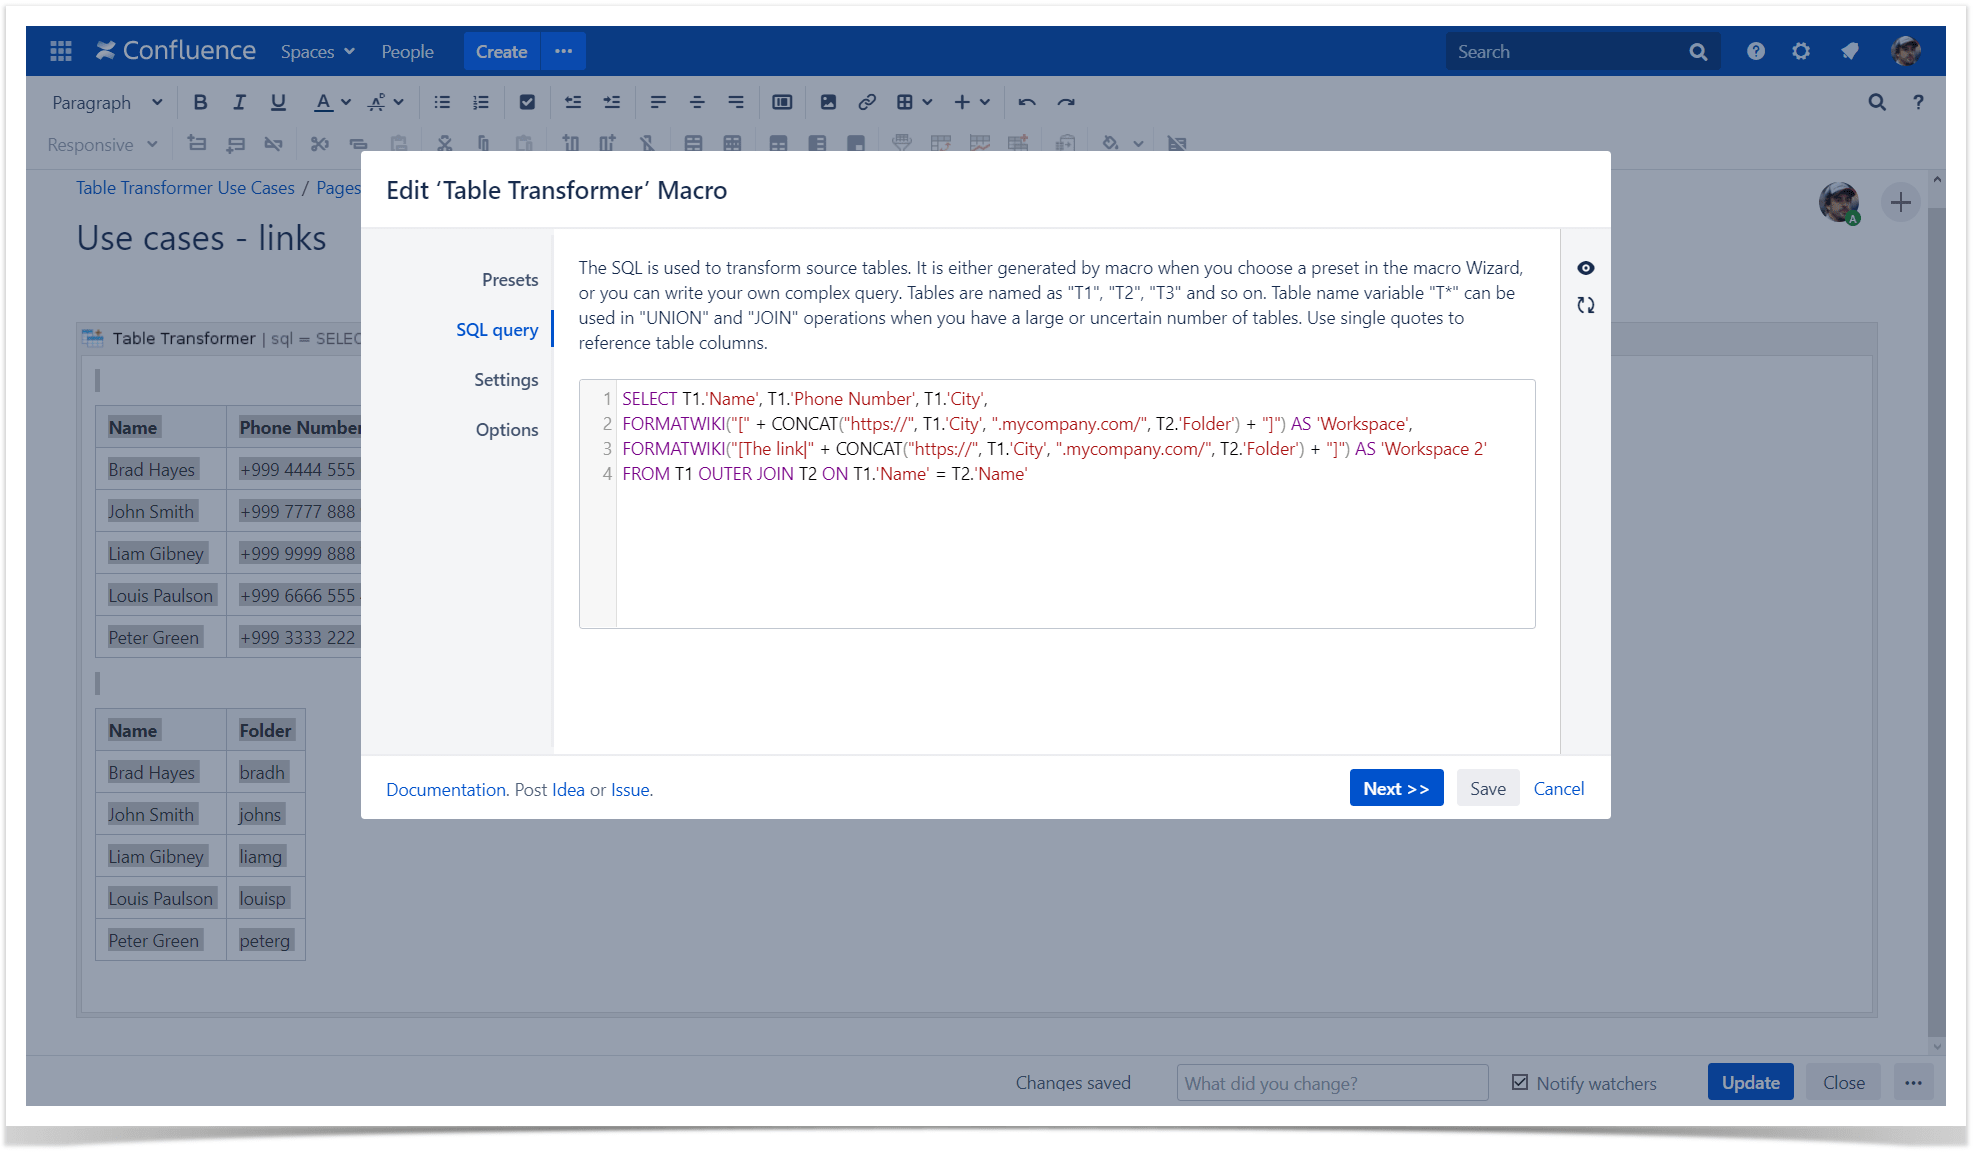
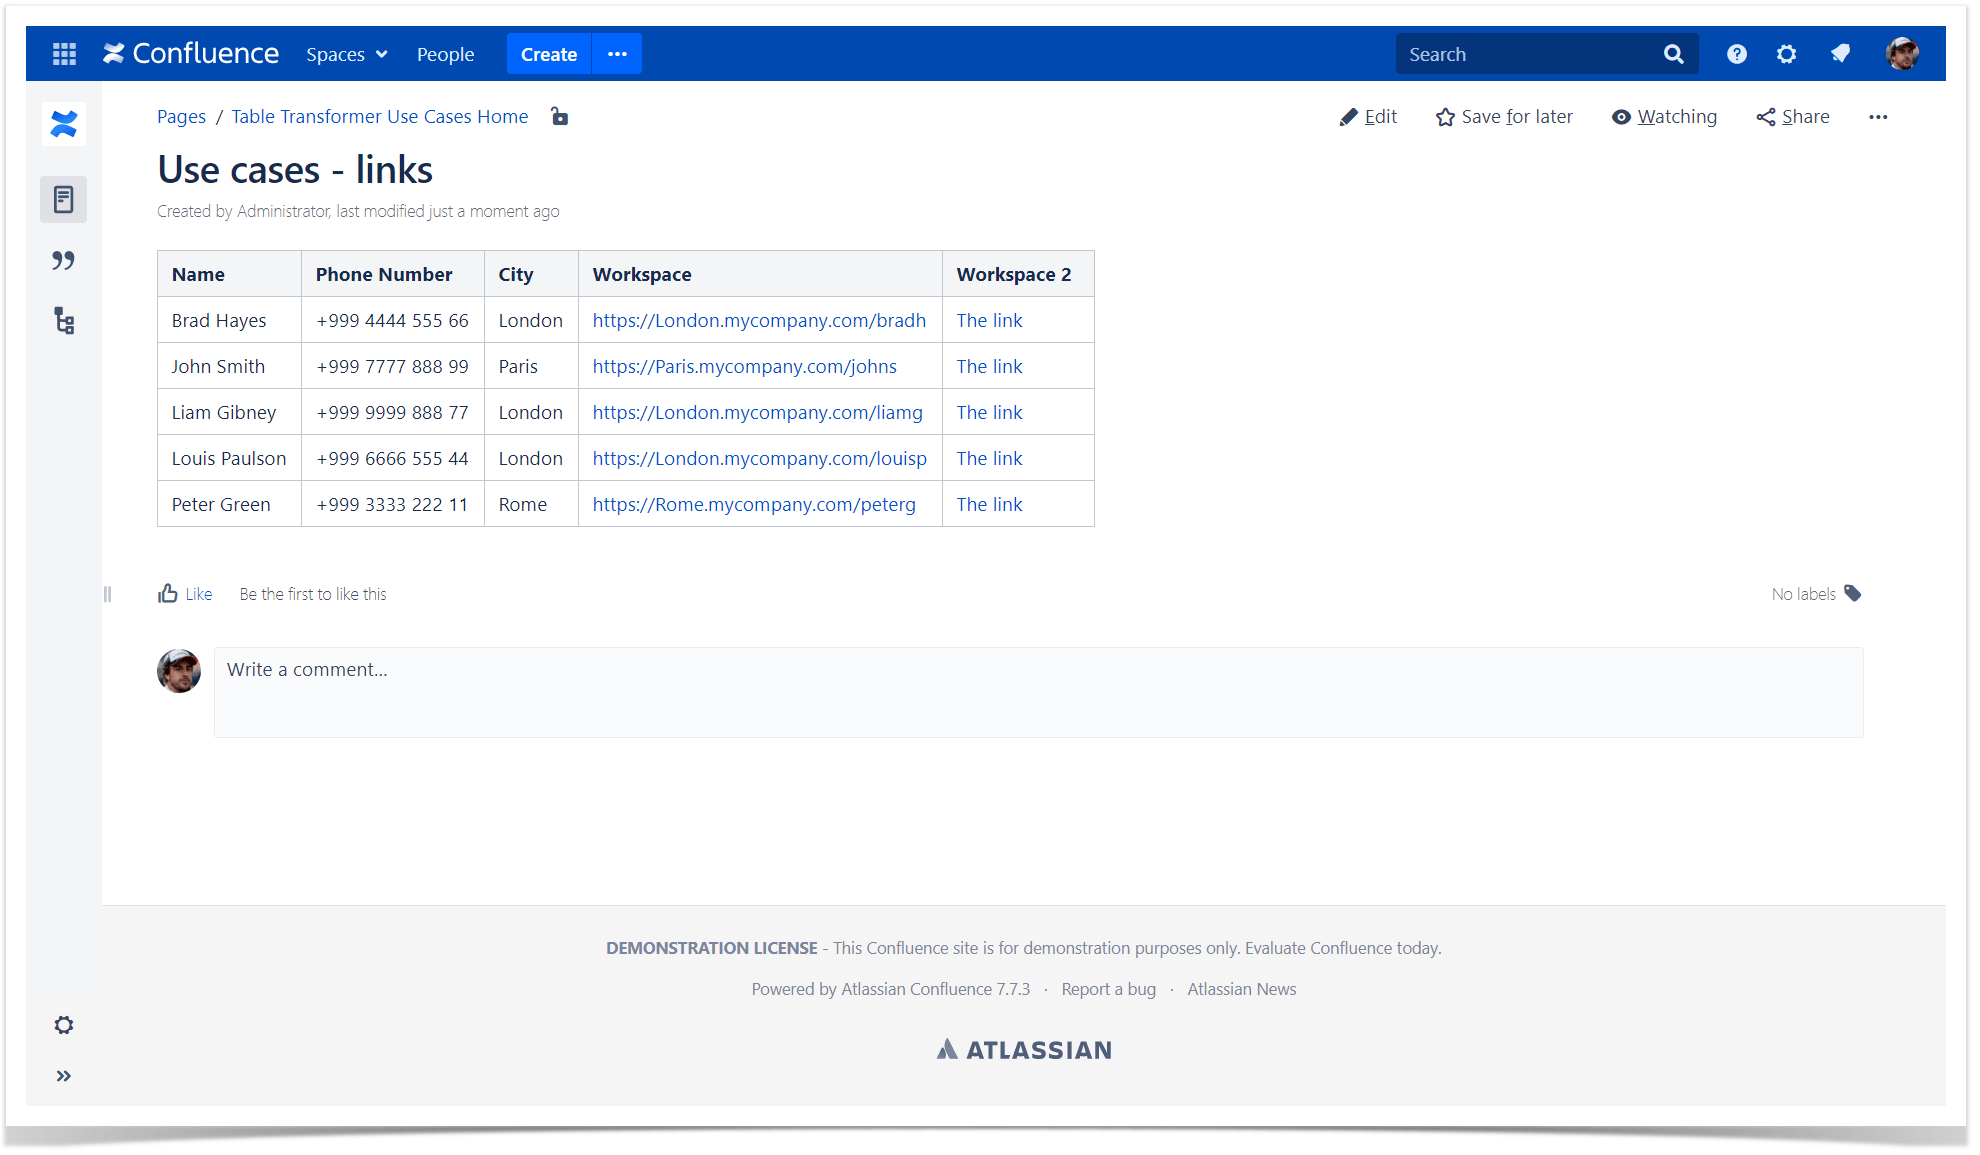
Creating clickable links
Use case:
You need to create clickable links from multiple text pieces put together.
Solution:
Switch the page to the edit mode.
Insert the Table Transformer macro and paste the table or the macros outputting tables within the macro body.
Select the macro and click Edit.
In the Presets tab select Custom transformation and click Next.
Enter the following SQL query:
SELECT T1.'Name', T1.'Phone Number', T1.'City', FORMATWIKI("[" + CONCAT("https://", T1.'City', ".mycompany.com/", T2.'Folder') + "]") AS 'Workspace', FORMATWIKI("[The link|" + CONCAT("https://", T1.'City', ".mycompany.com/", T2.'Folder') + "]") AS 'Workspace 2' FROM T1 OUTER JOIN T2 ON T1.'Name' = T2.'Name'SQLClick Next.
Define the table settings and view options if needed.
Save the macro and the page.
Here's the example on how to create them to the JIRA issues.

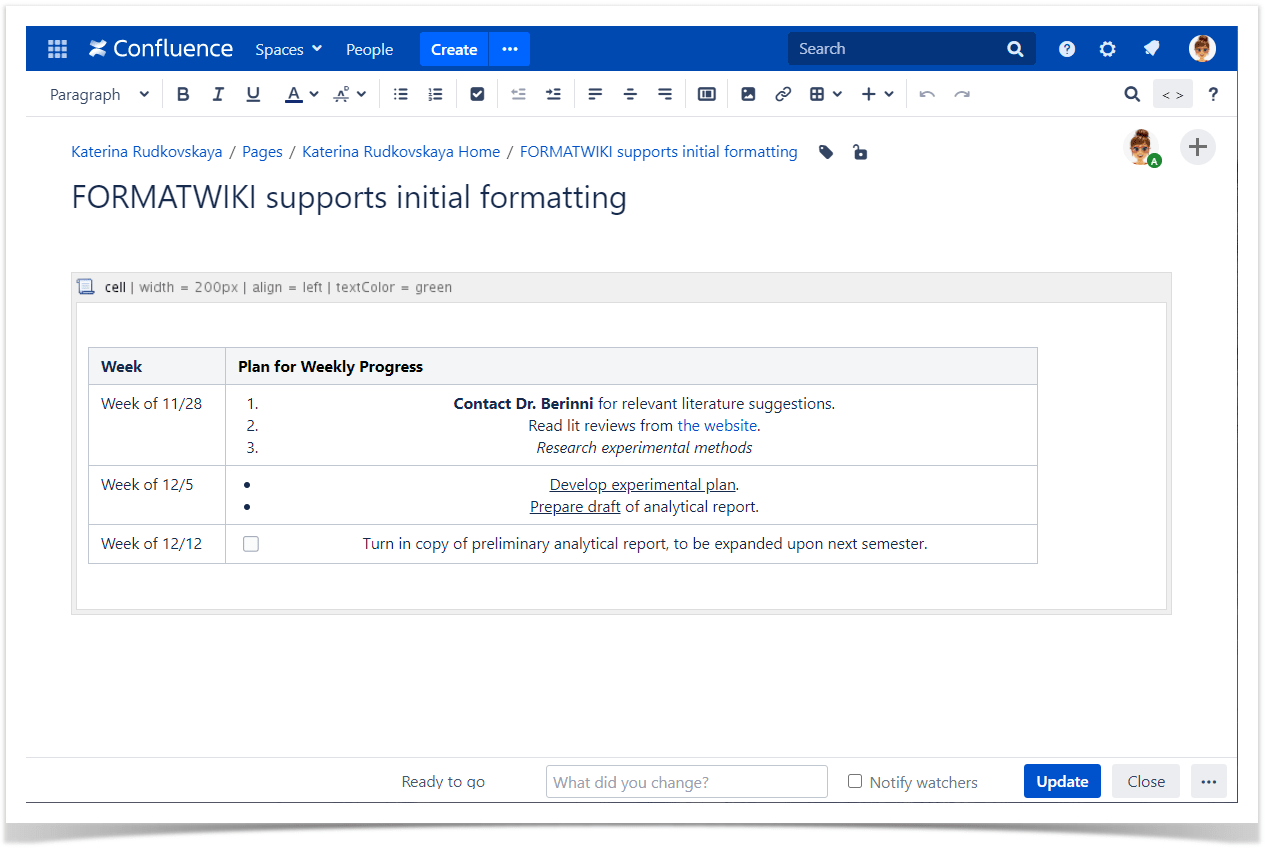
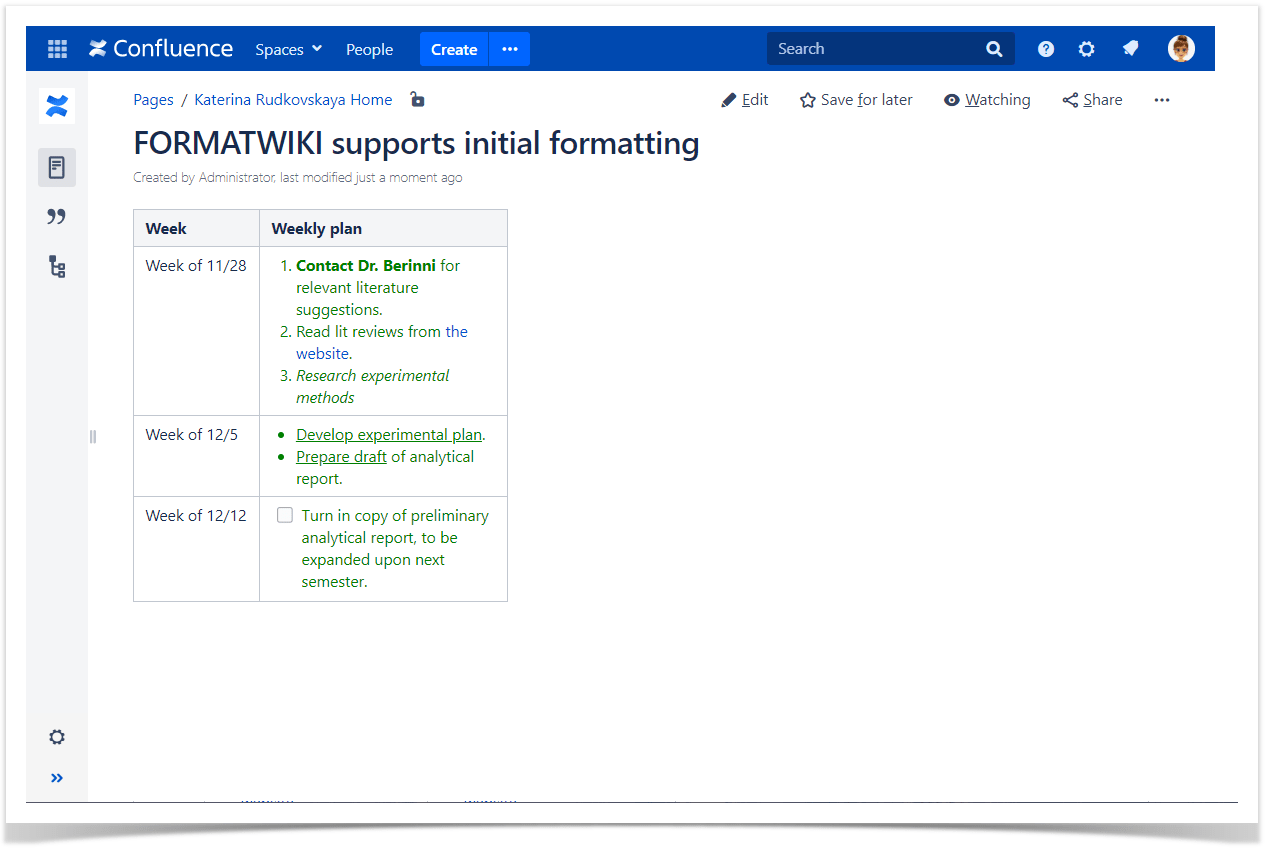
Preserving initial cell formatting
Use case:
You need to preserve the initial formatting and apply a new one.
Solution:
Switch the page to the edit mode.
Insert the Table Transformer macro and paste the table or the macros outputting tables within the macro body.
Select the macro and click Edit.
In the Presets tab select Custom transformation and click Next.
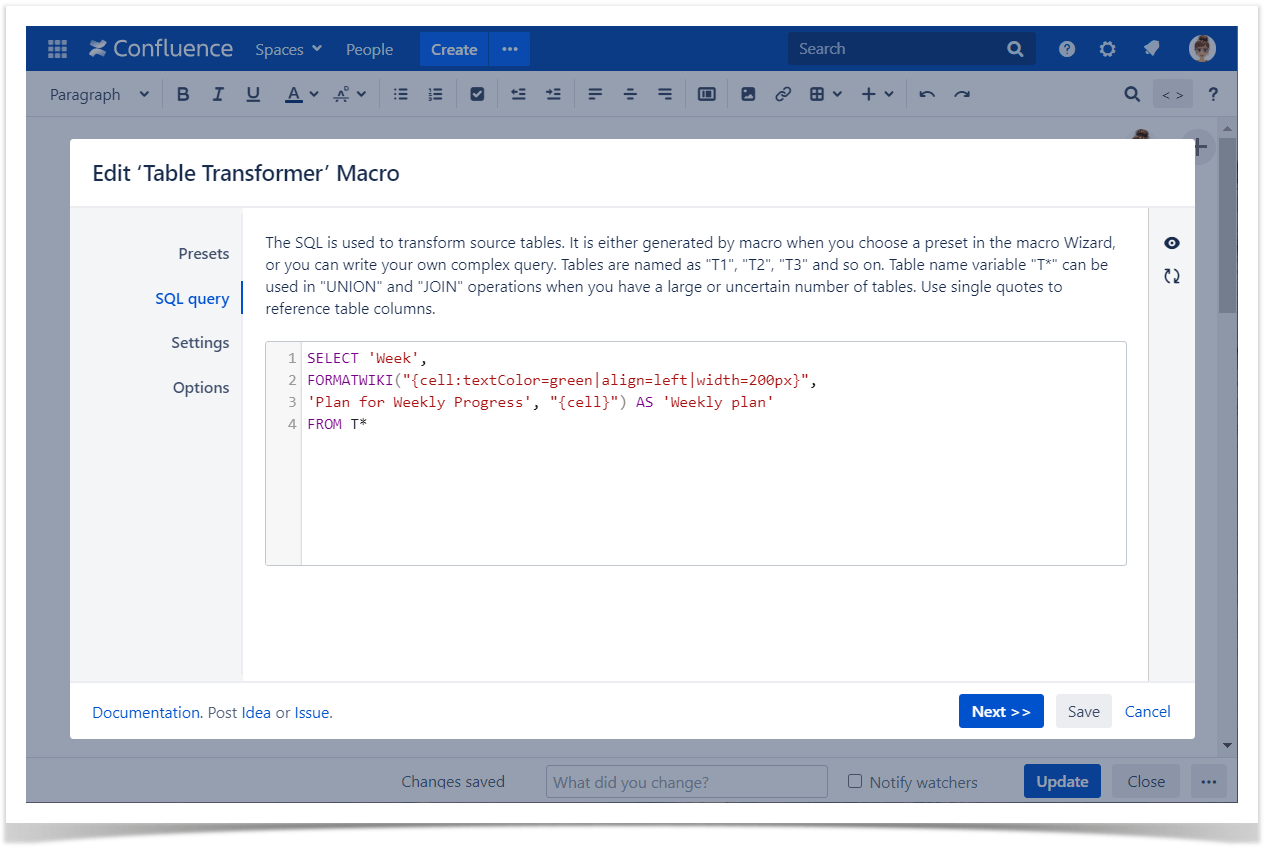
Enter the following SQL query:
SELECT 'Week', FORMATWIKI("{cell:textColor=green|align=left|width=200px}", 'Plan for Weekly Progress', "{cell}") AS 'Weekly plan' FROM T*SQLClick Next.
Define the table settings and view options if needed.
Save the macro and the page.
Preserving initial cell formatting doesn't work in case of rows concatenation.