| Excerpt | ||
|---|---|---|
| ||
|

Inserting the macros
In the page view modeTo enable live filtration in headers:
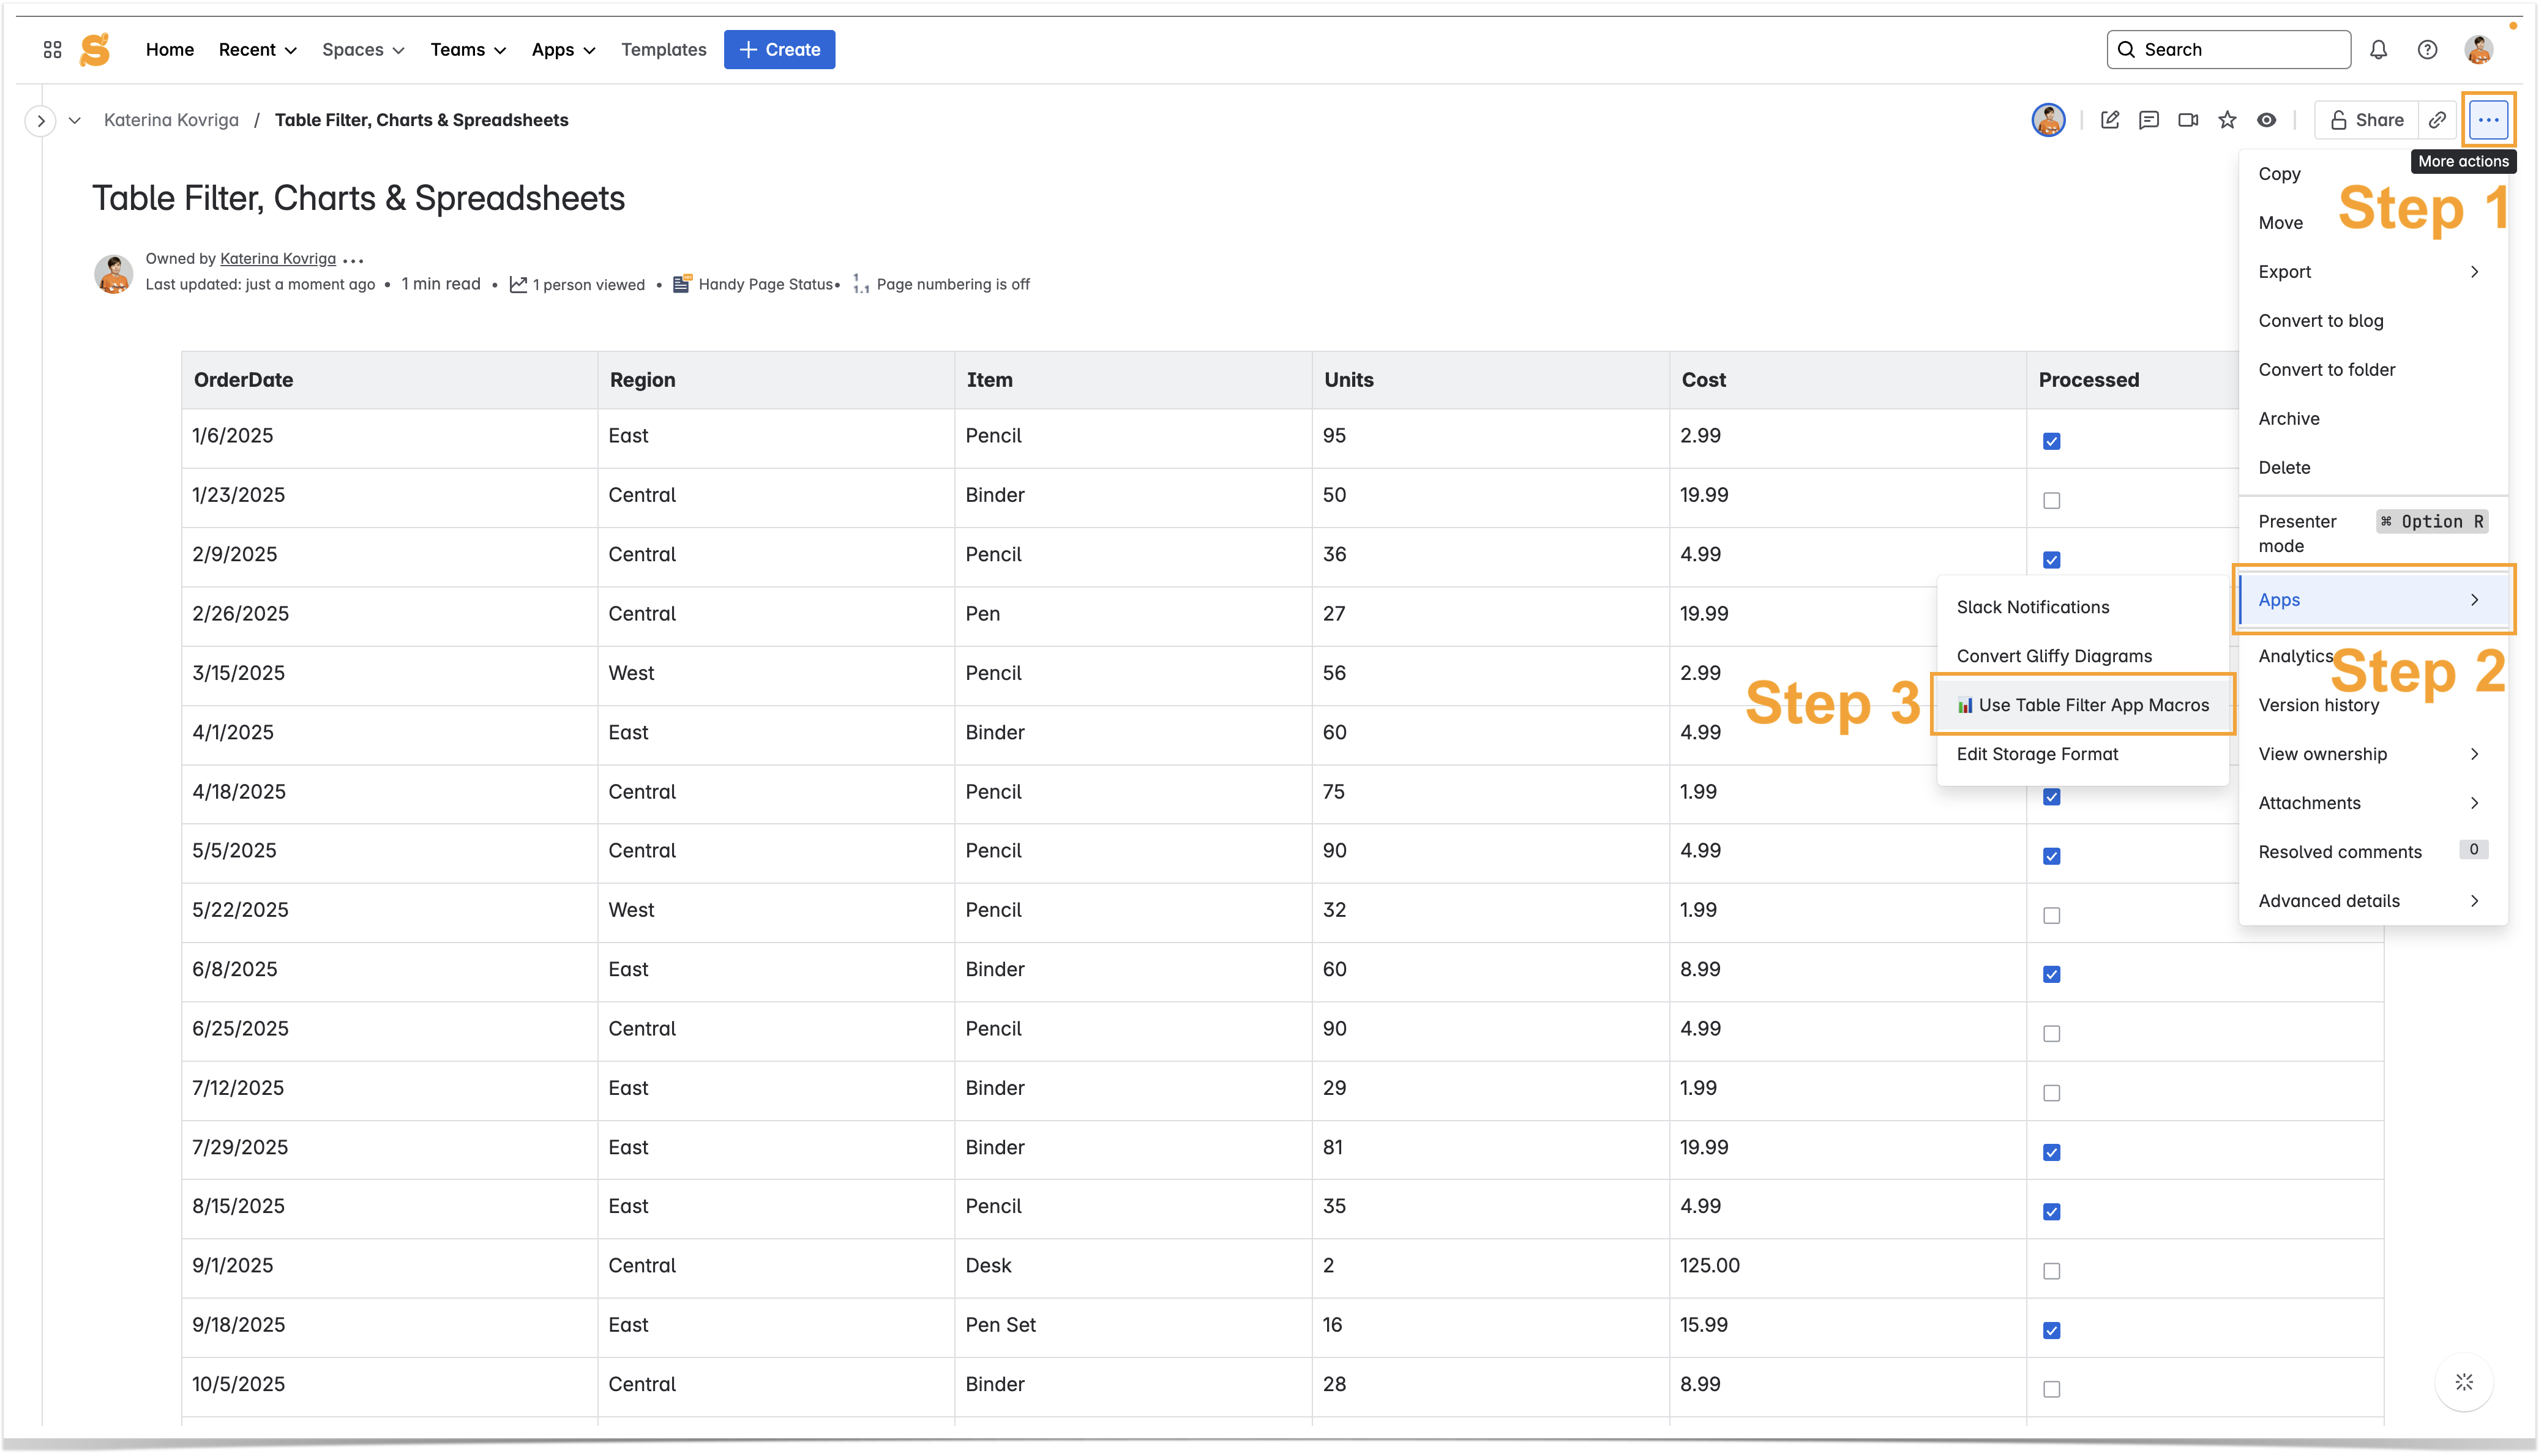
To add macros live (i.e. in view mode):
- Click the More actions (⋯) menu in the top-Click the
 button on the top right corner of the page beside the Edit button..
 - Go to Apps → Use Table Filter App Macros.
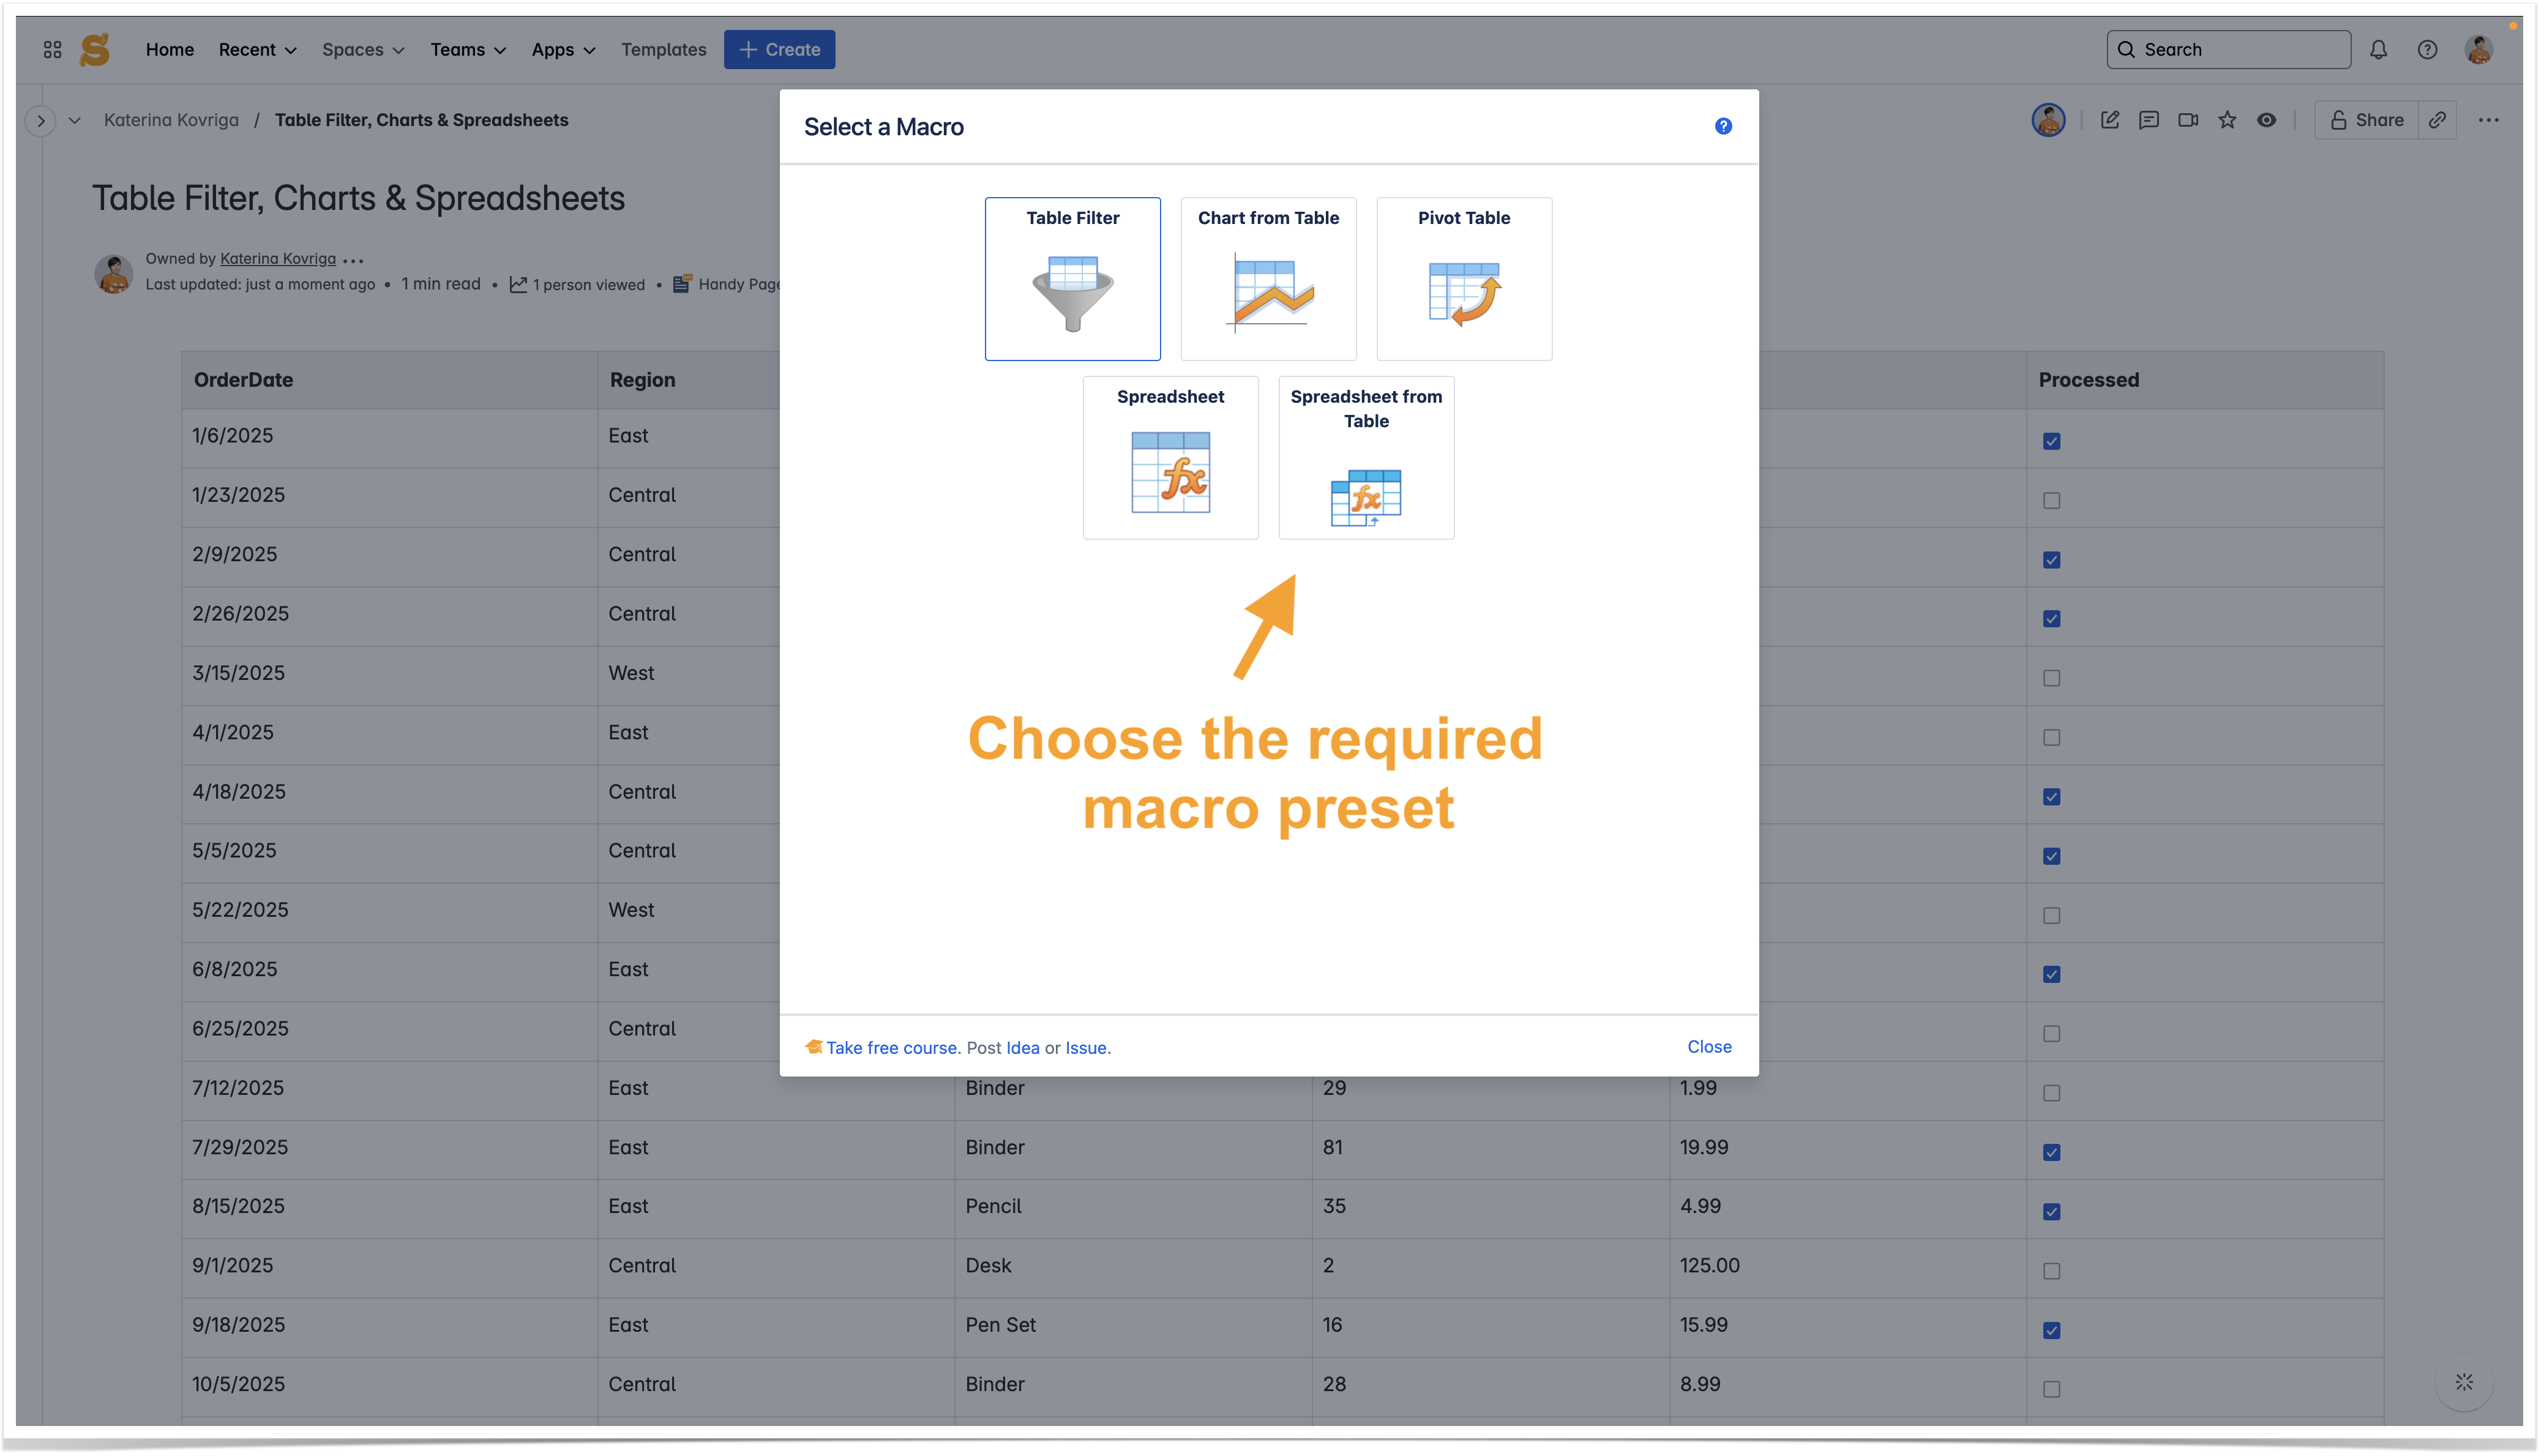
- Choose the required preset and follow Click Enable in the dialog.Start
For example, choose the Table Filter macro and start filtering data
inin table headers.
| Handy Tip | ||
|---|---|---|
| ||
Learn more on this page .
|

| Handy Carousel |
|---|
|


| Info |
|---|
Utilize the benefits of Excel-like spreadsheets right on your Confluence pages. Try spreadsheets for Confluence now! |
Learn more about live table filtration in headers on this page.
To insert the macros:
- Open a page with a table.
- Hover over the table.
- Click the
 icon.
icon. - Select one of the options:
- Filter table data
 (to display the filtration panel)
 - Create a pivot table

- Create a chart from data series
 .
.
- Filter table data
| Info |
|---|
You can disable the inline macro insertion and live filtration on a global or individual basis. |

Through the action icon in the editor
- Switch Confluence page to the edit mode.
- Position the mouse pointer within Place the cursor inside the table.
- On the editor pane, click the Filter table data
 or Create a pivot table
 or Create a chart from data series
 icon.
icon.

Manual
entering
- Switch Confluence page to the edit mode.
- Click on the line where you want to insert the macro.
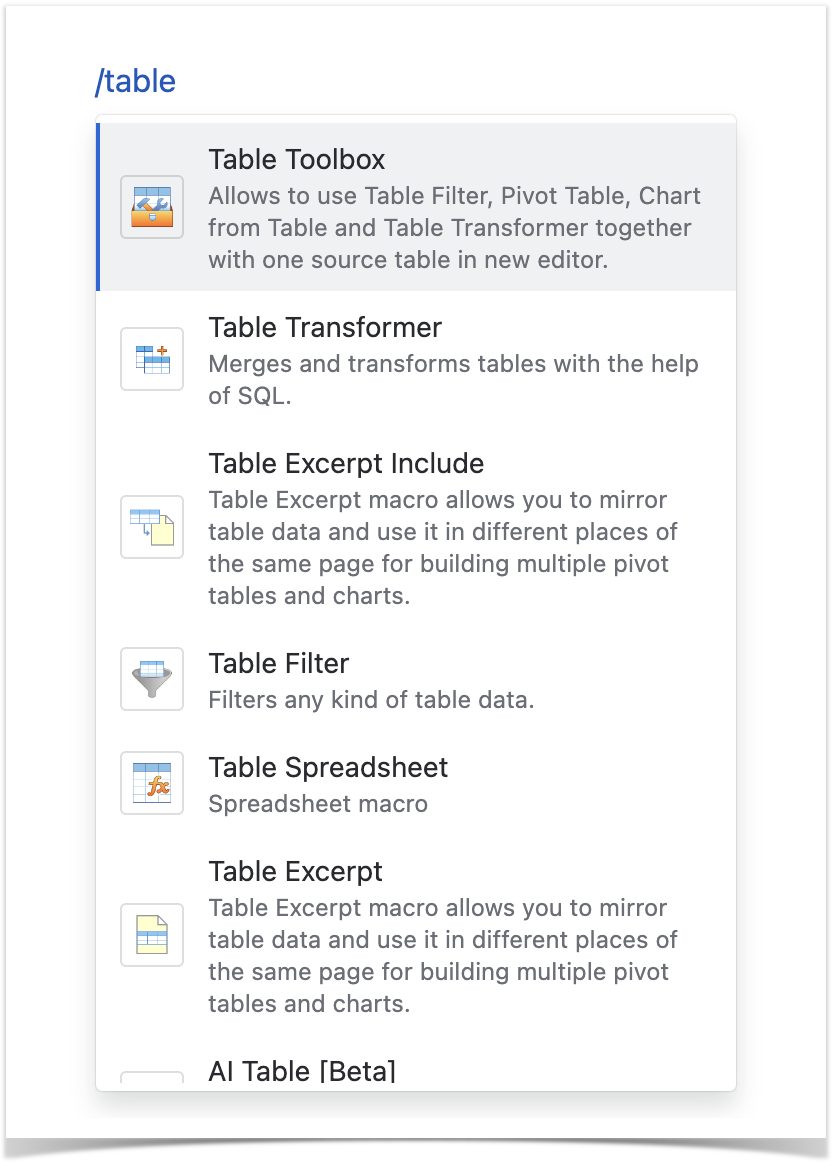
- Start entering
- /Table Filter
- ,
- /Pivot Table
- ,
- /Chart from Table
- ,
- /Table Transformer
- ,
- /Table
- Toolbox, etc. (for the
- new editor on Cloud)
- {Table Filter},
- {Pivot Table},
- {Chart from Table},
- {Table Transformer},
- {Table
- Toolbox}, etc. (for the
- legacy editor on Cloud )
- From the prompted list of macro choices, select the macro.
- Place the table within the macro.
- Switch Confluence page to the edit mode.
- Click on the line where you want to insert the macro.
- Start entering
- {Table Filter},
- {Pivot Table},
- {Chart from Table},
- {Table Transformer}, {Table Excerpt},
- {Table
- from CSV}, etc.
- From the prompted list of macro choices, select the macro.
- Place the table within the macro.

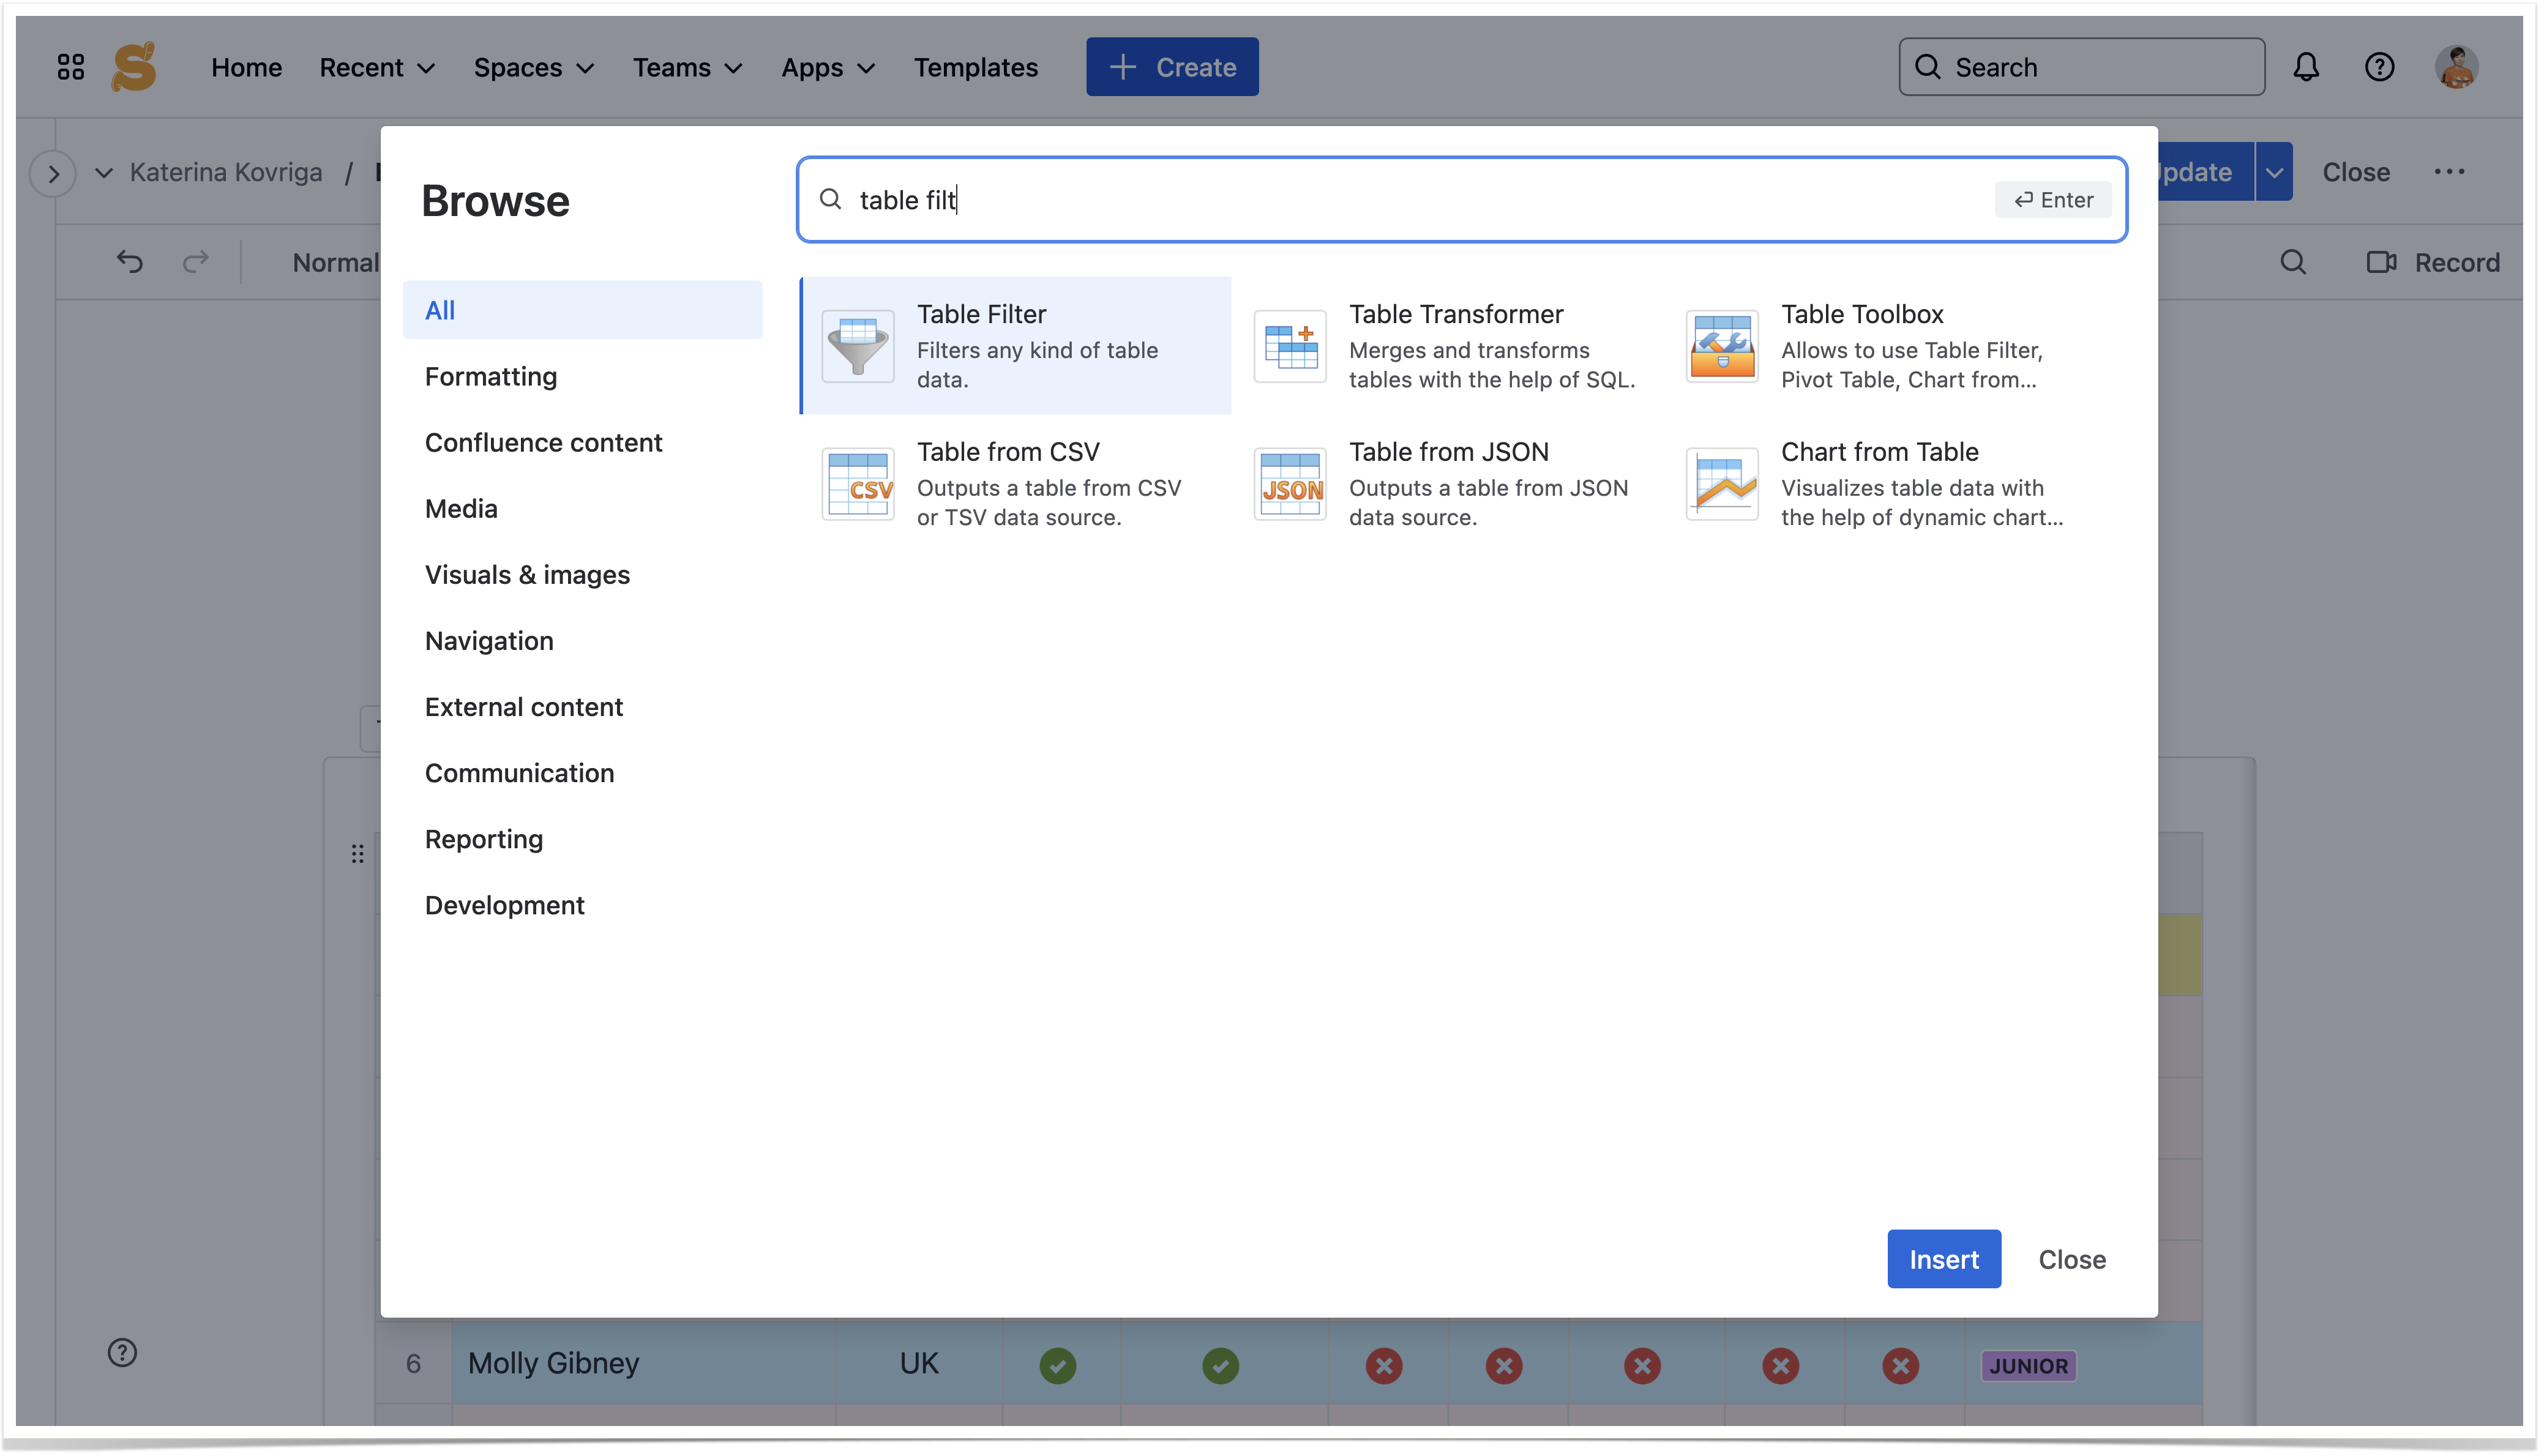
Selecting in the Select macro form
Switch Confluence page to the edit mode.
Position the mouse pointer in the appropriate place on the pageClick on the line where you want to insert the macro.
On the editor pane, click Insert more content -> Other macros.
In the Select Macro form, find the macro and insert it on the page.
Place the table within the macro.

Copying a table into the macros
- Switch Confluence page to the edit mode.
- Position Place the mouse pointer cursor into any cell of the table you want to copy.
- Click the Copy Table
 icon on the editor pane.
 - Paste the table into the Table Filter / Pivot Table / Chart from Table macro on the same or on a new page.
| Info | |||||||||||||
|---|---|---|---|---|---|---|---|---|---|---|---|---|---|
To copy a table into the macro in Confluence Cloud legacy editor highlight the table (as shown in the screencast below), copy and paste it into the macro body:
|


Removing the macros from tables
In the page view mode (Table Filter, Pivot Table, Chart from Table)
- Click the cogwheel icon on the filtration panel or on the pivot table or chart control panel.
- Select the Remove the macro option.
- Click Remove in the dialog.


In the page edit mode (all the macros)
- Switch Confluence page to the edit mode.
- Copy the table and paste it outside the macro body.
- Select the macro and click Remove.

- Switch Confluence page to the edit mode.
- Select the Table Filter/Pivot Table/Chart from Table/Table Transformer/Table Excerpt macro.
- Click Unwrap.
| Info |
|---|
You can remove all the macros bundled with the app from your pages on the global level. |

Configuring inline macro insertion and live filtration
On the global level
| Anchor | ||||
|---|---|---|---|---|
|
- Navigate to Confluence administration console.
- On the sidebar, locate the Table Filter and , Charts & Spreadsheets menu group. Select Select Configuration .
- To enable inline macro insertion/live filtration globally, check the corresponding box.
- Define additional parameters, as follows:
- Groups - enter the names of user groups who can use the inline macro insertion/live filtration.
- Individual users - enter the names of individual users who can use the inline macro insertion/live filtration.
- Anonymous - check the box to allow anonymous users to use the inline macro insertion/live filtration.
To disable inline macro insertion/live filtration:
- Clear the Inline macro insertion box.
To disable inline macro insertion/live filtration for the group/user:
- Click the
 icon for a specific user or group.
| Handy Carousel |
|---|
|


On the user's level
| Anchor | ||||
|---|---|---|---|---|
|
To enable inline macro insertion/live filtration:
In the top-right part of the screen, locate your profile picture and click it.
Select Settings.
On the navigational sidebar, select select Table Filter and , Charts & Spreadsheets.
Select the Inline macro insertion or live filtration options.
To disable inline macro insertion/live filtration:
- Clear the option.
| Info |
|---|
This modification will override the global configuration settings for user groups you are associated with. |


Hiding inline macro insertion and live filtration buttons
Add the following CSS to the global, space stylesheet or the HTML macro to hide buttons for the whole instance, for a space or the specific page:
To hide all buttons:
| Code Block |
|---|
 #tfac-macro-inserter, #tfac-macro-inserter-container, .tf-inline-filter:not(.btn, .trigger) {
  display: none !important;
} |
To hide one of three inline insertion buttons:
- Table Filter button
| Code Block |
|---|
#tfac-macro-inserter [data-macro="table-filter"] {
display: none !important;
} |
- Pivot Table button
| Code Block |
|---|
#tfac-macro-inserter [data-macro="pivot-table"] {
display: none !important;
} |
Chart from Table button
| Code Block |
|---|
#tfac-macro-inserter [data-macro="table-chart"] {
display: none !important;
} |
| Info |
|---|
You can combine CSS to hide two of three buttons. |
| Info | ||
|---|---|---|
Add <style> ...</style> to CSS in the HTML macro.
|
| Handy Carousel |
|---|
|


Removing all the macros from pages
| Anchor | ||||
|---|---|---|---|---|
|
The Table Filter and , Charts app & Spreadsheets app allows you to remove all the macros bundled with the app, including the following:
- Table Filter
- Pivot Table
- Chart from Table
- Table Transformer
- Table Excerpt
- Table Excerpt Include
The source data tables and macros outputting table data will not be affected anyhow and will be preserved in your Confluence after completion of the procedure.
To remove all app macros from Confluence pages:
| Note |
|---|
Please perform the full Confluence backup prior to running this procedure. This operation may require some time depending on the size of your Confluence and number of app's macros on your Confluence pages. |
- Switch to the Add-on Macro Cleanup tab.
- Click Clean up.
- Confirm the operation.
