Download PDF
Download page Intro to Course Management.
Intro to Course Management
IZI for Confluence (LMS, Training Courses, Quizzes) allows you to create courses in Confluence and enroll anyone by email. Courses are great for:
- Training and educating employees and customers
- Organizing onboarding
- Enabling knowledge transfer
- Provide self-directed learning opportunities
Create a new course
Create courses on the Learning portal
Click + Create.

- Choose Course.

Give your course a name.

If needed, you can change the location and choose another space and parent page for your course administration page.


Click Create.

When done, you'll see an empty course administration page.

Create courses using templates
- You can create a course from anywhere in Confluence – just click


- Select the Course template.

- The Create a course dialog opens. Type Course name.

Click Create. You’ll see an empty course administration page.

Courses are created with viewing restrictions. By default, a course can be viewed only by its creator. Later on, the author can modify viewing restrictions and add grant viewing permissions to some other users or user groups, e.g. to collaborate on a course or have it reviewed by someone else. Learn more
Don't remove izi - LMS for Confluence user from course page permissions. This is the app user that is needed for courses to work.
If you add co-authors to a course, make sure you add the same people in co-authors for quizzes included in this course.
Course content
You can decide when to push content updates to participants.
A course consists of sections and modules:
- Section – a title for a subset of modules
- Module – a piece of course content
Types of modules
There are several types of modules:
- Page (Confluence page)
- for including content that already exists in Confluence
- for combining different content types in one module
- Quiz – for checking understanding
- Video – for a module with only a video with a description
- PDF – for a module with only a PDF file with a description
- Slides – for a module with only a Presentation with a description
- SCORM
- for including interactive content
- for adding content created by third-party
It is possible to use existing Confluence pages and quizzes as well as create new ones.
Add a module
New content
Click Add module.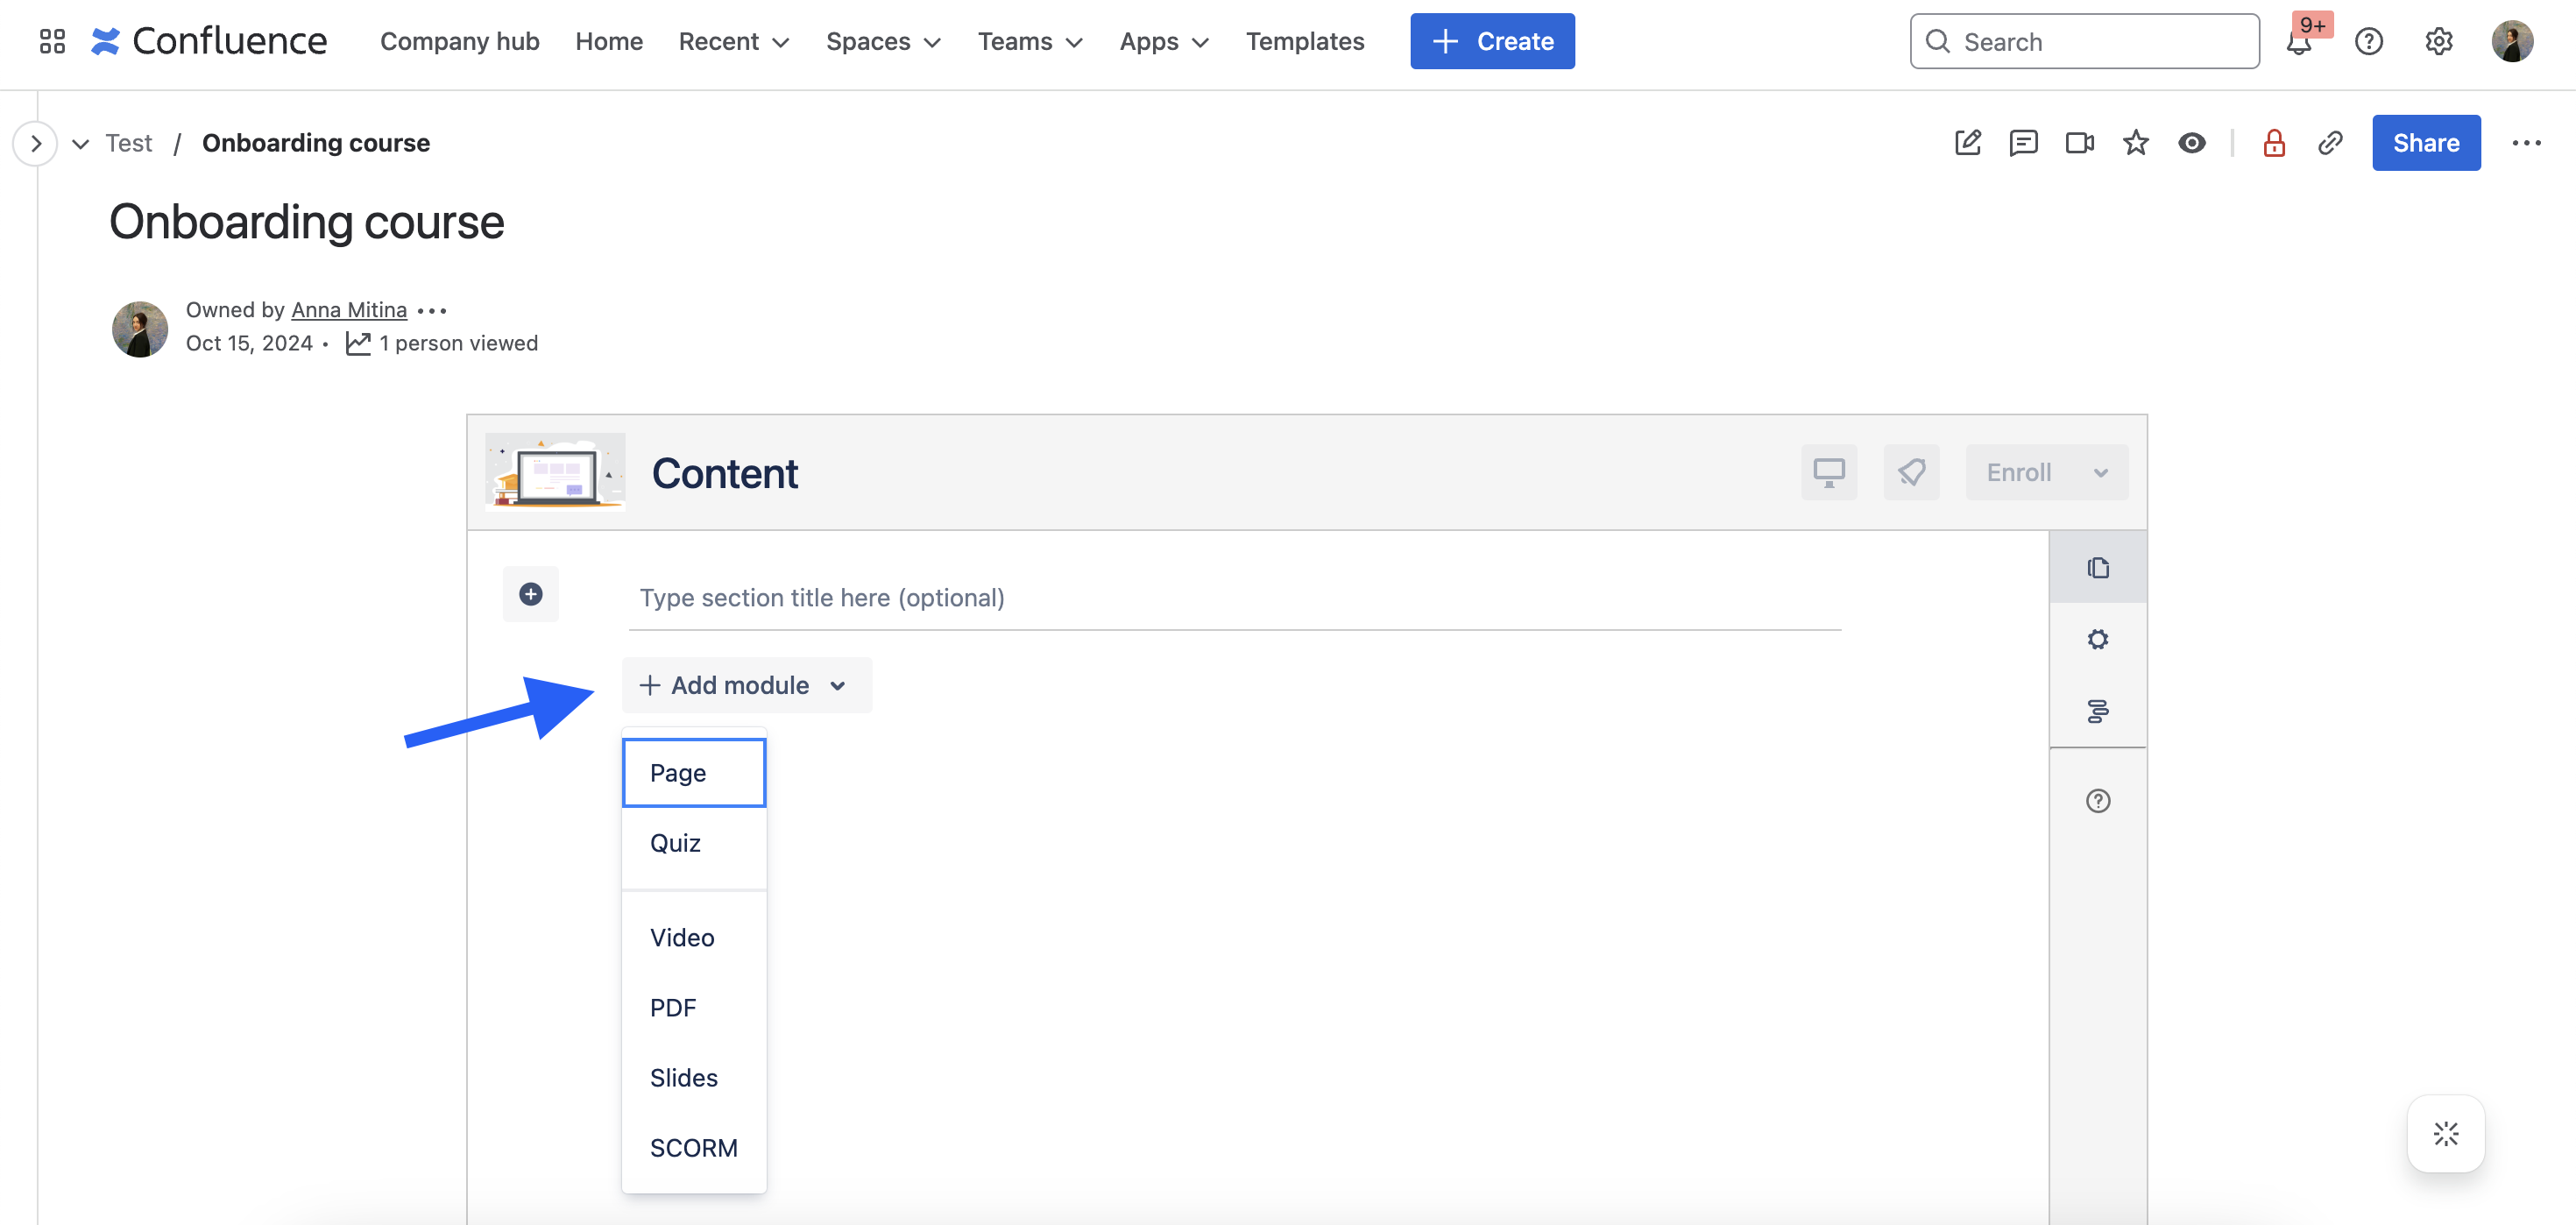
Select a module type.
Page/quiz
- Click Create a new page/quiz.

- Add a name for a module.

- Add content.
- Page. If you chose Page, add your learning material into a page body. You can use Confluence powerful editor to add formatted text, images, videos, slides, etc.
- Quiz. If you chose Quiz, enter a quiz name, add questions and configure quiz settings.
Video
- Type the name of your module. You can also add a description if needed.

- Select your file – either drag&drop it into the dialog or click the Upload video file button.

- Type the name of your module. You can also add a description if needed.

- Select your file – either drag&drop it into the dialog or click the Upload PDF file button.

Slides
- Type the name of your module. You can also add a description if needed.

- Select your file – either drag&drop it into the dialog or click the Upload slides file button.

SCORM
- Type the name of your module. You can type the name of your SCORM package here.

- Upload your SCORM package. Make sure it meets the requirements.

Go back to a course administration page and add the next module.
Please keep in mind that IZI LMS doesn't support the content created with the help of other Atlassian Marketplace apps. It's the limitation of Confluence Cloud.
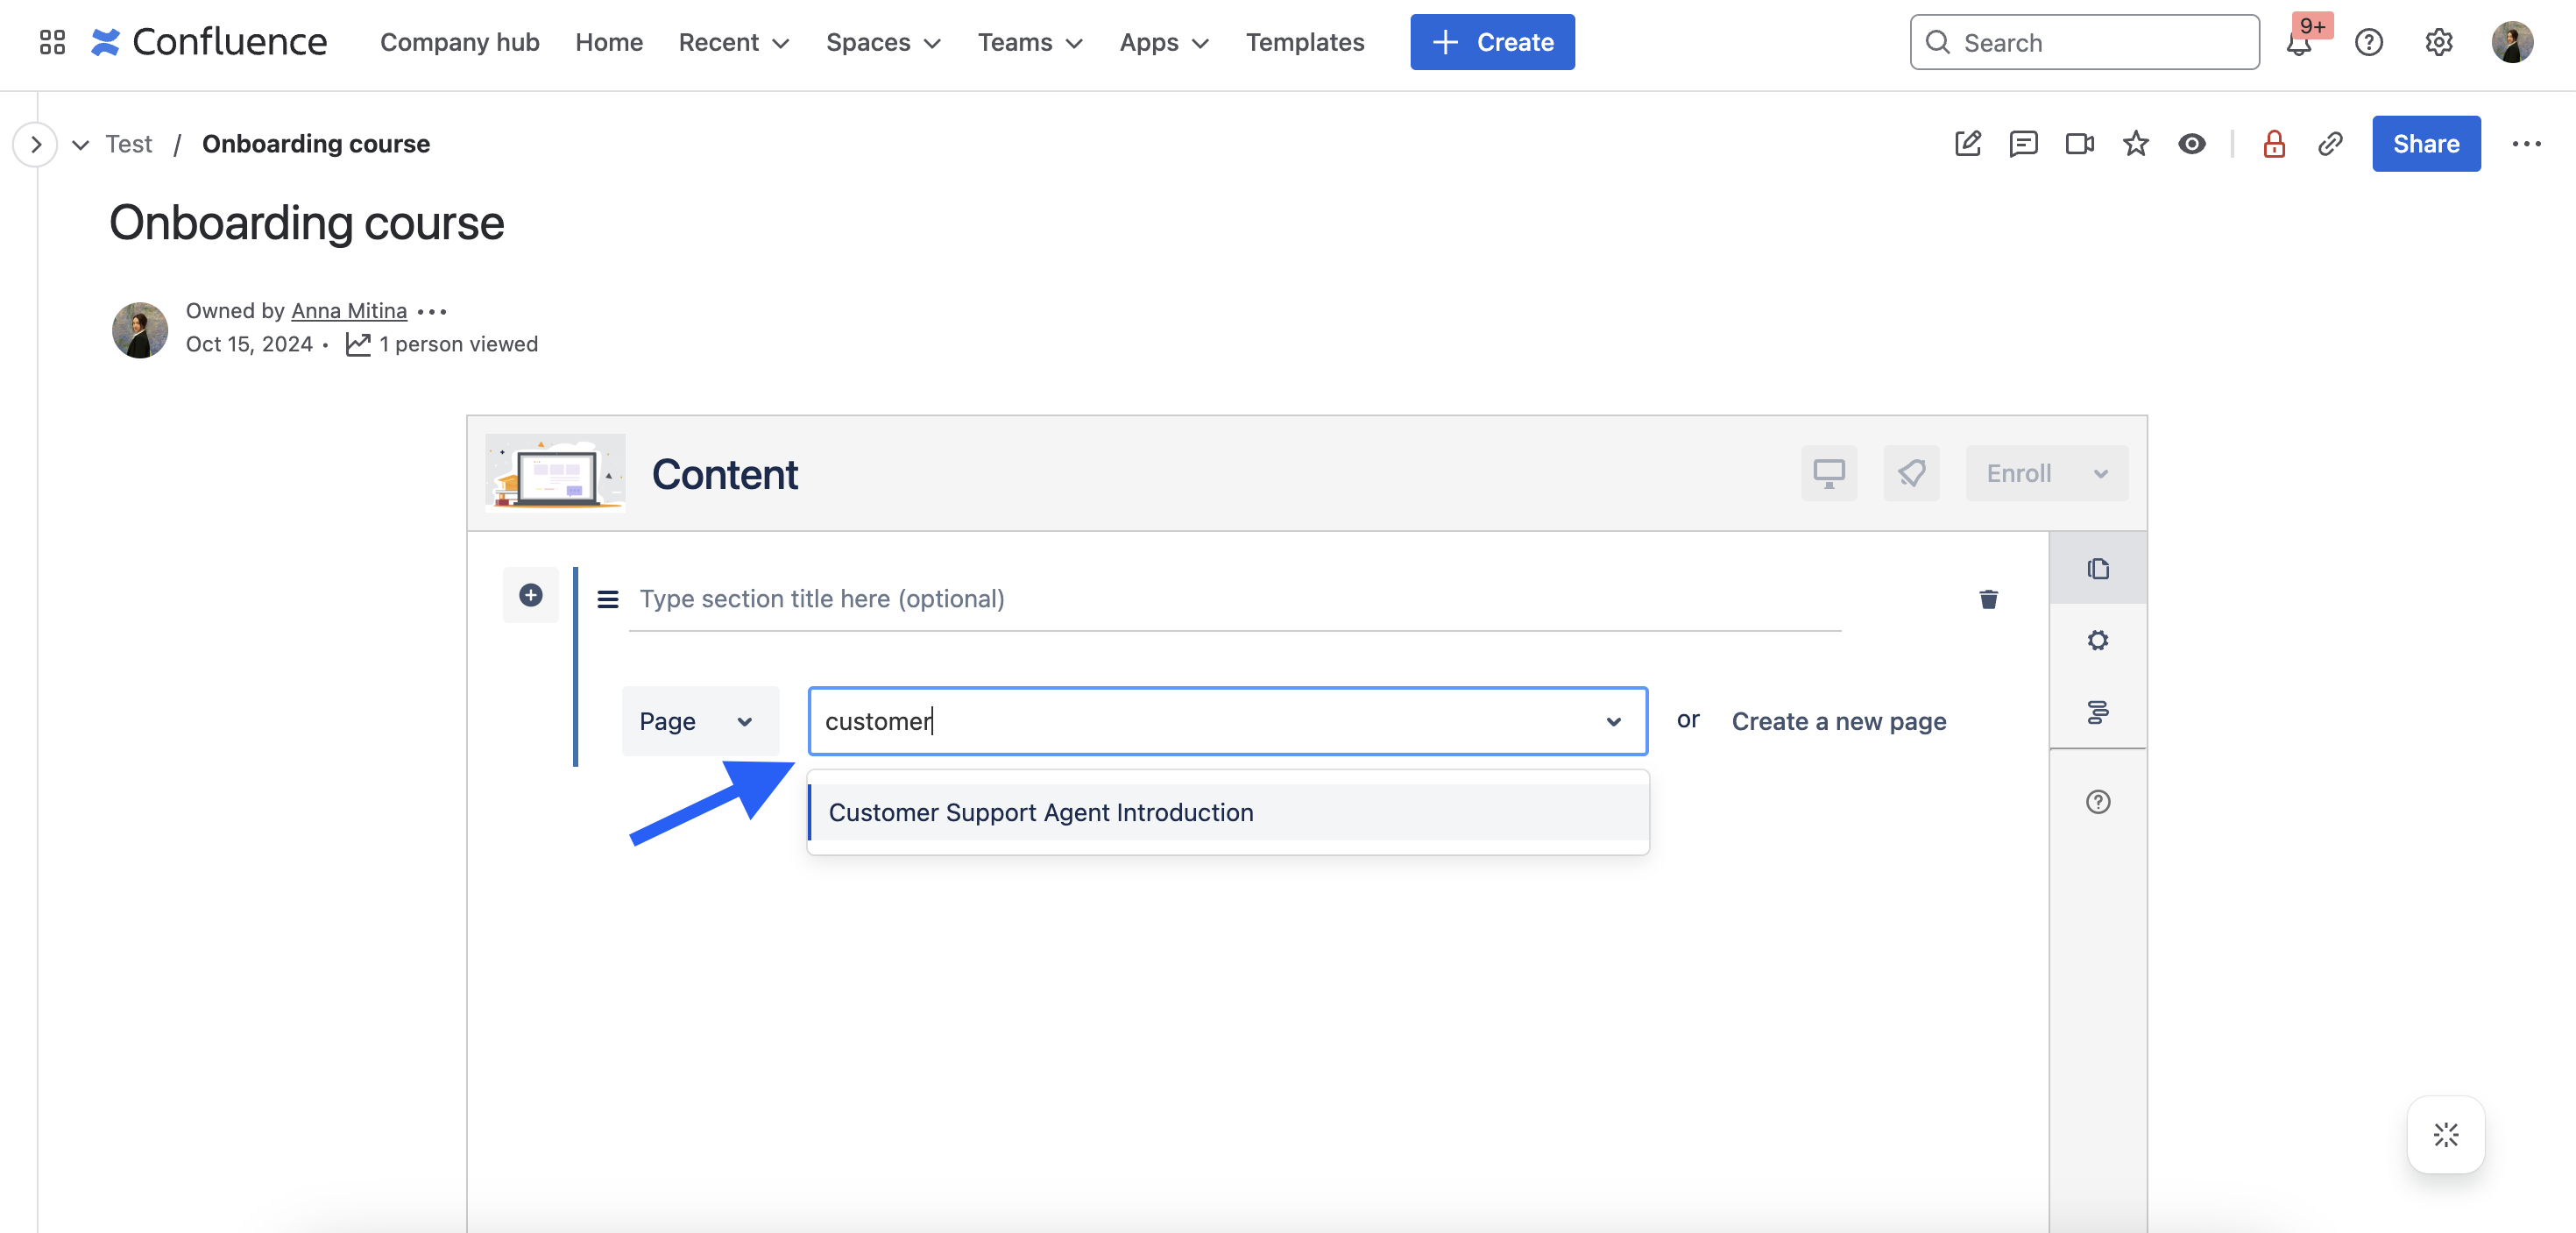
Existing page or quiz
When adding a module, instead of clicking Create a new page/quiz type a name of an existing page or quiz in the field and find the needed page/quiz.
Organize modules
Use sections to arrange modules (e.g. by topic or difficulty). It's optional. You can have a course without sections.

To add a new section, click ![]() .
.
You may also drag&drop both sections and modules. To do that, direct a cursor to a section or module you'd like to move, press![]() and drag it to the place you need.
and drag it to the place you need.
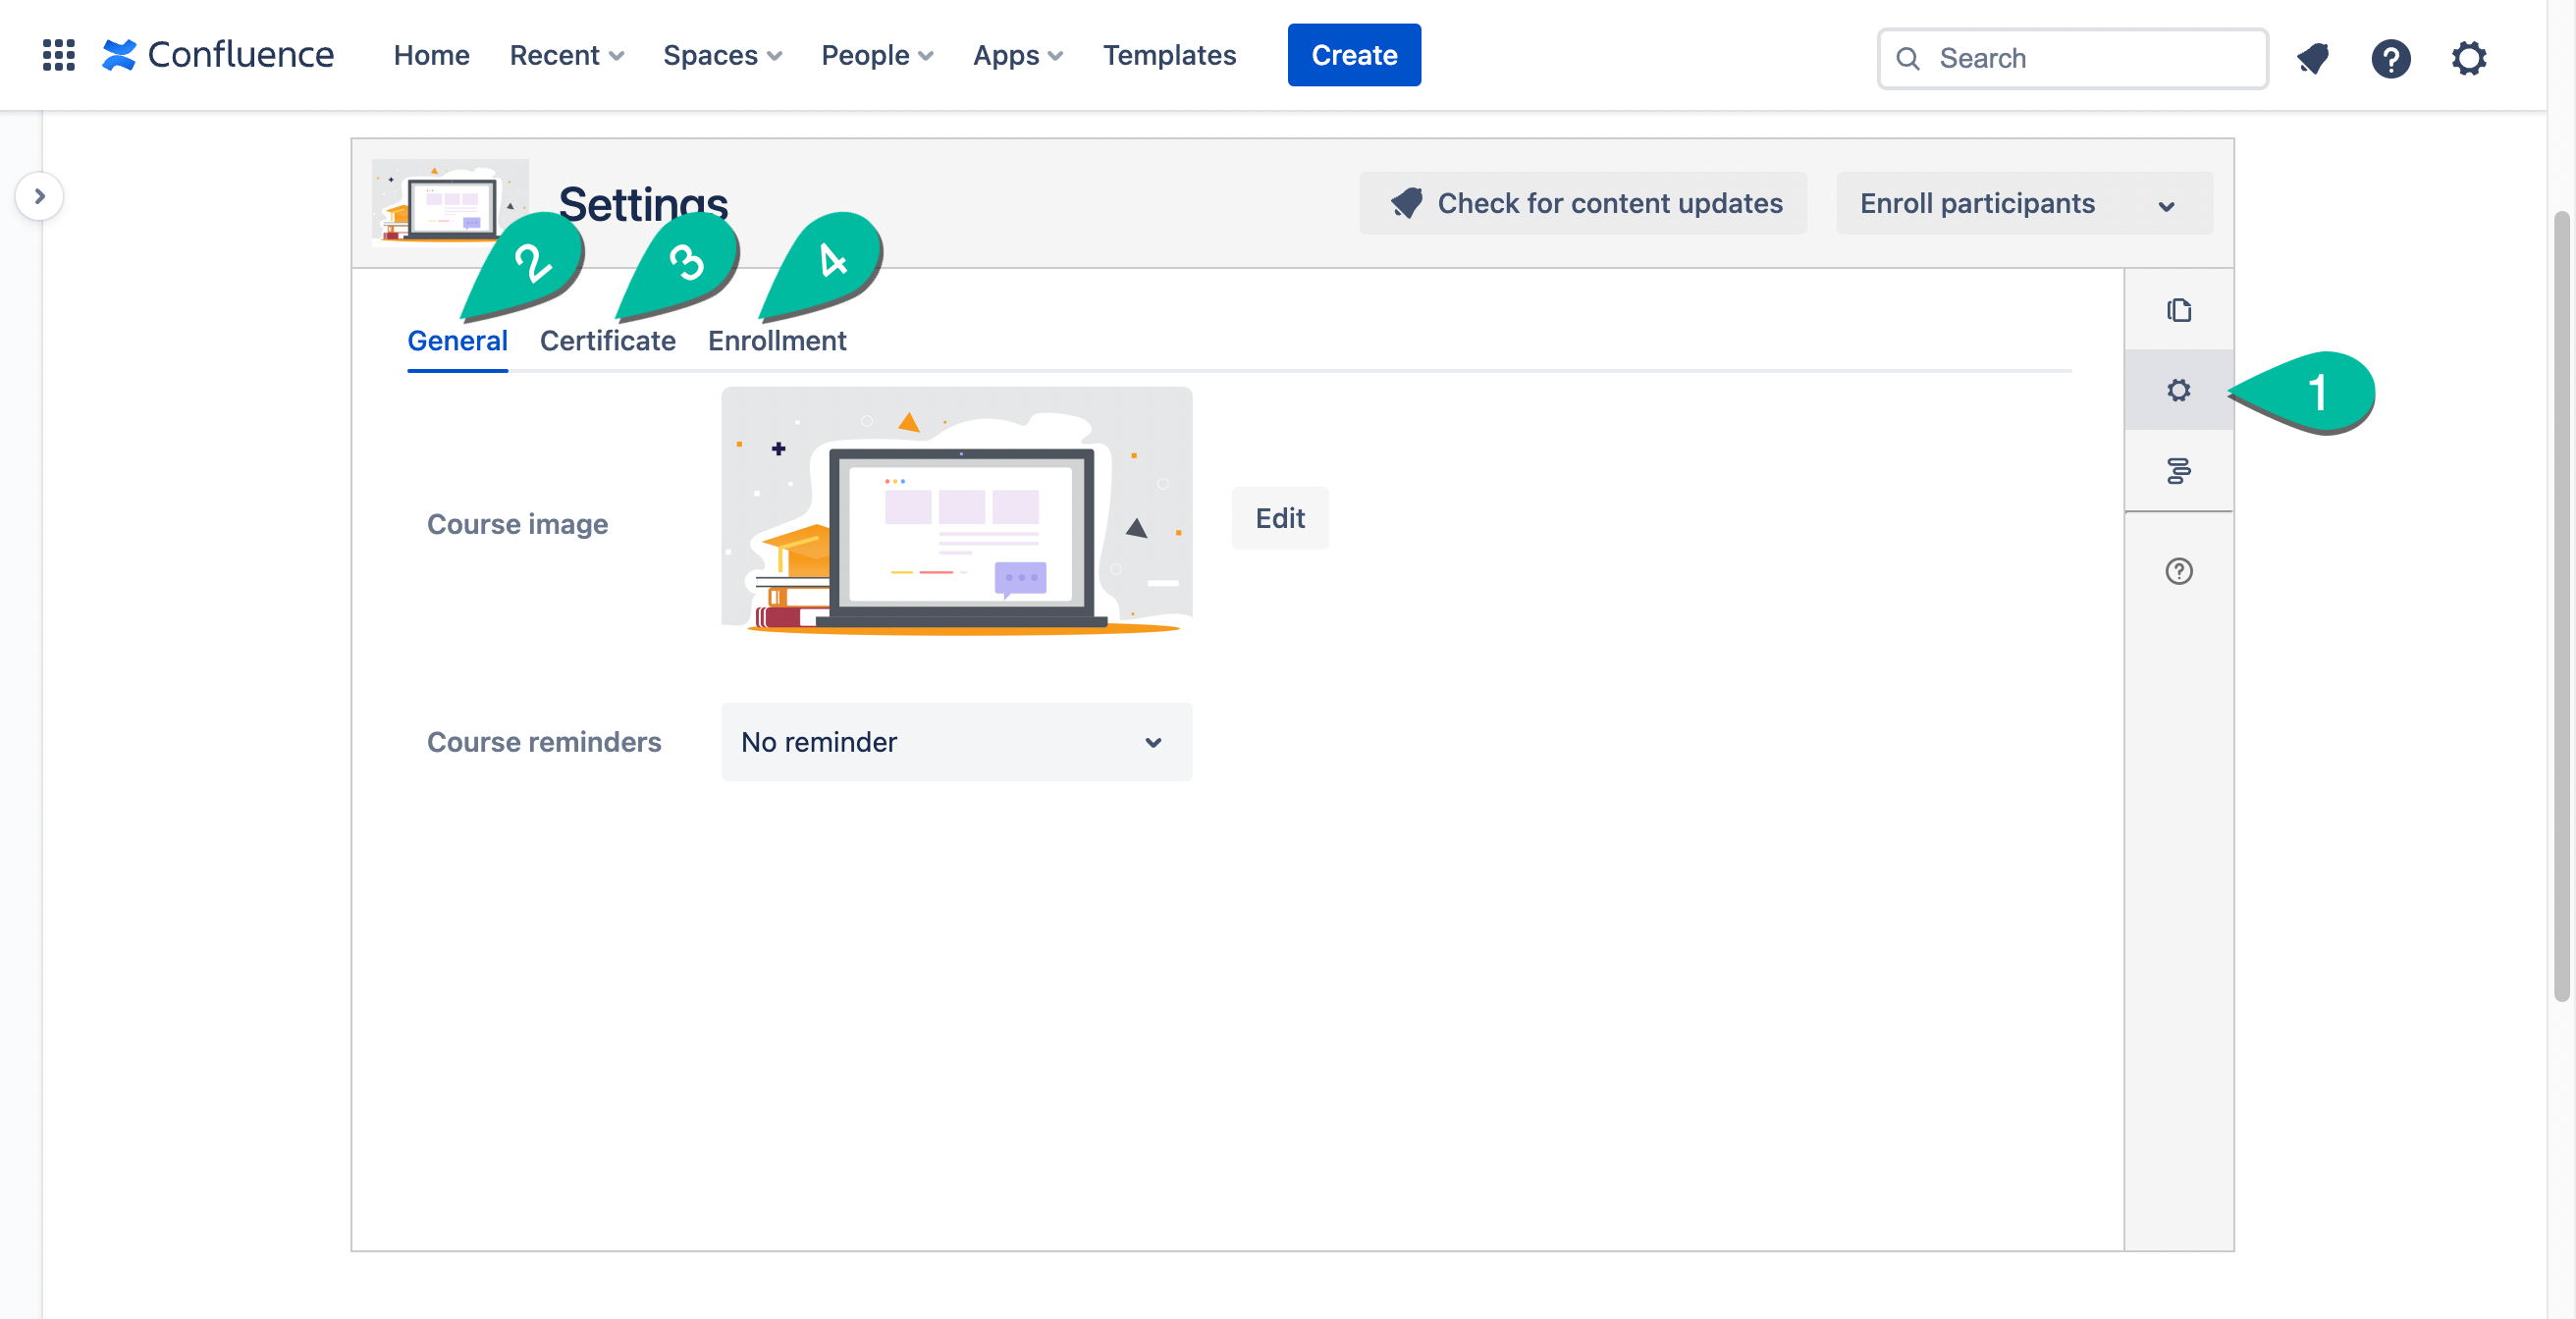
Configure settings
Go to course settings to:
- change course image
- set reminders
- enable certificates for participants
- explore enrollment additional options
Enroll to course Confluence users or Confluence user groups
Use Confluence user names or user groups when you need to enroll Confluence users to a course.
To enroll a Confluence user or a Confluence user group to a course, you need to:
Click the Enroll button.

Type in the field a user name or a Confluence user group.
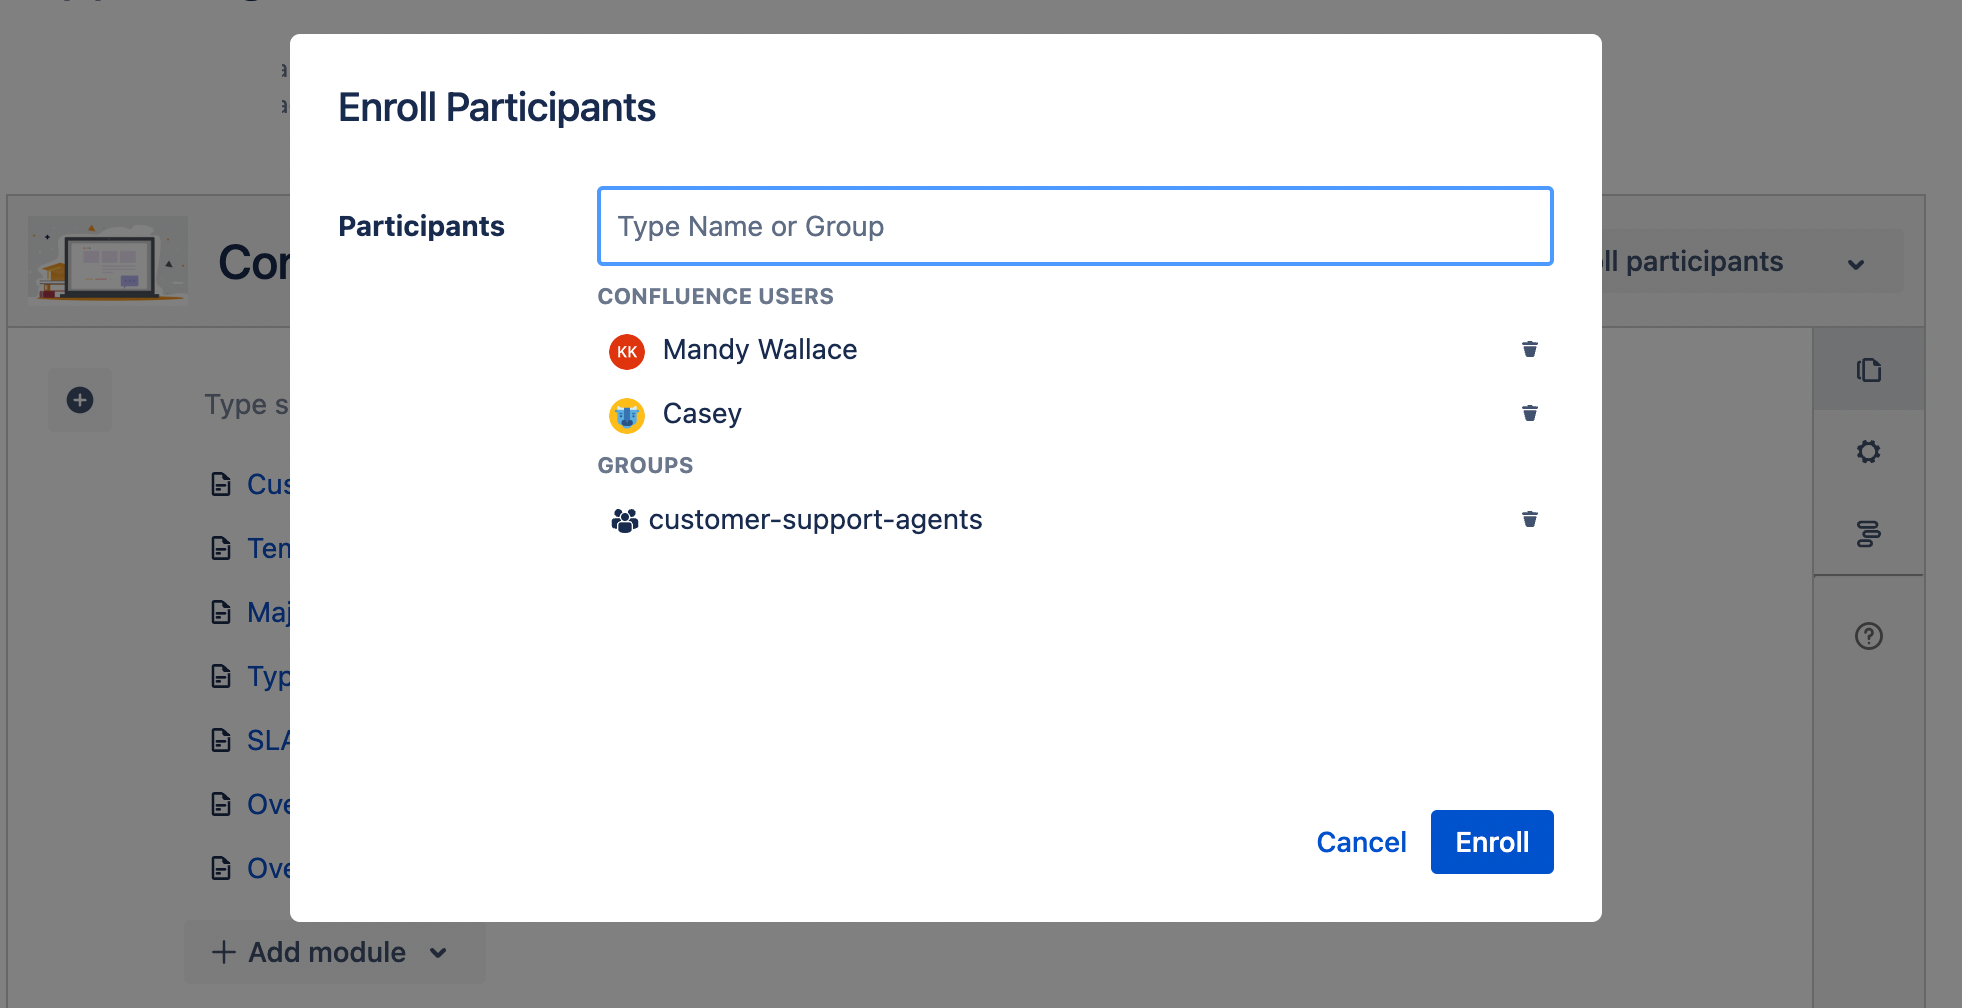
Click the Enroll button.
All Confluence users you enrolled will get a link to a course via email. Each course link is unique. Different people get different links.
In the Course report, these participants will be displayed by their Confluence user names.

Enroll to course external users (users without Confluence accounts)
In a situation when you need to send a course to an external user (for example, for a product training of your customers), use the Enroll external participants feature. It will let you enroll external users using their emails.
To enroll an external user, you need to:
Click the arrow near the Enroll button.

Click Enroll external participants.
Type in the field an email of a user who doesn't have a Confluence account.

Click the Enroll button.
All external participants you enrolled will get a link to a course via email. Each course link is unique, different people get different links.
In the reporting, these users will be displayed by their emails.
Participants will get an email with a link to a course. Each course link is unique. Different people get different links. What will happen if I enroll Confluence users as external users?
Enrollment Recommendations:
Avoid enrolling Confluence users by email. They will be enrolled as external users and won't see a course you enrolled them to in Learning.
You cannot enroll the same participant twice. However, you can delete a participant in the Report tab and enroll that person one more time.
Auto-enrollment
As an alternative to enrolling participants, you can set up automatic enrollment for Confluence groups.
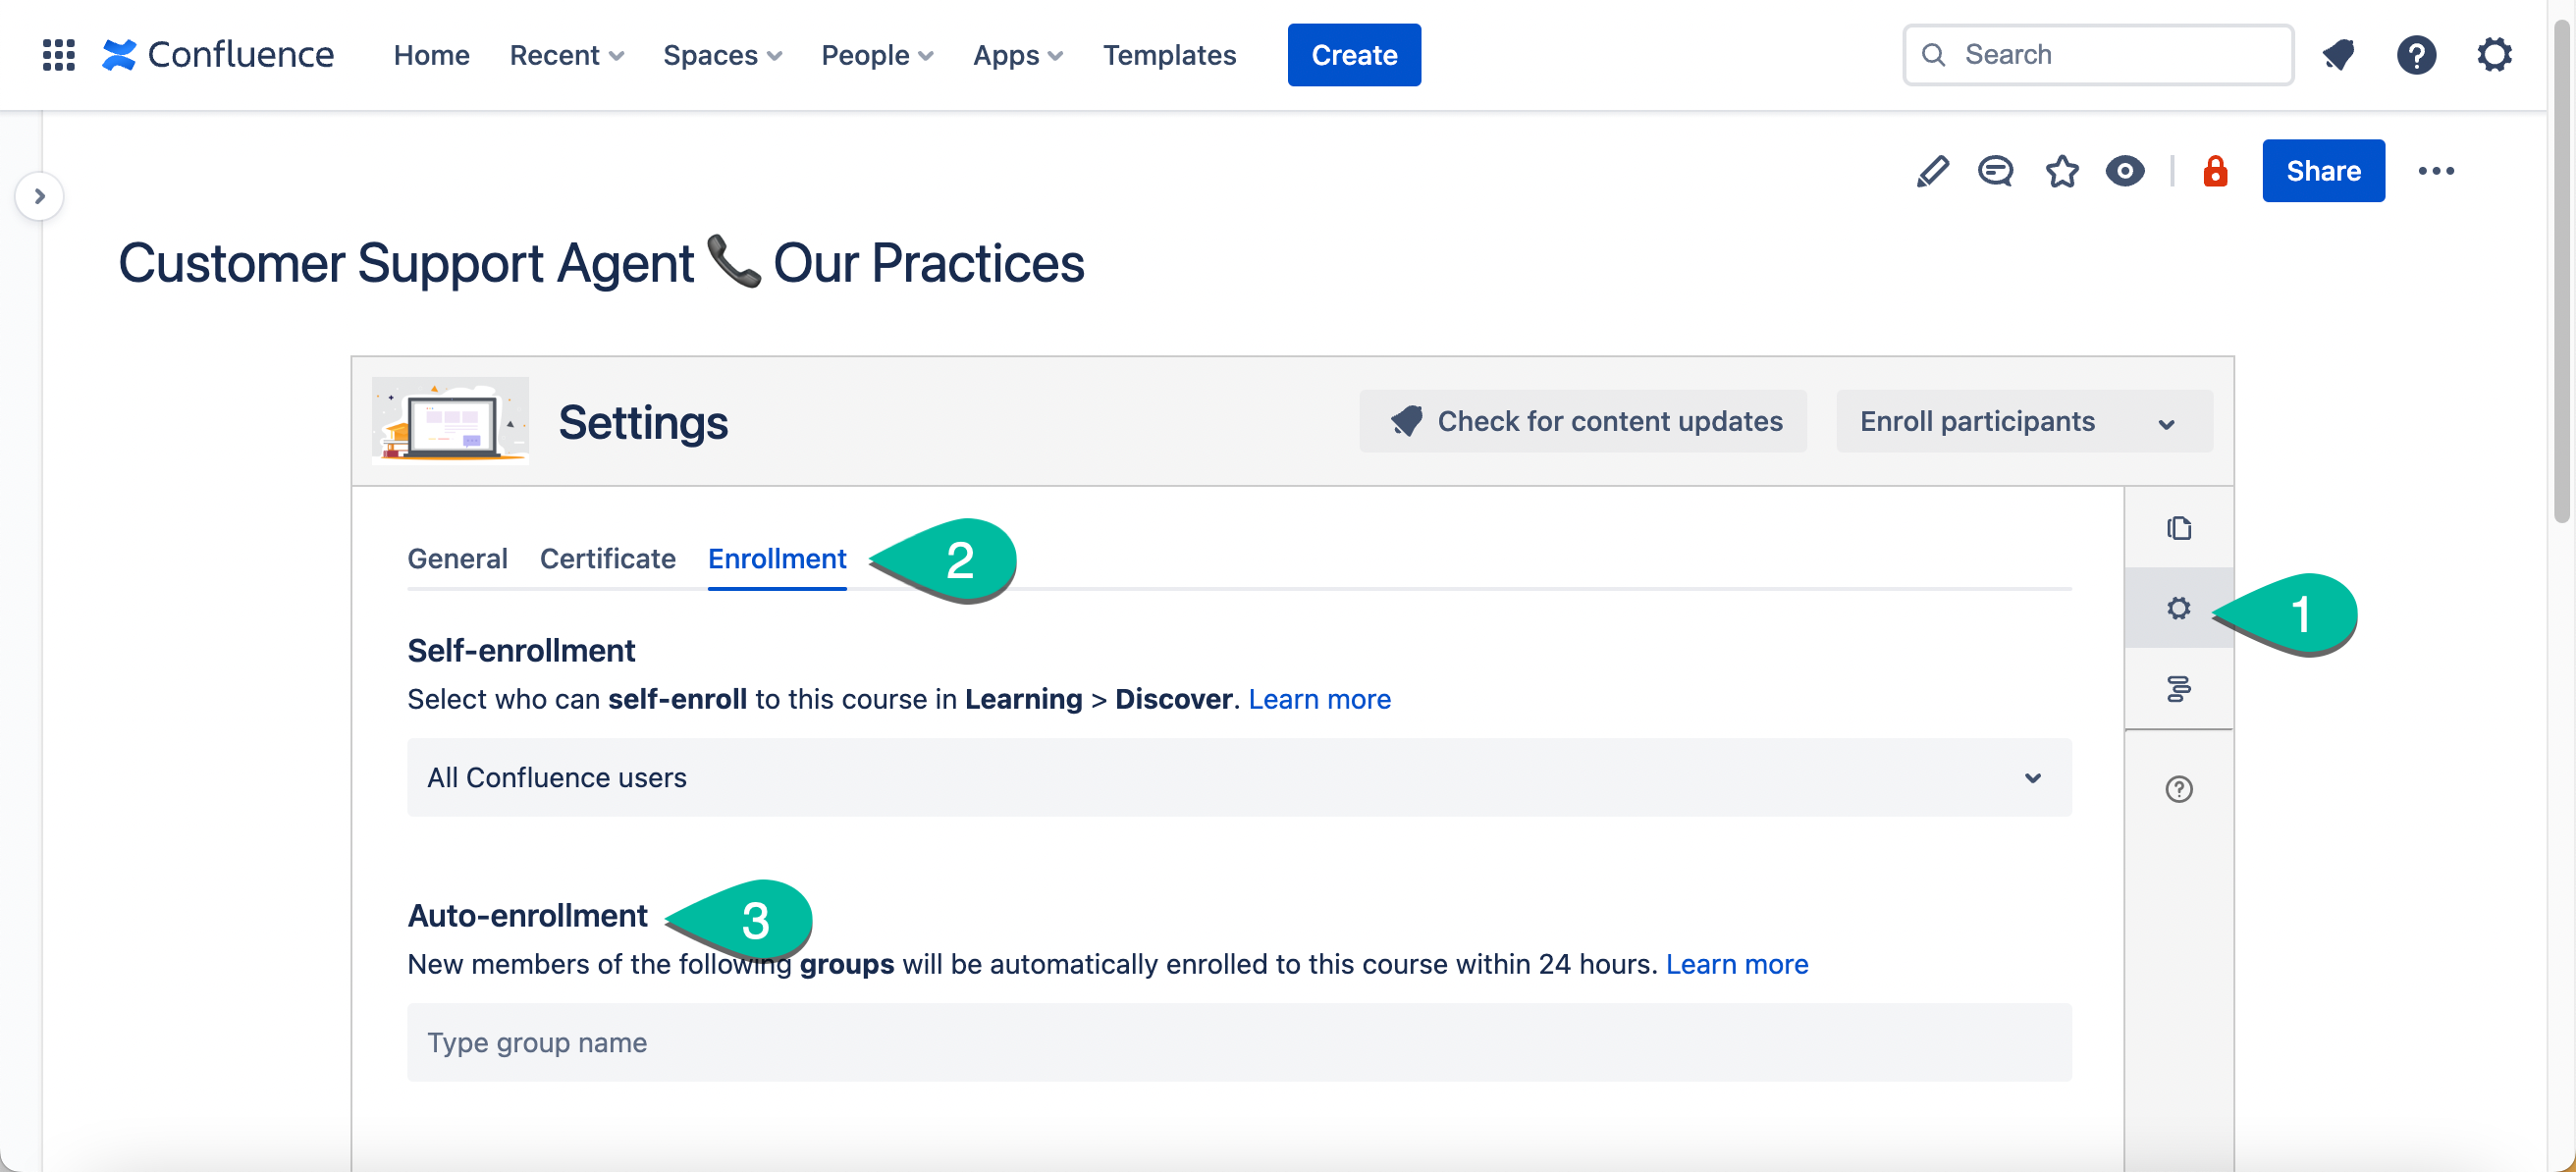
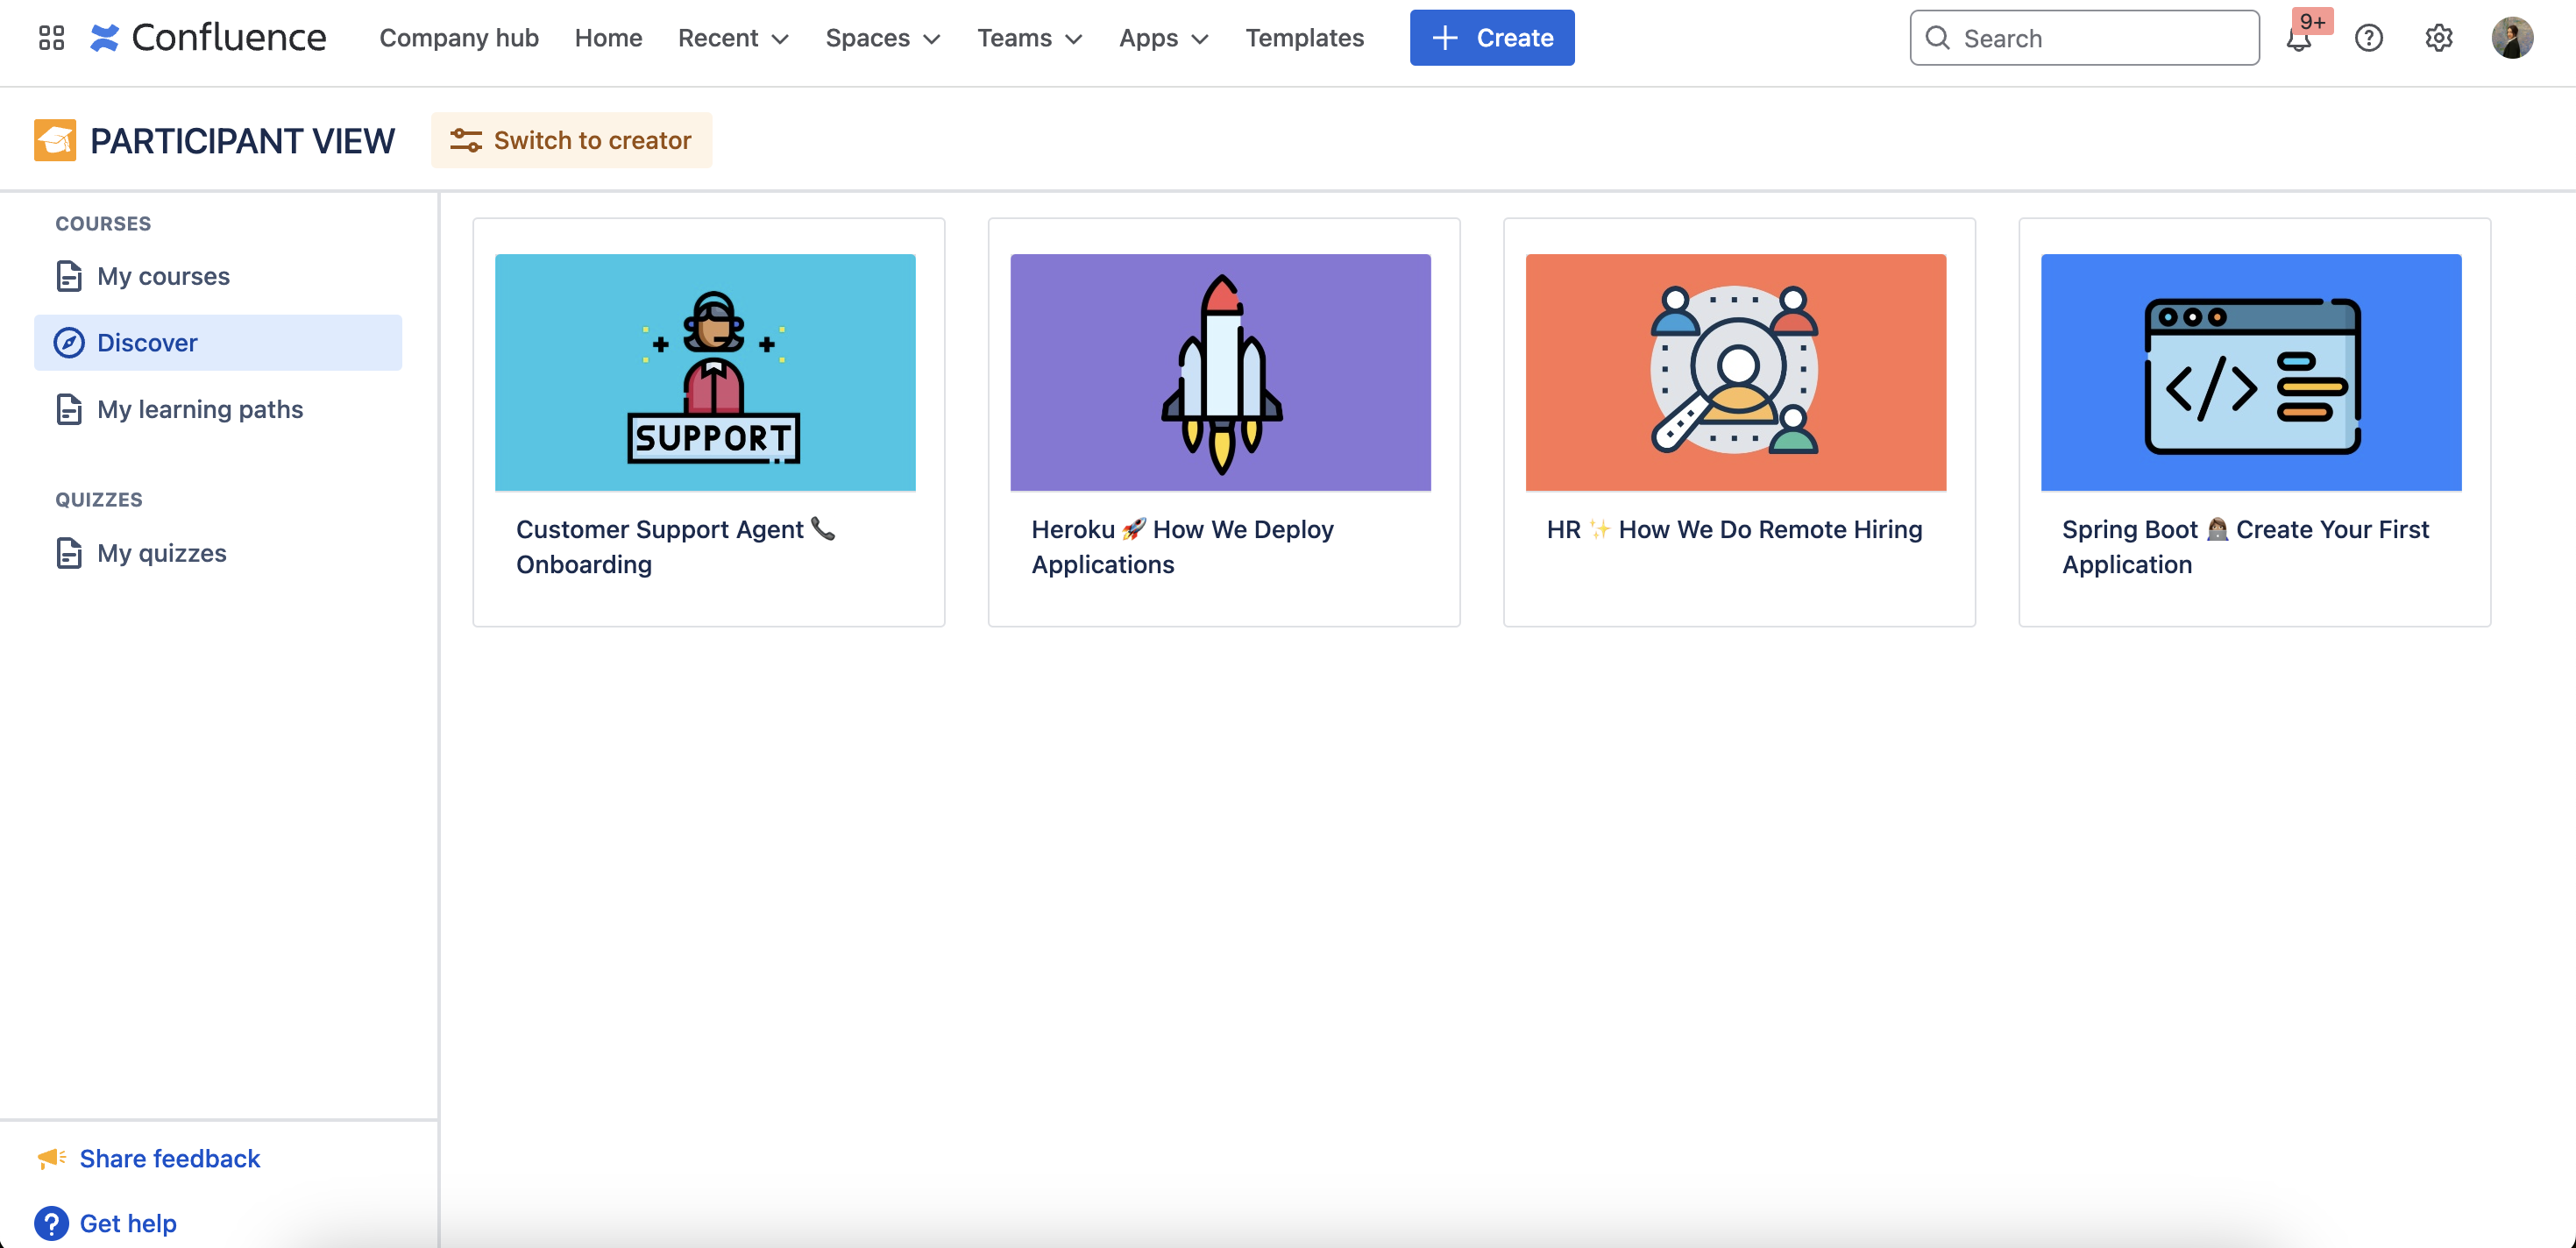
Self-enrollment in Discover
You can also create a catalog of self-enrollment courses for users to browse and select courses that they want to take in Learning > Discover.
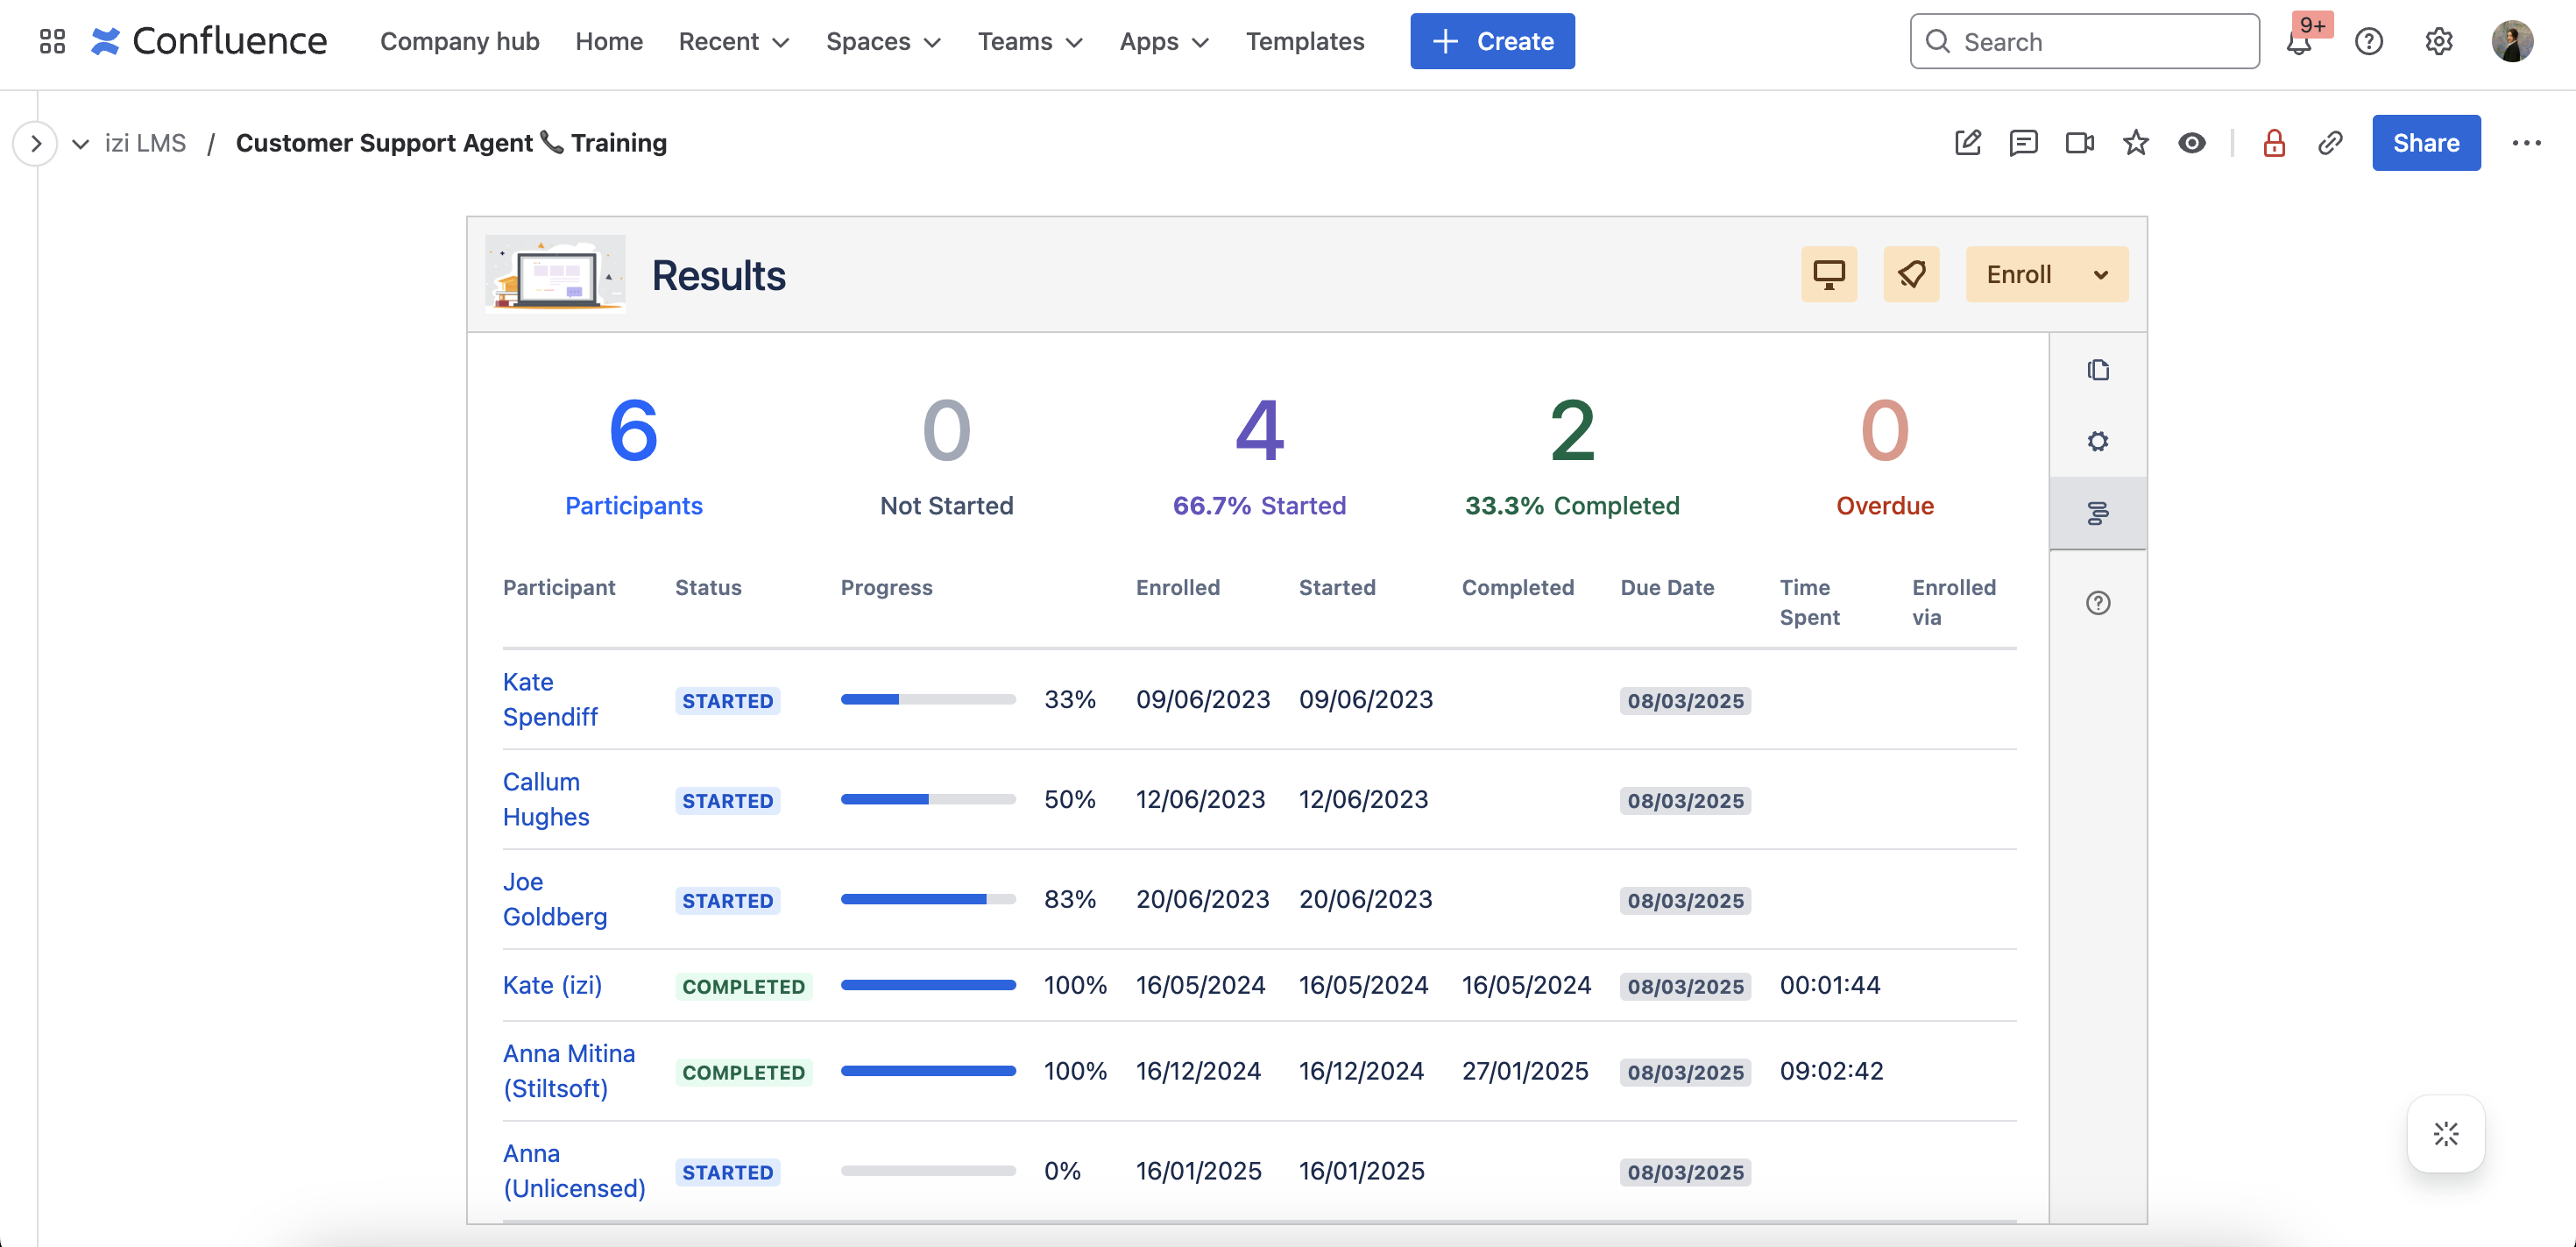
Track course completion
To see a list of enrolled participants and track their course progress, click ![]() (Report) on the right hand sidebar on a course administration page. You will see who is enrolled to a course and their progress.
(Report) on the right hand sidebar on a course administration page. You will see who is enrolled to a course and their progress.
Participants can also track course completion. They may find a dashboard with all courses they need to take, are taking and completed on the My courses tab of the Learning portal.

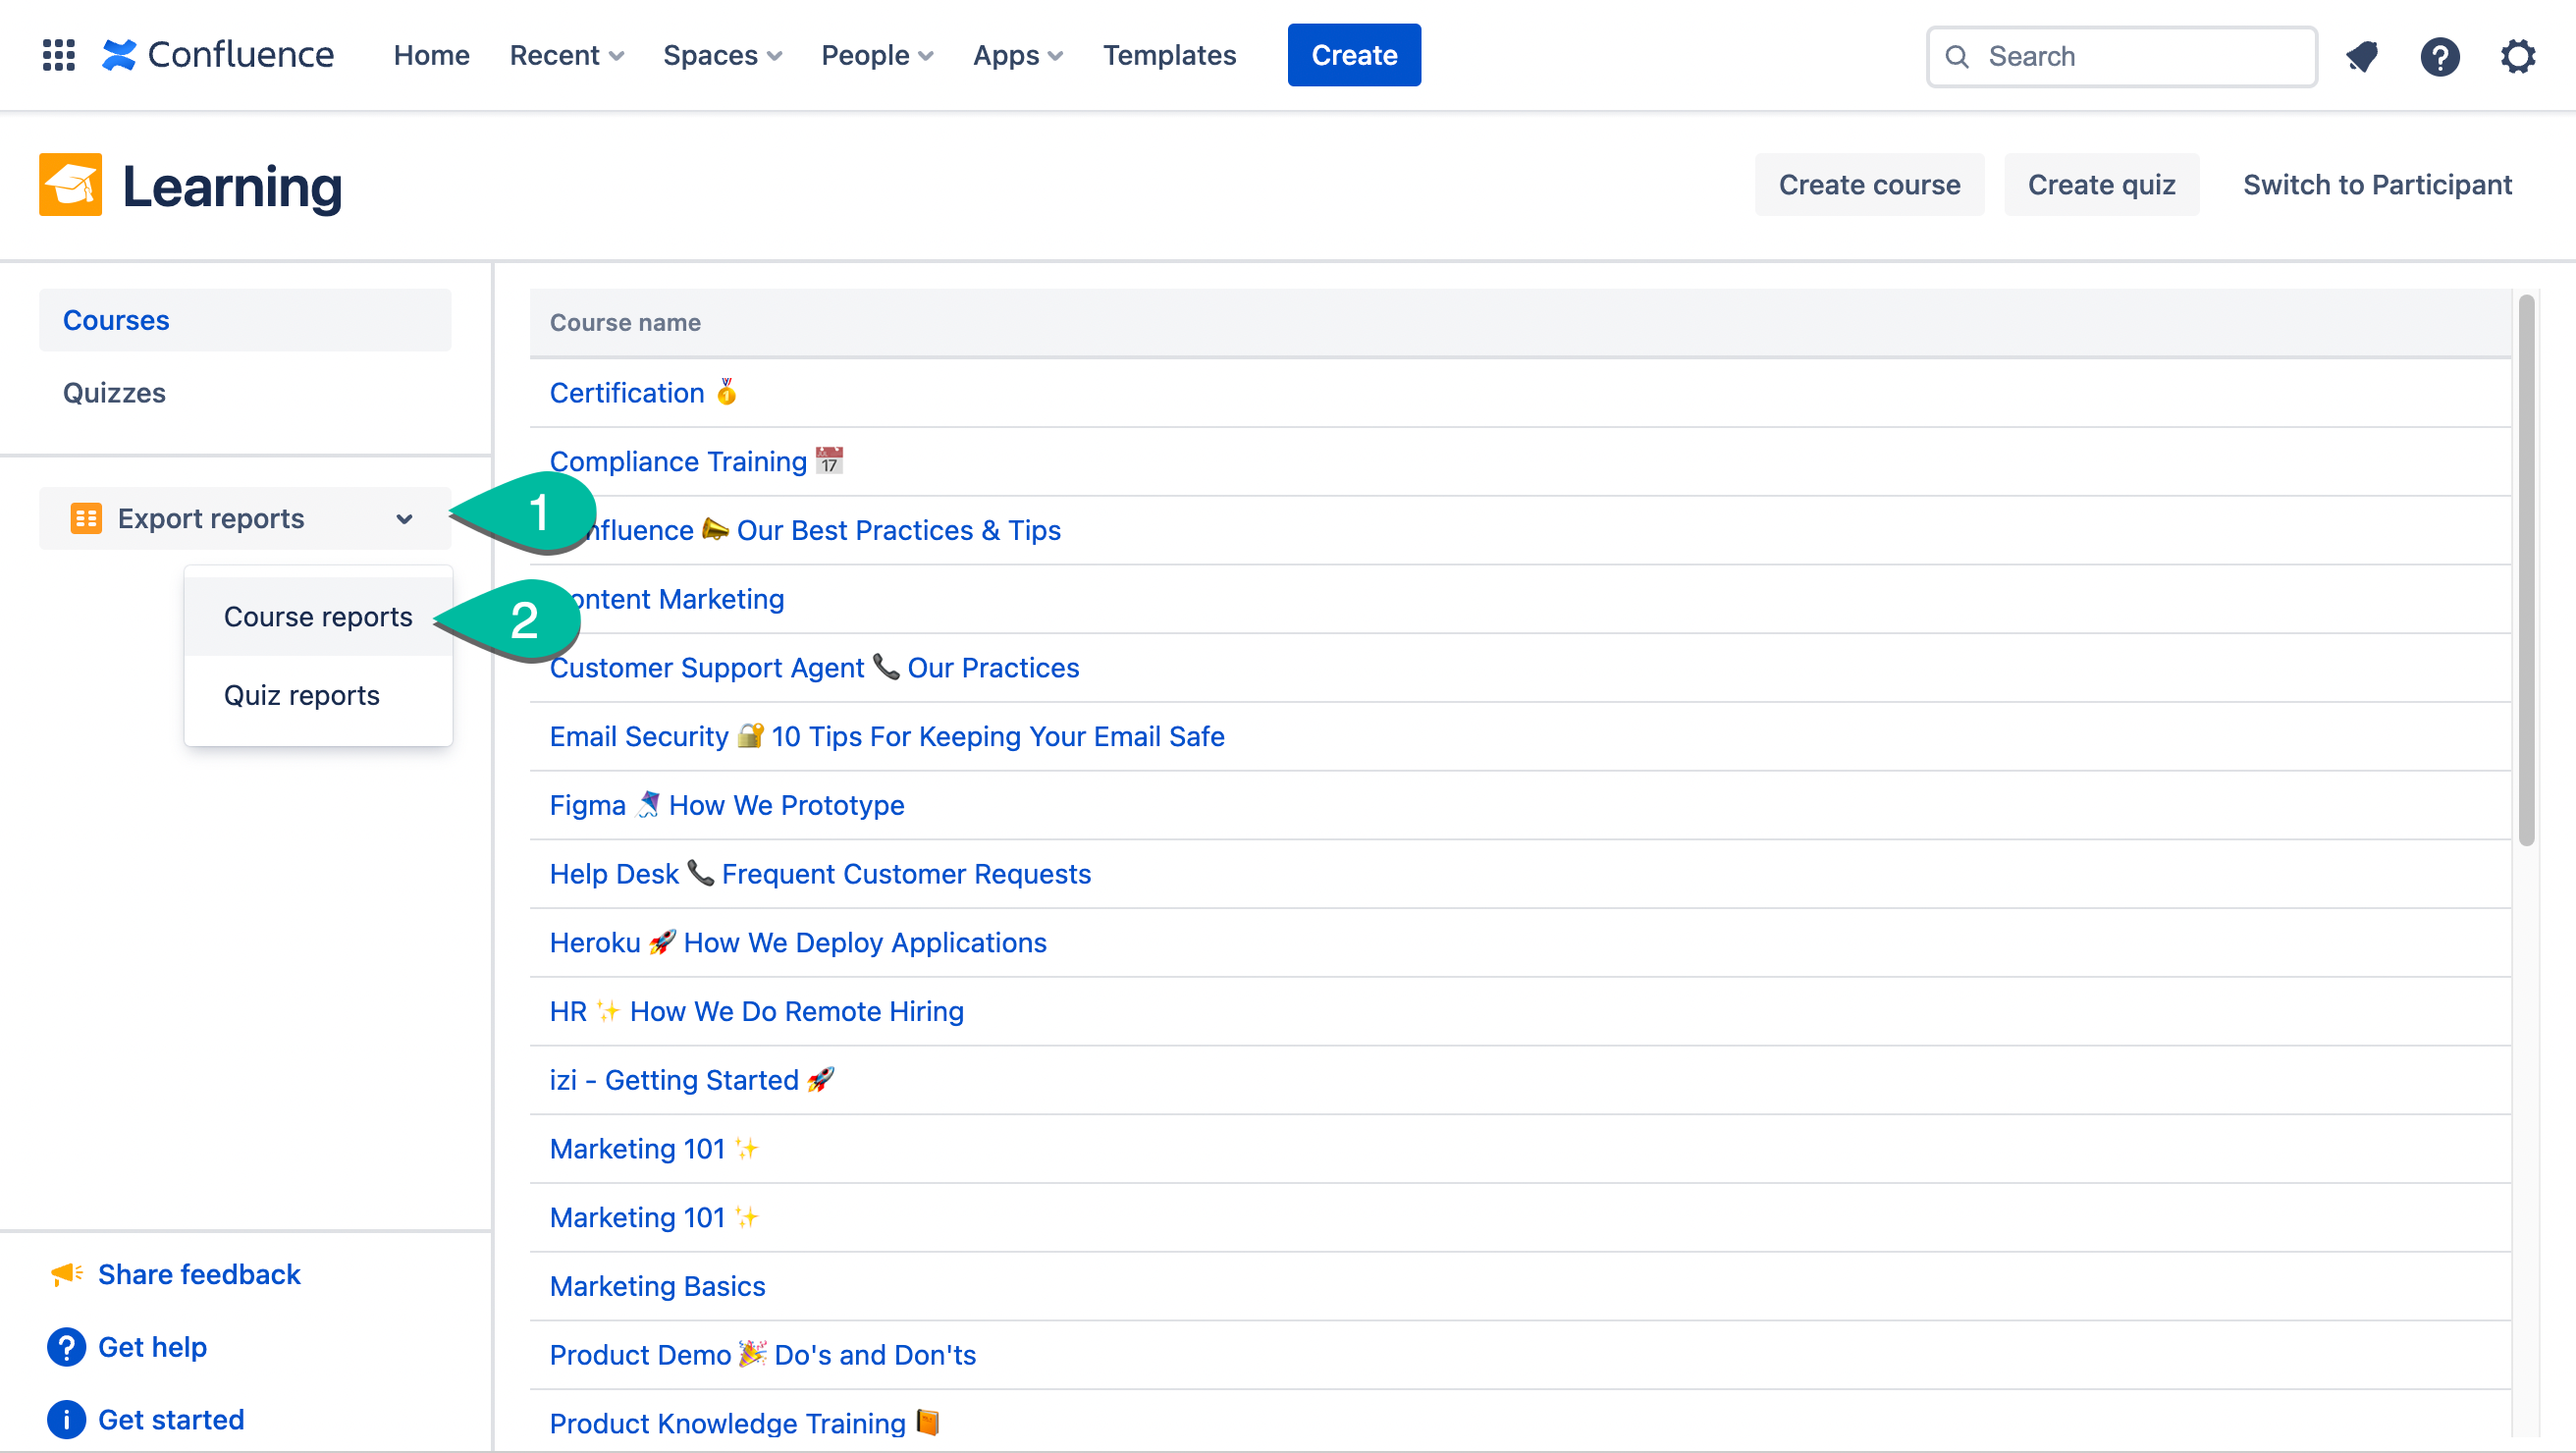
Export course report
Course admin can export results from one, several or all courses in Learning.